---
title: "Configurez votre authentification unique (SSO) via Okta (SAML 2.0)"
description: "Découvrez comment établir une connexion via le protocole SAML 2.0 pour le SSO avec Filestage"
url: https://help.filestage.io/fr/articles/9465130-configurez-votre-authentification-unique-sso-via-okta-saml-20
collection: "Configuration, compatibilité et dépannage"
updated: 2026-08-11
language: fr
alternates: [en, de, es]
---

# Configurez votre authentification unique (SSO) via Okta (SAML 2.0)

Découvrez comment établir une connexion via le protocole SAML 2.0 pour le SSO avec Filestage

> **Info:** Cette fonctionnalité est disponible sur notre plan Enterprise, ou en tant que module complémentaire payant sur notre plan Business. Si vous avez des questions supplémentaires, veuillez contacter notre support client via [support@filestage.io](mailto:support@filestage.io) ou via notre chat.

* * *

_Avec l'authentification unique (SSO), votre équipe se connecte à Filestage avec le compte Okta qu'elle utilise déjà au quotidien. Pas de mots de passe supplémentaires, plus de sécurité et un contrôle total sur l'accès à vos projets - et la connexion via SAML 2.0 ne prend que quelques minutes._

## Comment l'authentification unique via SAML 2.0 peut vous aider

Connecter Filestage à Okta simplifie la connexion pour votre équipe et donne à vos administrateurs un contrôle centralisé des accès :

-   **Pas de mots de passe supplémentaires** - chacun se connecte à Filestage avec son compte Okta existant.
    
-   **Contrôle centralisé des accès** - décidez dans Okta qui peut accéder à Filestage et supprimez les accès à un seul endroit lorsqu'une personne quitte votre organisation.
    
-   **Sécurité de niveau entreprise** - vos politiques d'authentification, comme l'authentification multifacteur, s'appliquent automatiquement à chaque connexion à Filestage.
    

## Comment configurer le SSO avec SAML 2.0 (via Okta)

### Étape 1 : Récupérez vos informations SAML dans Filestage

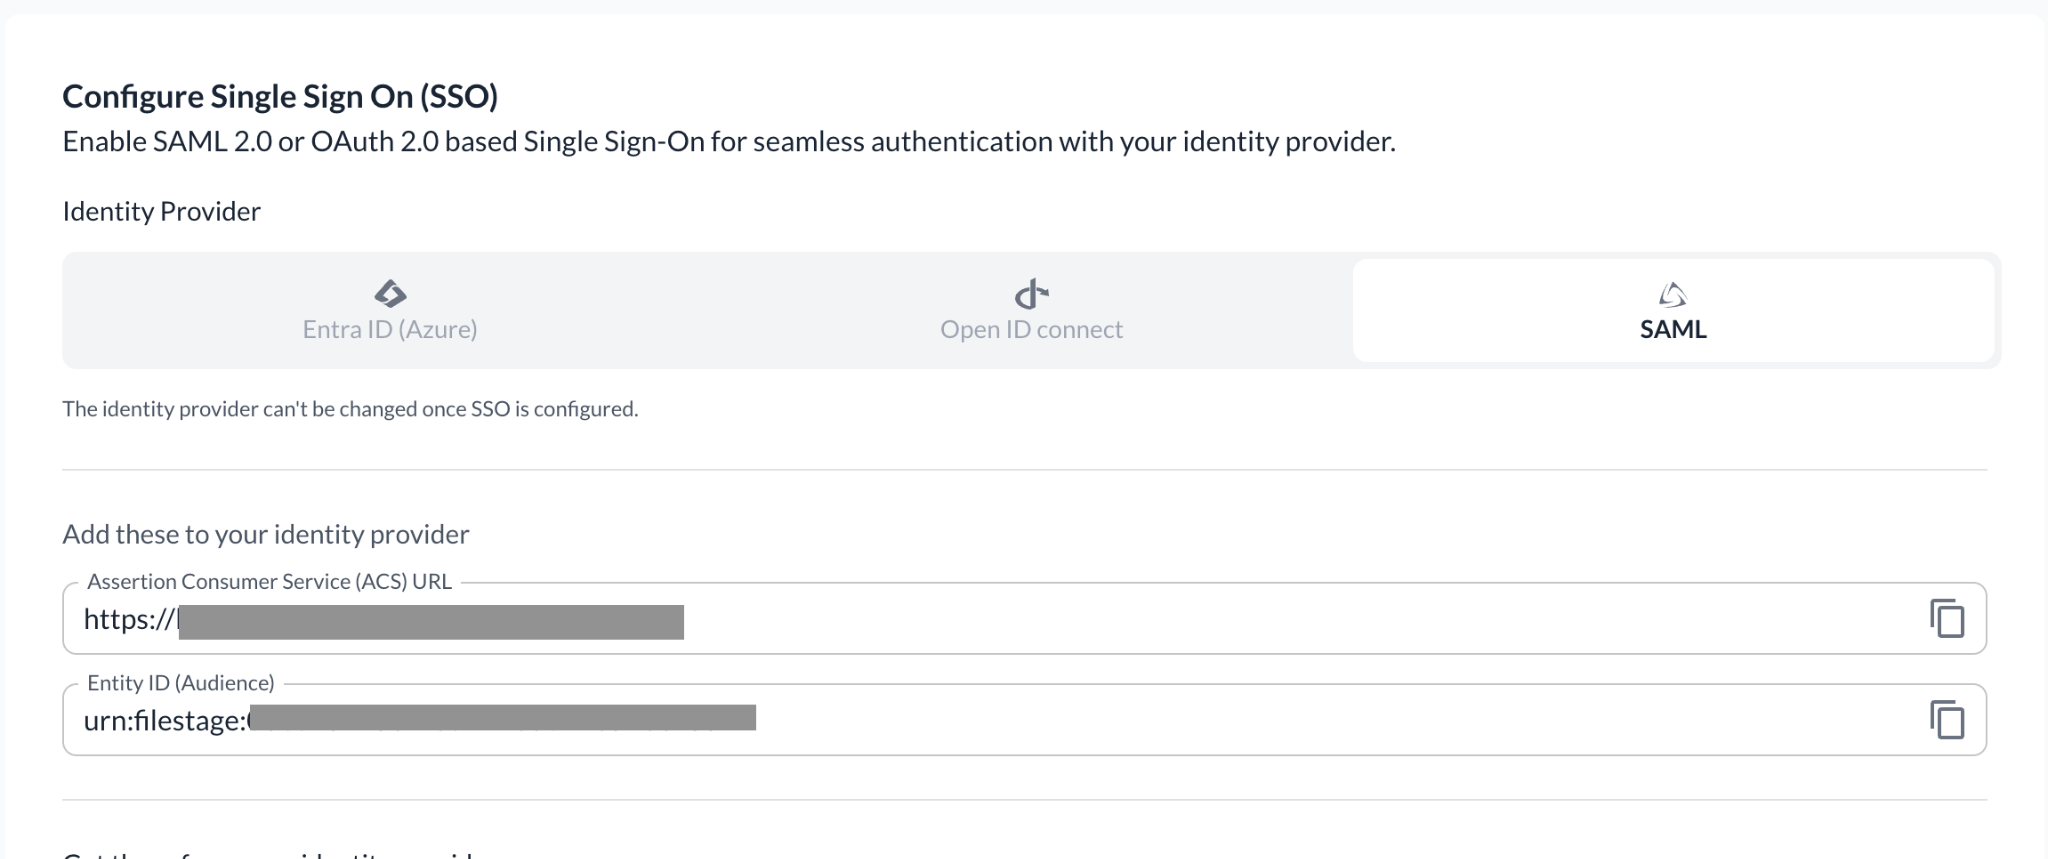
<table style="min-width: 25px;"><colgroup><col style="min-width: 25px;"></colgroup><tbody><tr><td colspan="1" rowspan="1" style="box-sizing: border-box; font-family: proxima-nova, &quot;Helvetica Neue&quot;, system-ui, &quot;Segoe UI&quot;, Roboto, Helvetica, Arial, sans-serif, &quot;Apple Color Emoji&quot;, &quot;Segoe UI Emoji&quot;, &quot;Segoe UI Symbol&quot;; line-height: 1; border: 1px solid rgba(0, 0, 0, 0.1); min-width: 100px; padding: 0.5rem; position: relative; text-align: left; vertical-align: top; margin-top: 0px;"><ol><li><p style="text-align: left;"><span style="color: rgb(0, 0, 0);">Dans Filestage, accédez à </span><a target="_blank" rel="noopener noreferrer nofollow" class="linktype-link link" data-linktype="link" href="https://app.filestage.io/teams/security-and-privacy"><span style="color: rgb(0, 0, 0);"><u>app.filestage.io/teams/security-and-privacy</u></span></a><span style="color: rgb(0, 0, 0);"> - cela ouvre les paramètres de sécurité et de confidentialité de votre dernière équipe sélectionnée.</span></p></li><li><p style="text-align: left;"><span style="color: rgb(0, 0, 0);">Faites défiler jusqu’à la section <strong>Identity and Access Management (IAM)</strong> et cliquez sur <strong>Configure SSO</strong>.</span></p></li><li><p style="text-align: left;">Sélectionnez l'onglet <strong>SAML</strong>.</p></li><li><p style="text-align: left;">Copiez les deux valeurs affichées sous <strong>Add these to your identity provider</strong> : l'<strong>Assertion Consumer Service (ACS) URL</strong> et l'<strong>Entity ID (Audience)</strong> - vous en aurez besoin dans Okta.</p></li></ol><img src="https://staticfiles.gleap.io/g/KALQiXS5g2aIdtaoSbGuE4xtlQWKmSTmVK4feRV65mWgJAys0LjYo5eYVVeACjucKaLpR8Icth1.png" style="box-sizing: border-box; font-family: proxima-nova, &quot;Helvetica Neue&quot;, system-ui, &quot;Segoe UI&quot;, Roboto, Helvetica, Arial, sans-serif, &quot;Apple Color Emoji&quot;, &quot;Segoe UI Emoji&quot;, &quot;Segoe UI Symbol&quot;; line-height: 1; height: auto; width: 100%; max-width: 100%; margin-top: 24px; margin-bottom: 24px; border-radius: 8px; align-self: center; cursor: pointer;"></td></tr></tbody></table>

### Étape 2 : Créez l'application SAML dans Okta

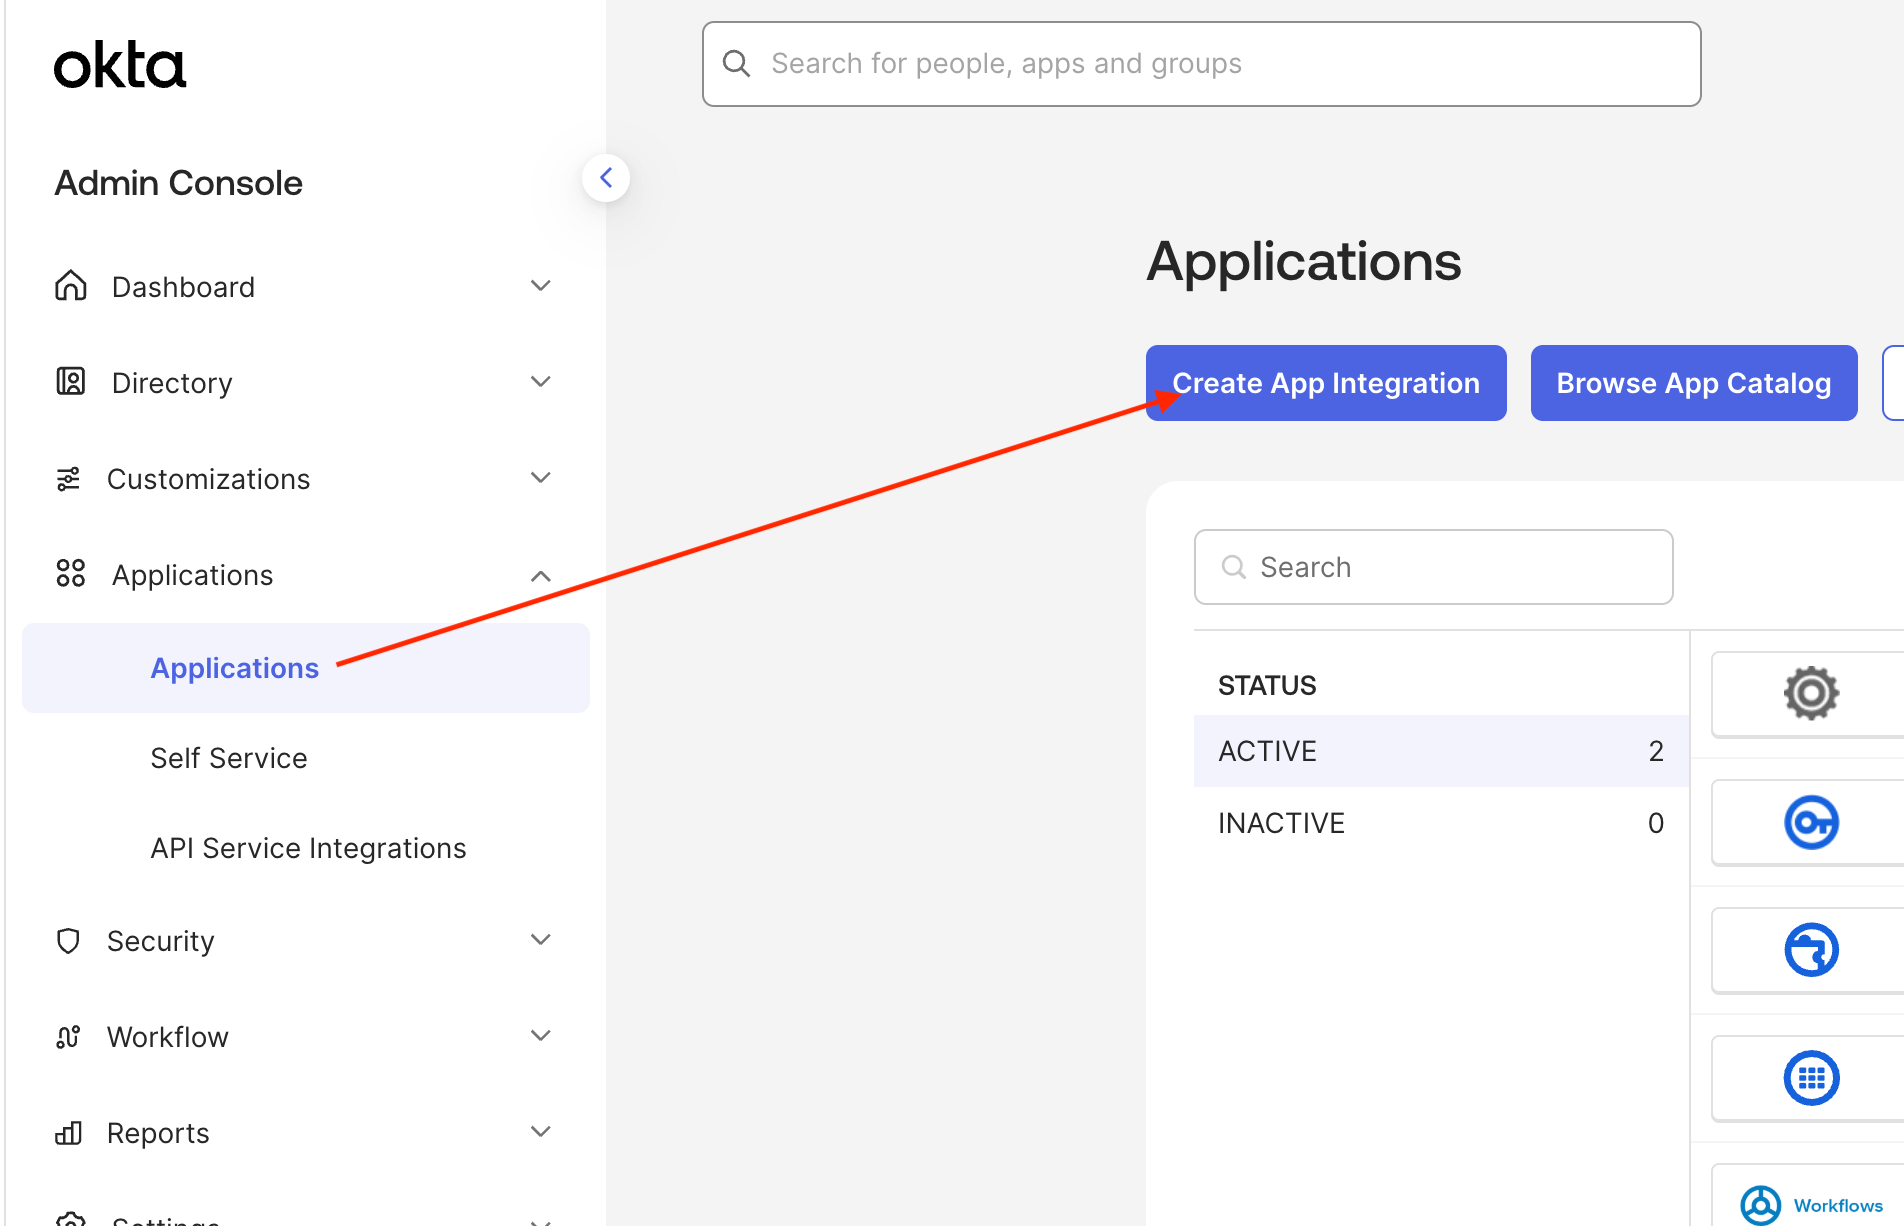
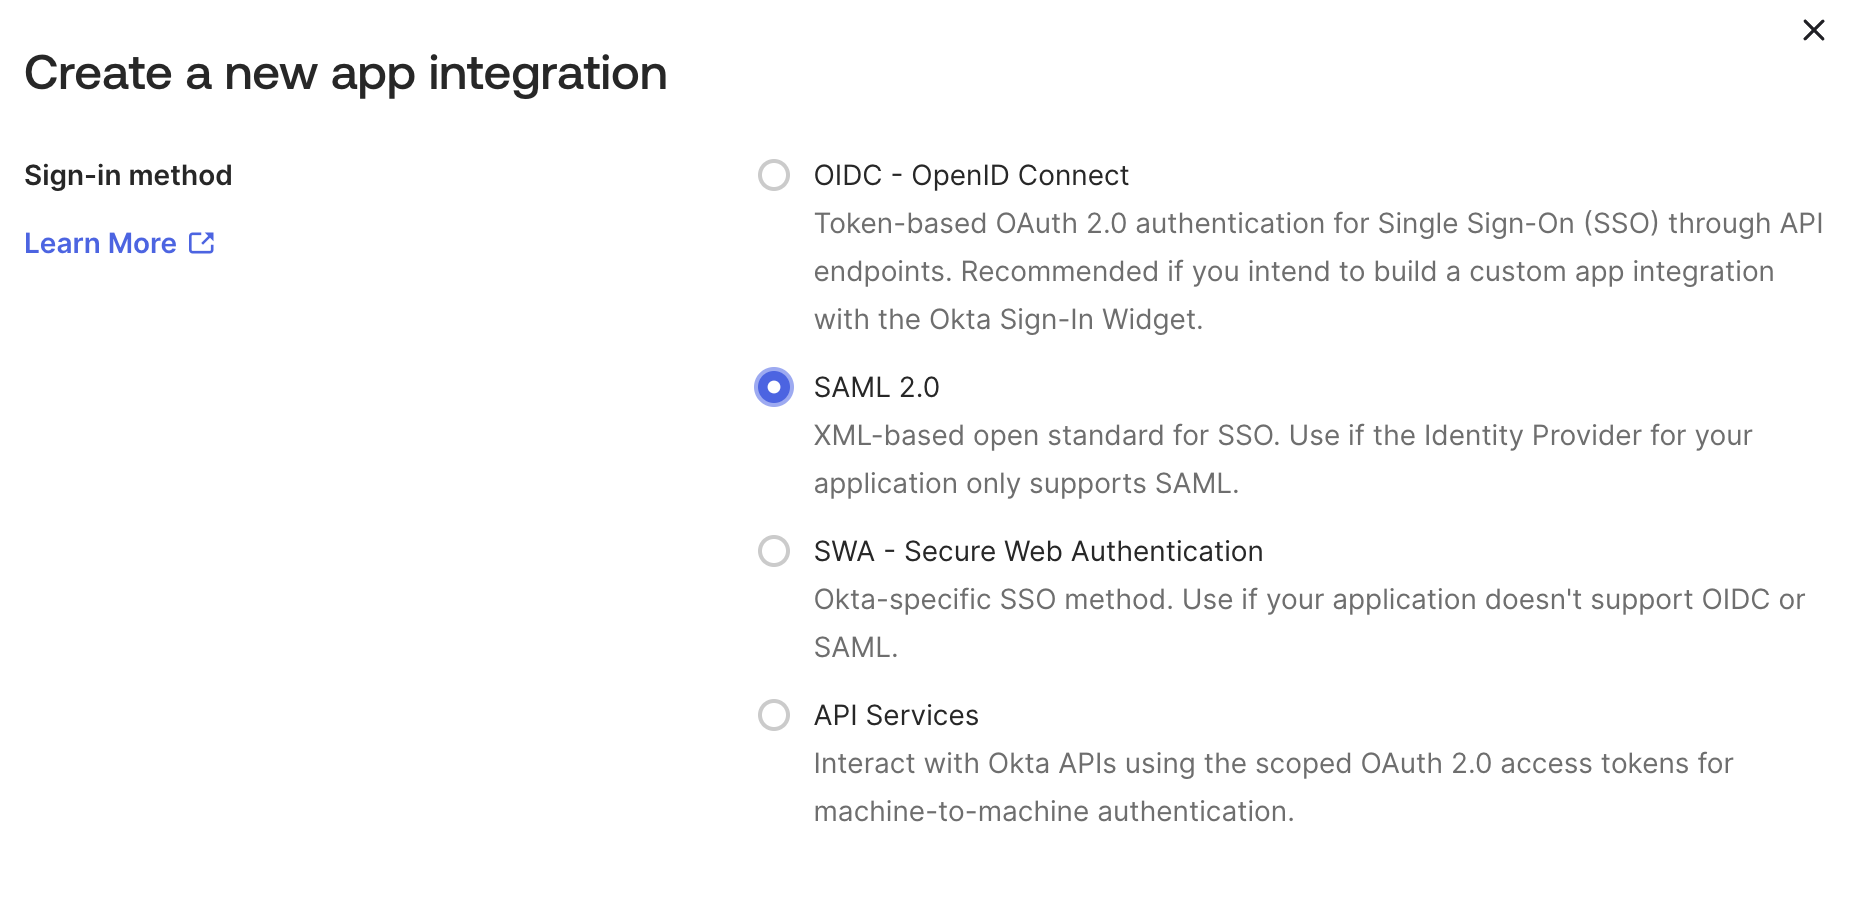
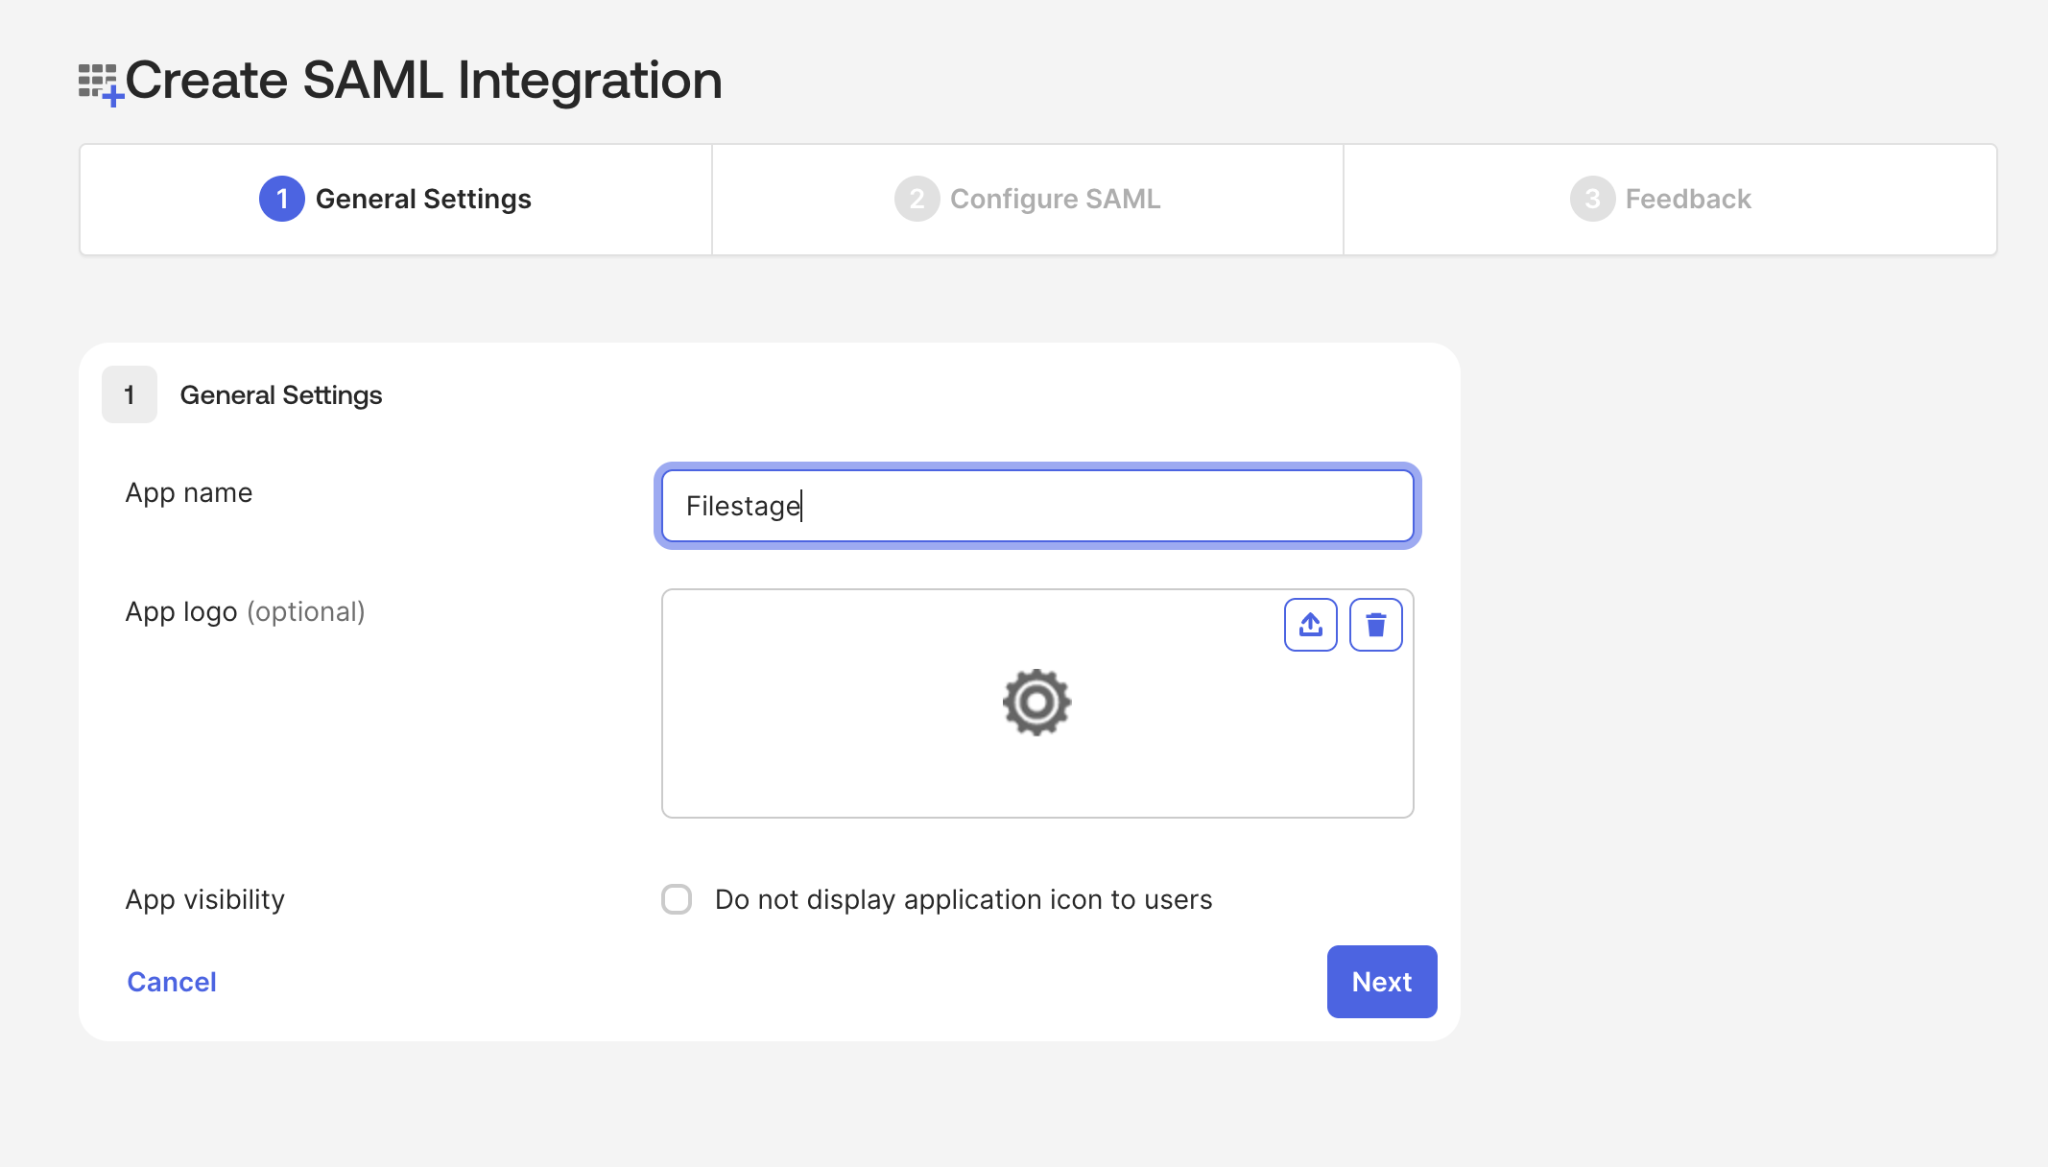
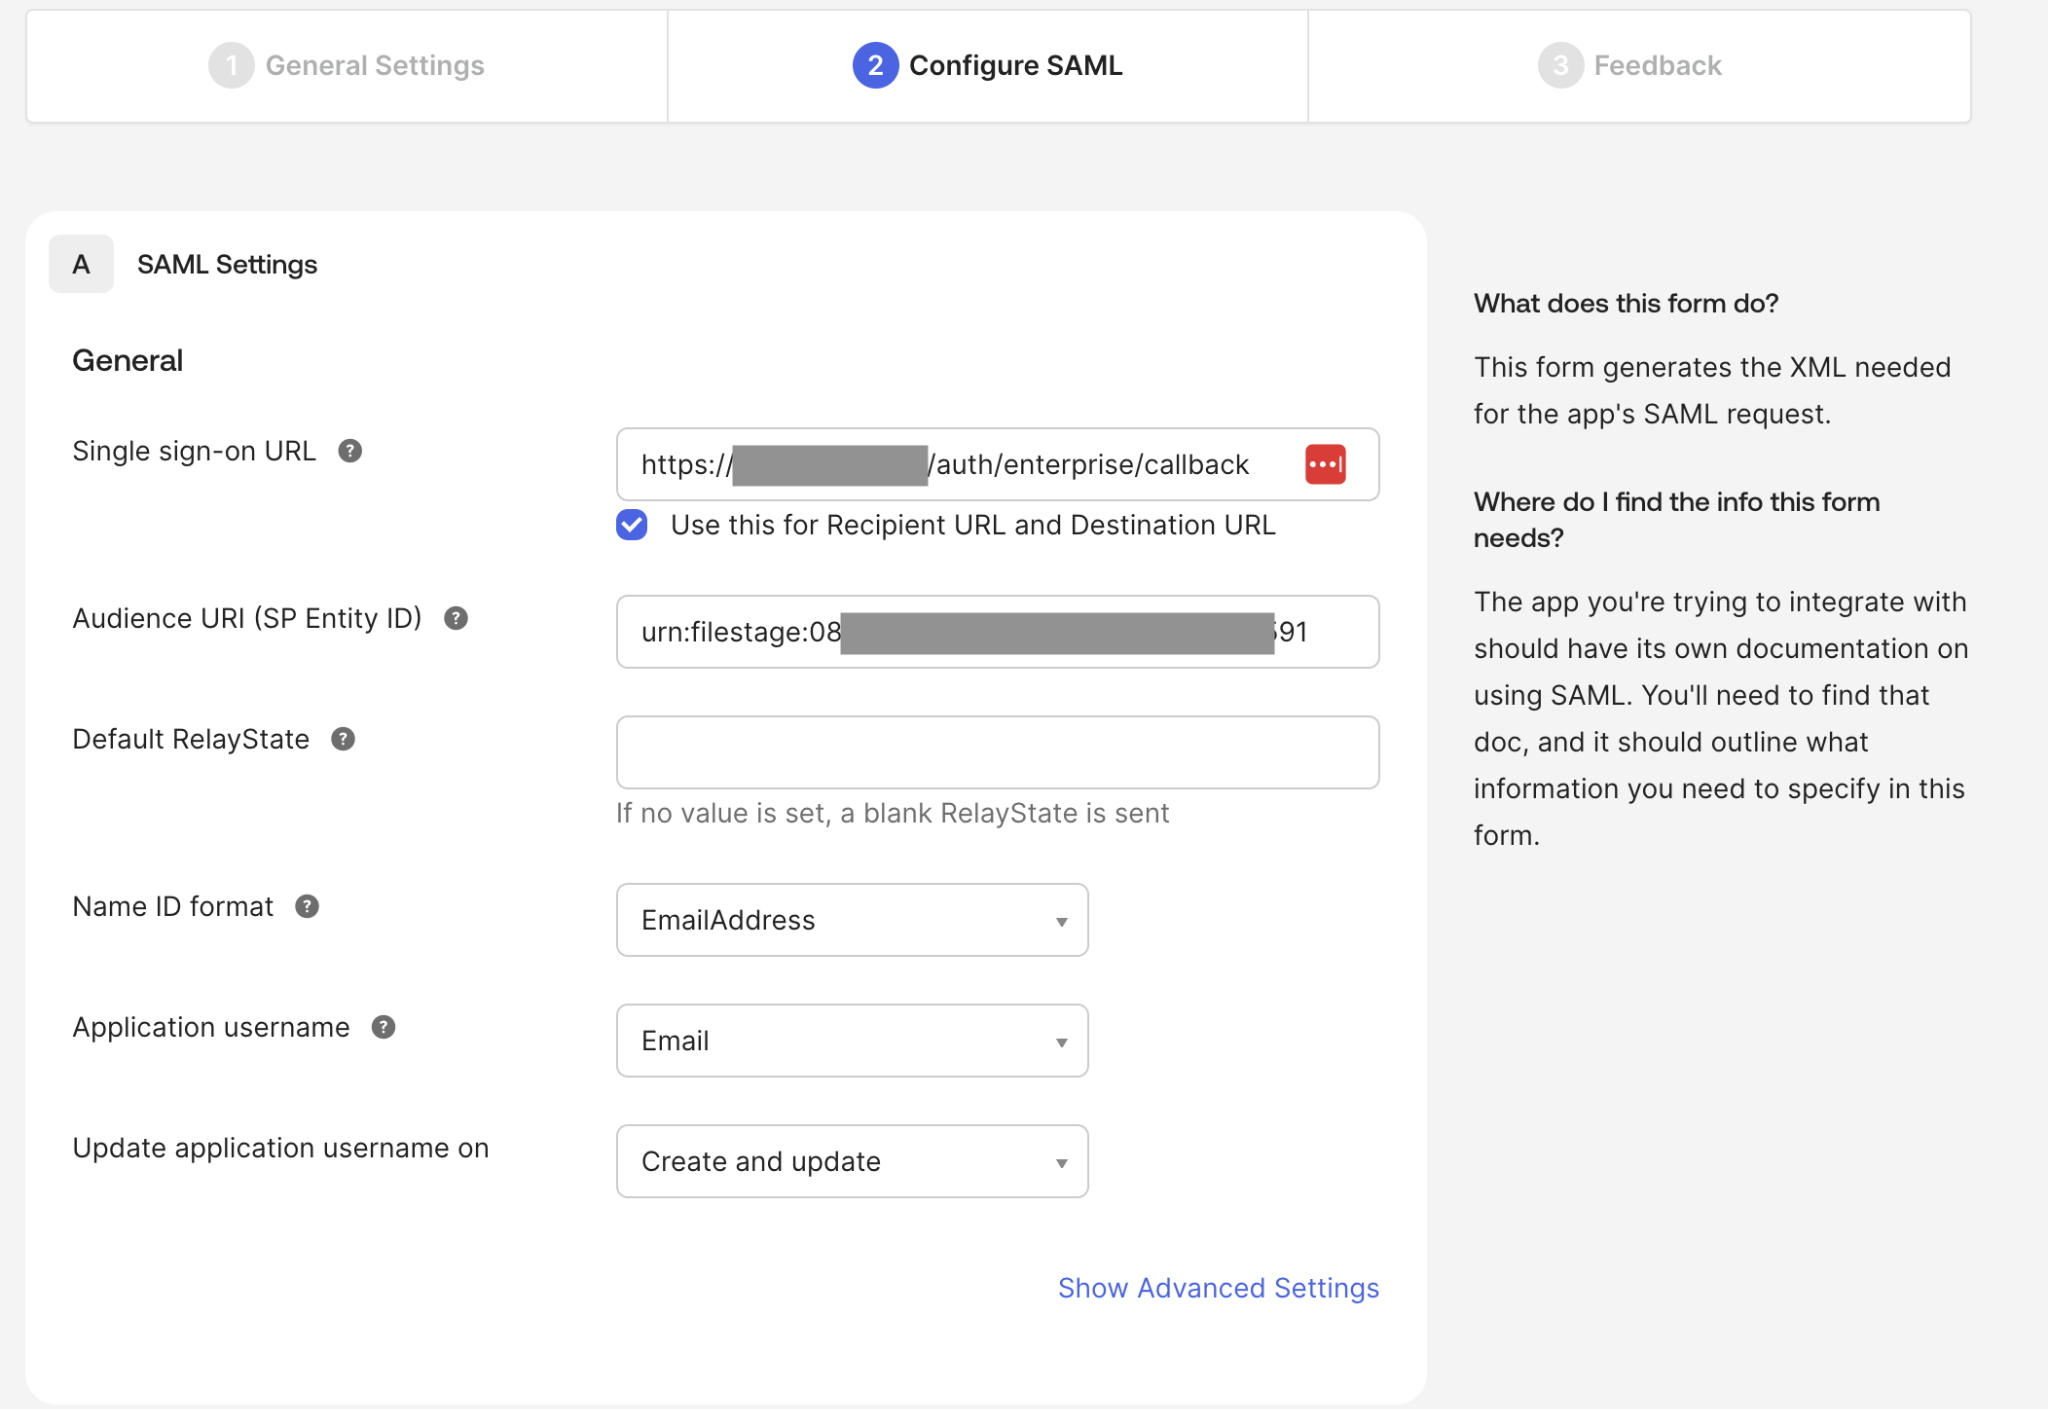
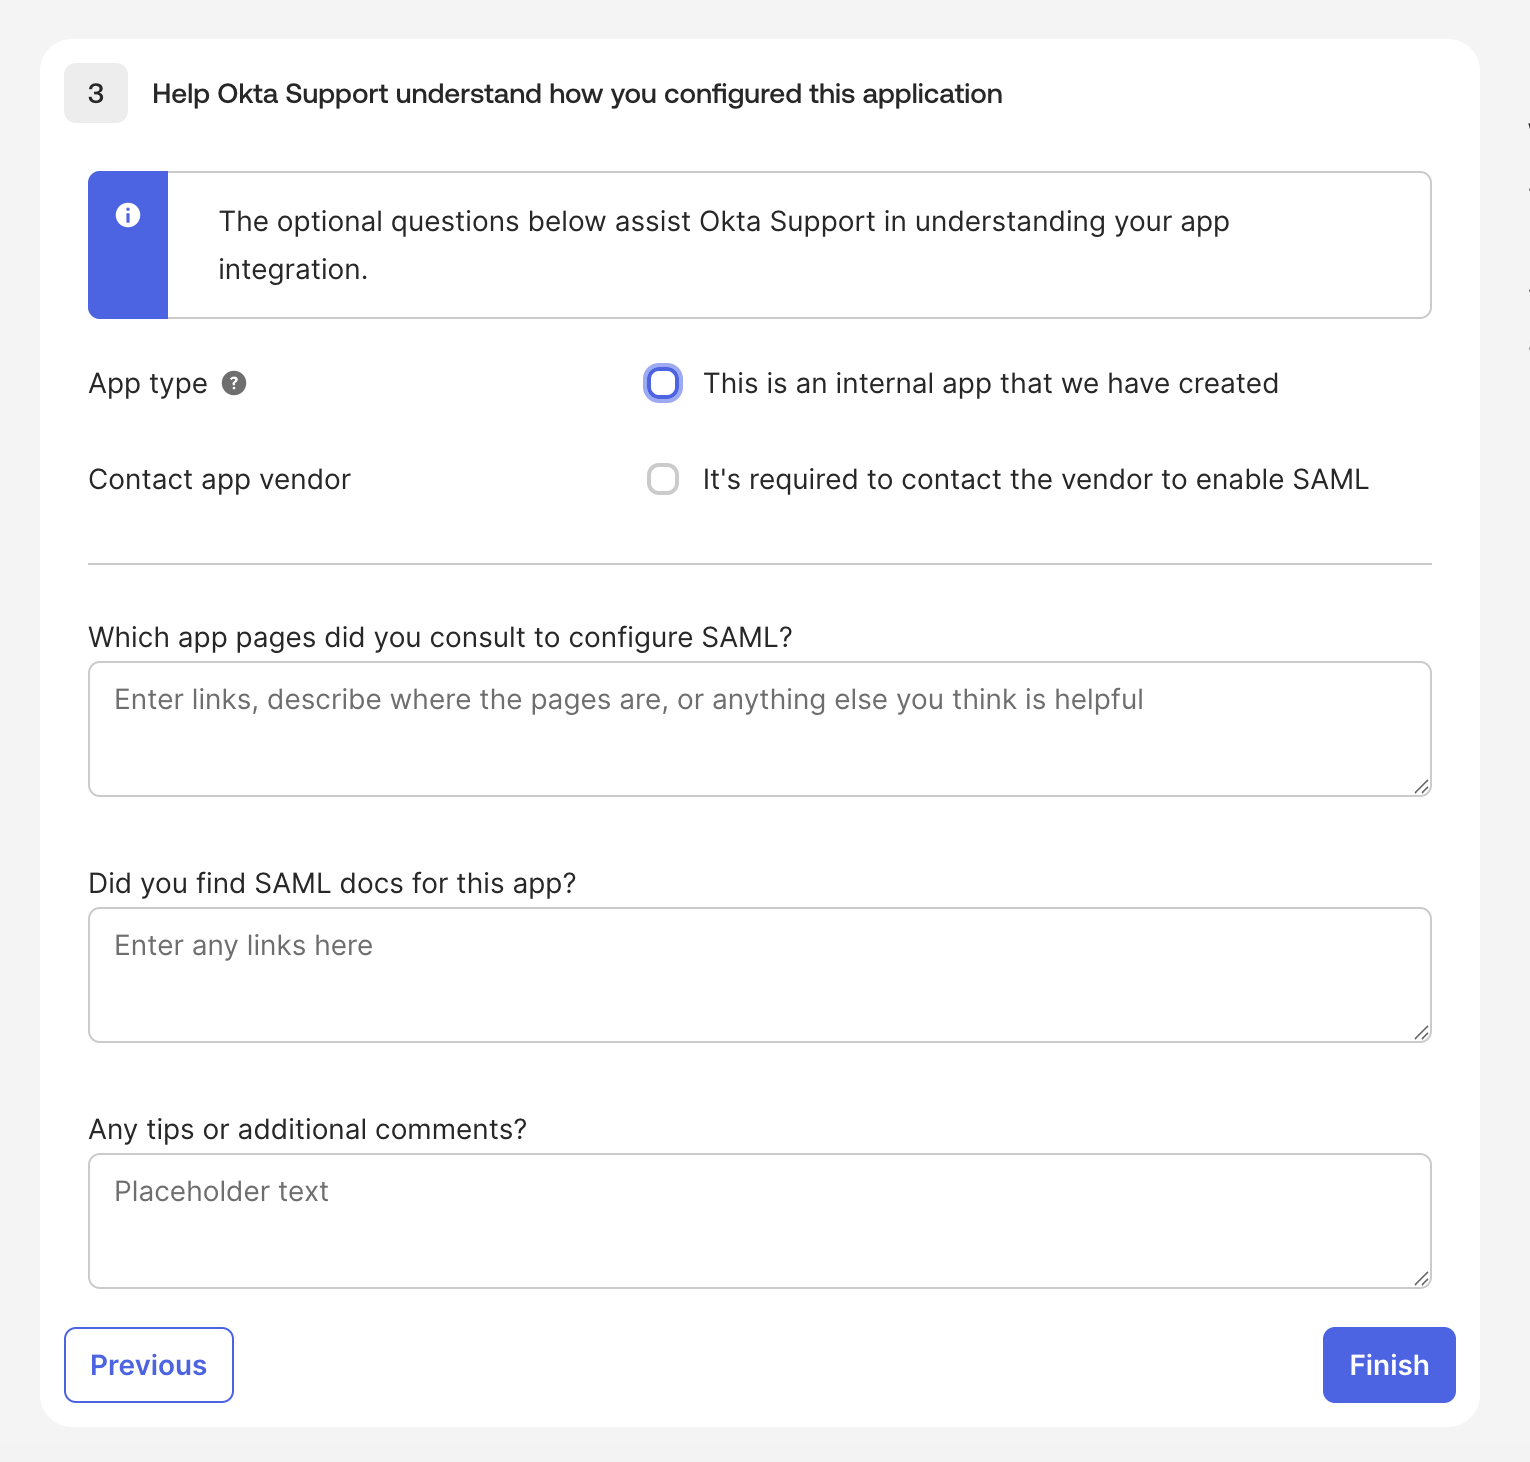
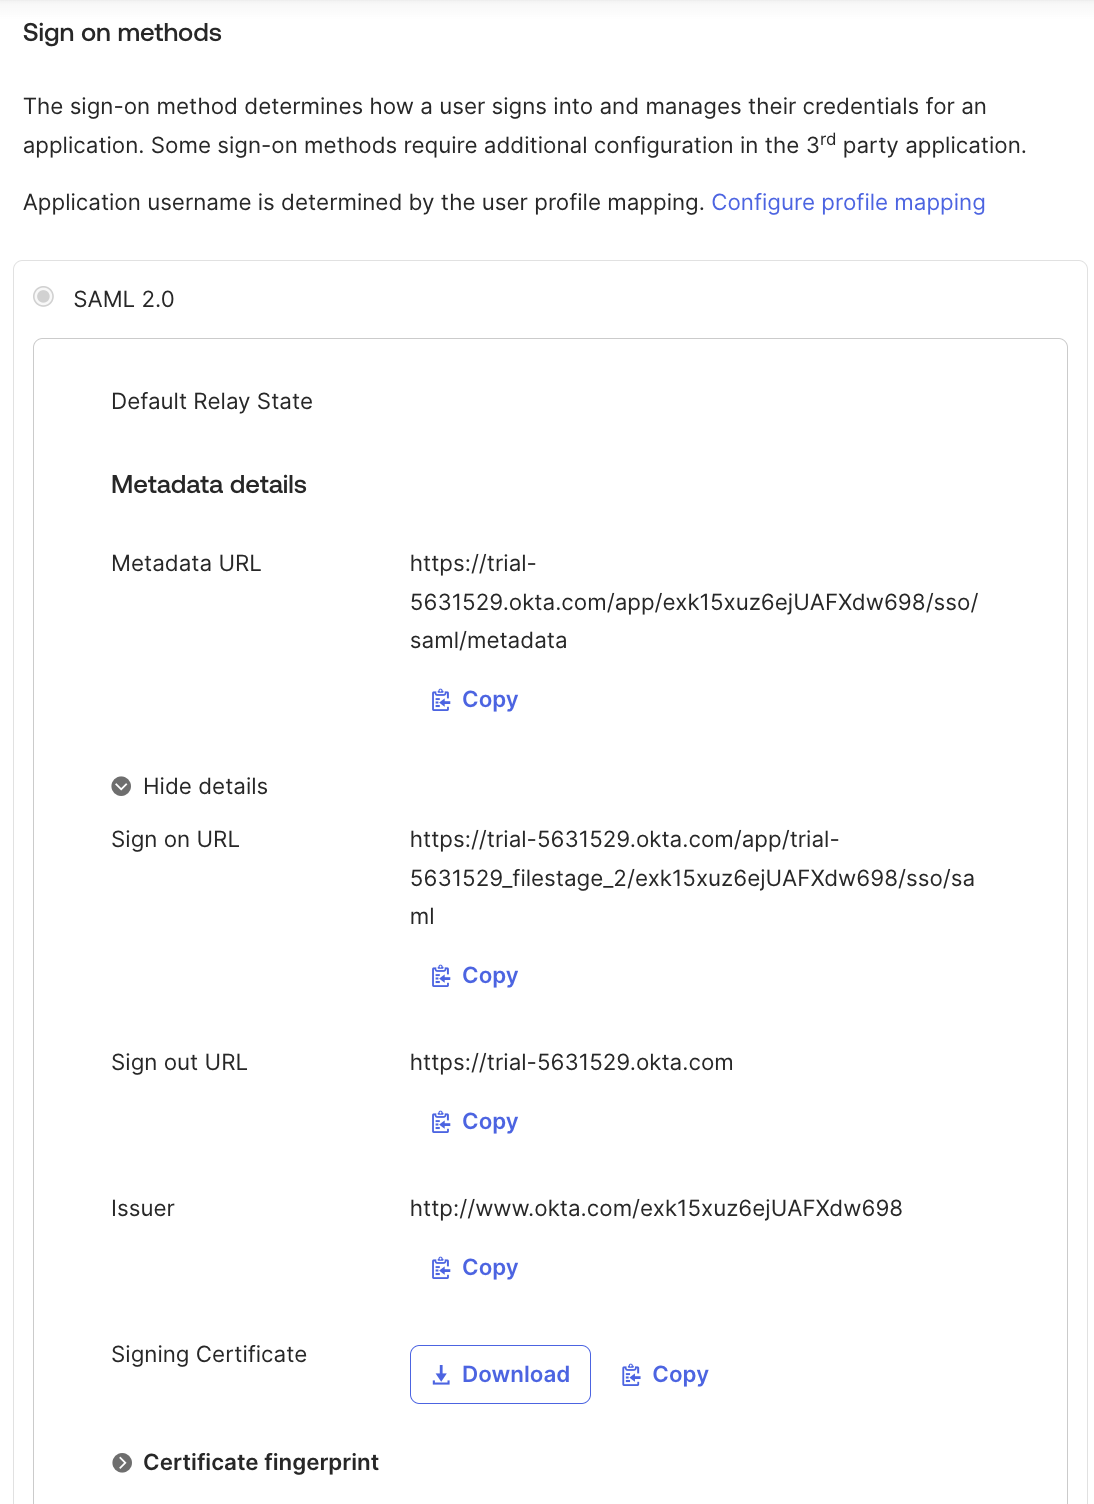
<table style="min-width: 25px;"><colgroup><col style="min-width: 25px;"></colgroup><tbody><tr><td colspan="1" rowspan="1" style="box-sizing: border-box; font-family: proxima-nova, &quot;Helvetica Neue&quot;, system-ui, &quot;Segoe UI&quot;, Roboto, Helvetica, Arial, sans-serif, &quot;Apple Color Emoji&quot;, &quot;Segoe UI Emoji&quot;, &quot;Segoe UI Symbol&quot;; line-height: 1; border: 1px solid rgba(0, 0, 0, 0.1); min-width: 100px; padding: 0.5rem; position: relative; text-align: left; vertical-align: top; margin-top: 0px;"><ol><li><p style="text-align: left;"><span style="color: rgb(0, 0, 0);">Connectez-vous à votre <strong>Okta Admin Dashboard</strong>.</span></p></li><li><p style="text-align: left;"><span style="color: rgb(0, 0, 0);">Accédez à <strong>Applications &gt; Applications</strong> et cliquez sur <strong>Create App Integration</strong>.</span></p></li></ol><img src="https://staticfiles.gleap.io/g/nAFaTlkBu1auWrrjdhqhYtgjm79twmf3Xu0ErKO4JFUAjATrZmzsgVfbR985PwIB4T7GmcmdnDh.png" style="box-sizing: border-box; font-family: proxima-nova, &quot;Helvetica Neue&quot;, system-ui, &quot;Segoe UI&quot;, Roboto, Helvetica, Arial, sans-serif, &quot;Apple Color Emoji&quot;, &quot;Segoe UI Emoji&quot;, &quot;Segoe UI Symbol&quot;; line-height: 1; height: auto; width: 100%; max-width: 100%; margin-top: 24px; margin-bottom: 24px; border-radius: 8px; align-self: center; cursor: pointer;"><ol start="3"><li><p style="text-align: left;">Sélectionnez <strong>SAML 2.0</strong> comme méthode de connexion, puis cliquez sur <strong>Next</strong>.</p></li></ol><img src="https://staticfiles.gleap.io/g/B9htfrznp6AzSi8vcndvoit7puwX8x1jYLihAl2l6FWS8OgDOjAmretCN9cYM4oqUfpYB1wYktB.png" style="box-sizing: border-box; font-family: proxima-nova, &quot;Helvetica Neue&quot;, system-ui, &quot;Segoe UI&quot;, Roboto, Helvetica, Arial, sans-serif, &quot;Apple Color Emoji&quot;, &quot;Segoe UI Emoji&quot;, &quot;Segoe UI Symbol&quot;; line-height: 1; height: auto; width: 100%; max-width: 100%; margin-top: 24px; margin-bottom: 24px; border-radius: 8px; align-self: center; cursor: pointer;"><ol start="4"><li><p style="text-align: left;">Saisissez un <strong>App name</strong> qui vous aide à identifier l'application (par ex. Filestage), puis cliquez sur <strong>Next</strong>.</p></li></ol><img src="https://staticfiles.gleap.io/g/9eUe2Um9Ej3z7Cv51UPyI30CjaOP6iPOaXL5Orh8jrLccUy6QEBKqKQX8Y1SlwDI1CCfvfj0PnG.png" style="box-sizing: border-box; font-family: proxima-nova, &quot;Helvetica Neue&quot;, system-ui, &quot;Segoe UI&quot;, Roboto, Helvetica, Arial, sans-serif, &quot;Apple Color Emoji&quot;, &quot;Segoe UI Emoji&quot;, &quot;Segoe UI Symbol&quot;; line-height: 1; height: auto; width: 100%; max-width: 100%; margin-top: 24px; margin-bottom: 24px; border-radius: 8px; align-self: center; cursor: pointer;"><ol start="5"><li><p style="text-align: left;">À l'étape Configure SAML, renseignez la <strong>Single sign-on URL</strong> avec l'<strong>Assertion Consumer Service (ACS) URL</strong> copiée depuis Filestage.</p></li><li><p style="text-align: left;">Renseignez l'<strong>Audience URI (SP Entity ID)</strong> avec l'<strong>Entity ID (Audience)</strong> copiée depuis Filestage.</p></li><li><p style="text-align: left;">Définissez le <strong>Name ID format</strong> sur <strong>EmailAddress</strong> et l'<strong>Application username</strong> sur <strong>Email</strong>, puis cliquez sur <strong>Next</strong>.</p></li></ol><img src="https://staticfiles.gleap.io/g/vfLLQejc3bJo93m4DTYcFAZY0KBgRre6fN6kQItiBa88lb7jFD3ZDcJcicCWyevZWQQwVx6OQqJ.png" style="box-sizing: border-box; font-family: proxima-nova, &quot;Helvetica Neue&quot;, system-ui, &quot;Segoe UI&quot;, Roboto, Helvetica, Arial, sans-serif, &quot;Apple Color Emoji&quot;, &quot;Segoe UI Emoji&quot;, &quot;Segoe UI Symbol&quot;; line-height: 1; height: auto; width: 100%; max-width: 100%; margin-top: 24px; margin-bottom: 24px; border-radius: 8px; align-self: center; cursor: pointer;"><ol start="8"><li><p style="text-align: left;">À l'étape <strong>Feedback</strong>, tous les champs sont facultatifs - cliquez sur <strong>Finish</strong>.</p></li></ol><img src="https://staticfiles.gleap.io/g/9MF18chzXfMLB3LsX2c03wu6l1su8KqAli5N2peuqUSm0Co2o4tCacd9guF3cOofEVeWiSI7HaJ.png" style="box-sizing: border-box; font-family: proxima-nova, &quot;Helvetica Neue&quot;, system-ui, &quot;Segoe UI&quot;, Roboto, Helvetica, Arial, sans-serif, &quot;Apple Color Emoji&quot;, &quot;Segoe UI Emoji&quot;, &quot;Segoe UI Symbol&quot;; line-height: 1; height: auto; width: 100%; max-width: 100%; margin-top: 24px; margin-bottom: 24px; border-radius: 8px; align-self: center; cursor: pointer;"><ol start="9"><li><p style="text-align: left;">Ouvrez l'application que vous venez de créer, allez dans l'onglet <strong>Sign On</strong> et cliquez sur <strong>More details</strong>.</p></li></ol><img src="https://staticfiles.gleap.io/g/eouzb3OURNA6ZUiIN81dmxFLk8YgGMDueK1VOuq0S1kebFhpqGQla7yByPsHc1fqgGETxfQU6bN.png" style="box-sizing: border-box; font-family: proxima-nova, &quot;Helvetica Neue&quot;, system-ui, &quot;Segoe UI&quot;, Roboto, Helvetica, Arial, sans-serif, &quot;Apple Color Emoji&quot;, &quot;Segoe UI Emoji&quot;, &quot;Segoe UI Symbol&quot;; line-height: 1; height: auto; width: 100%; max-width: 100%; margin-top: 24px; margin-bottom: 24px; border-radius: 8px; align-self: center; cursor: pointer;"><ol start="10"><li><p style="text-align: left;">Notez la <strong>Sign on URL</strong> et l'<strong>Issuer</strong>, et téléchargez le <strong>Signing Certificate</strong> - vous en aurez besoin dans Filestage.</p></li></ol></td></tr></tbody></table>

### Étape 3 : Configurez le SSO dans Filestage

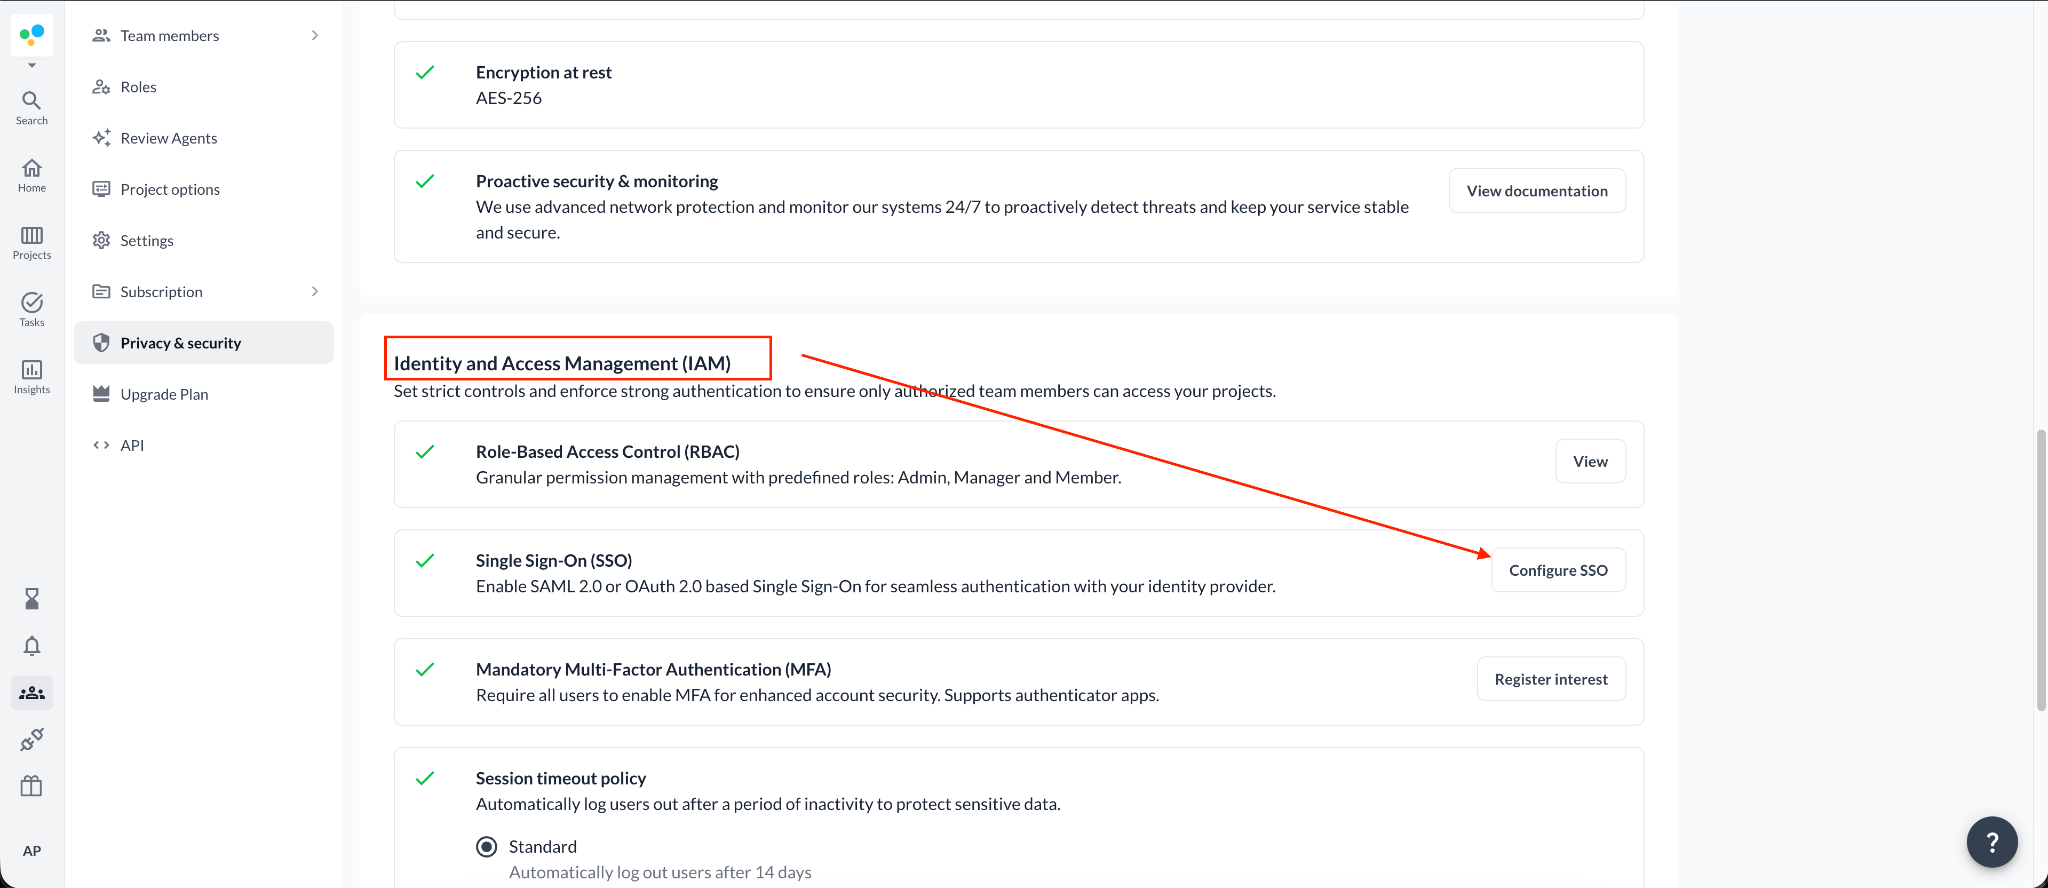
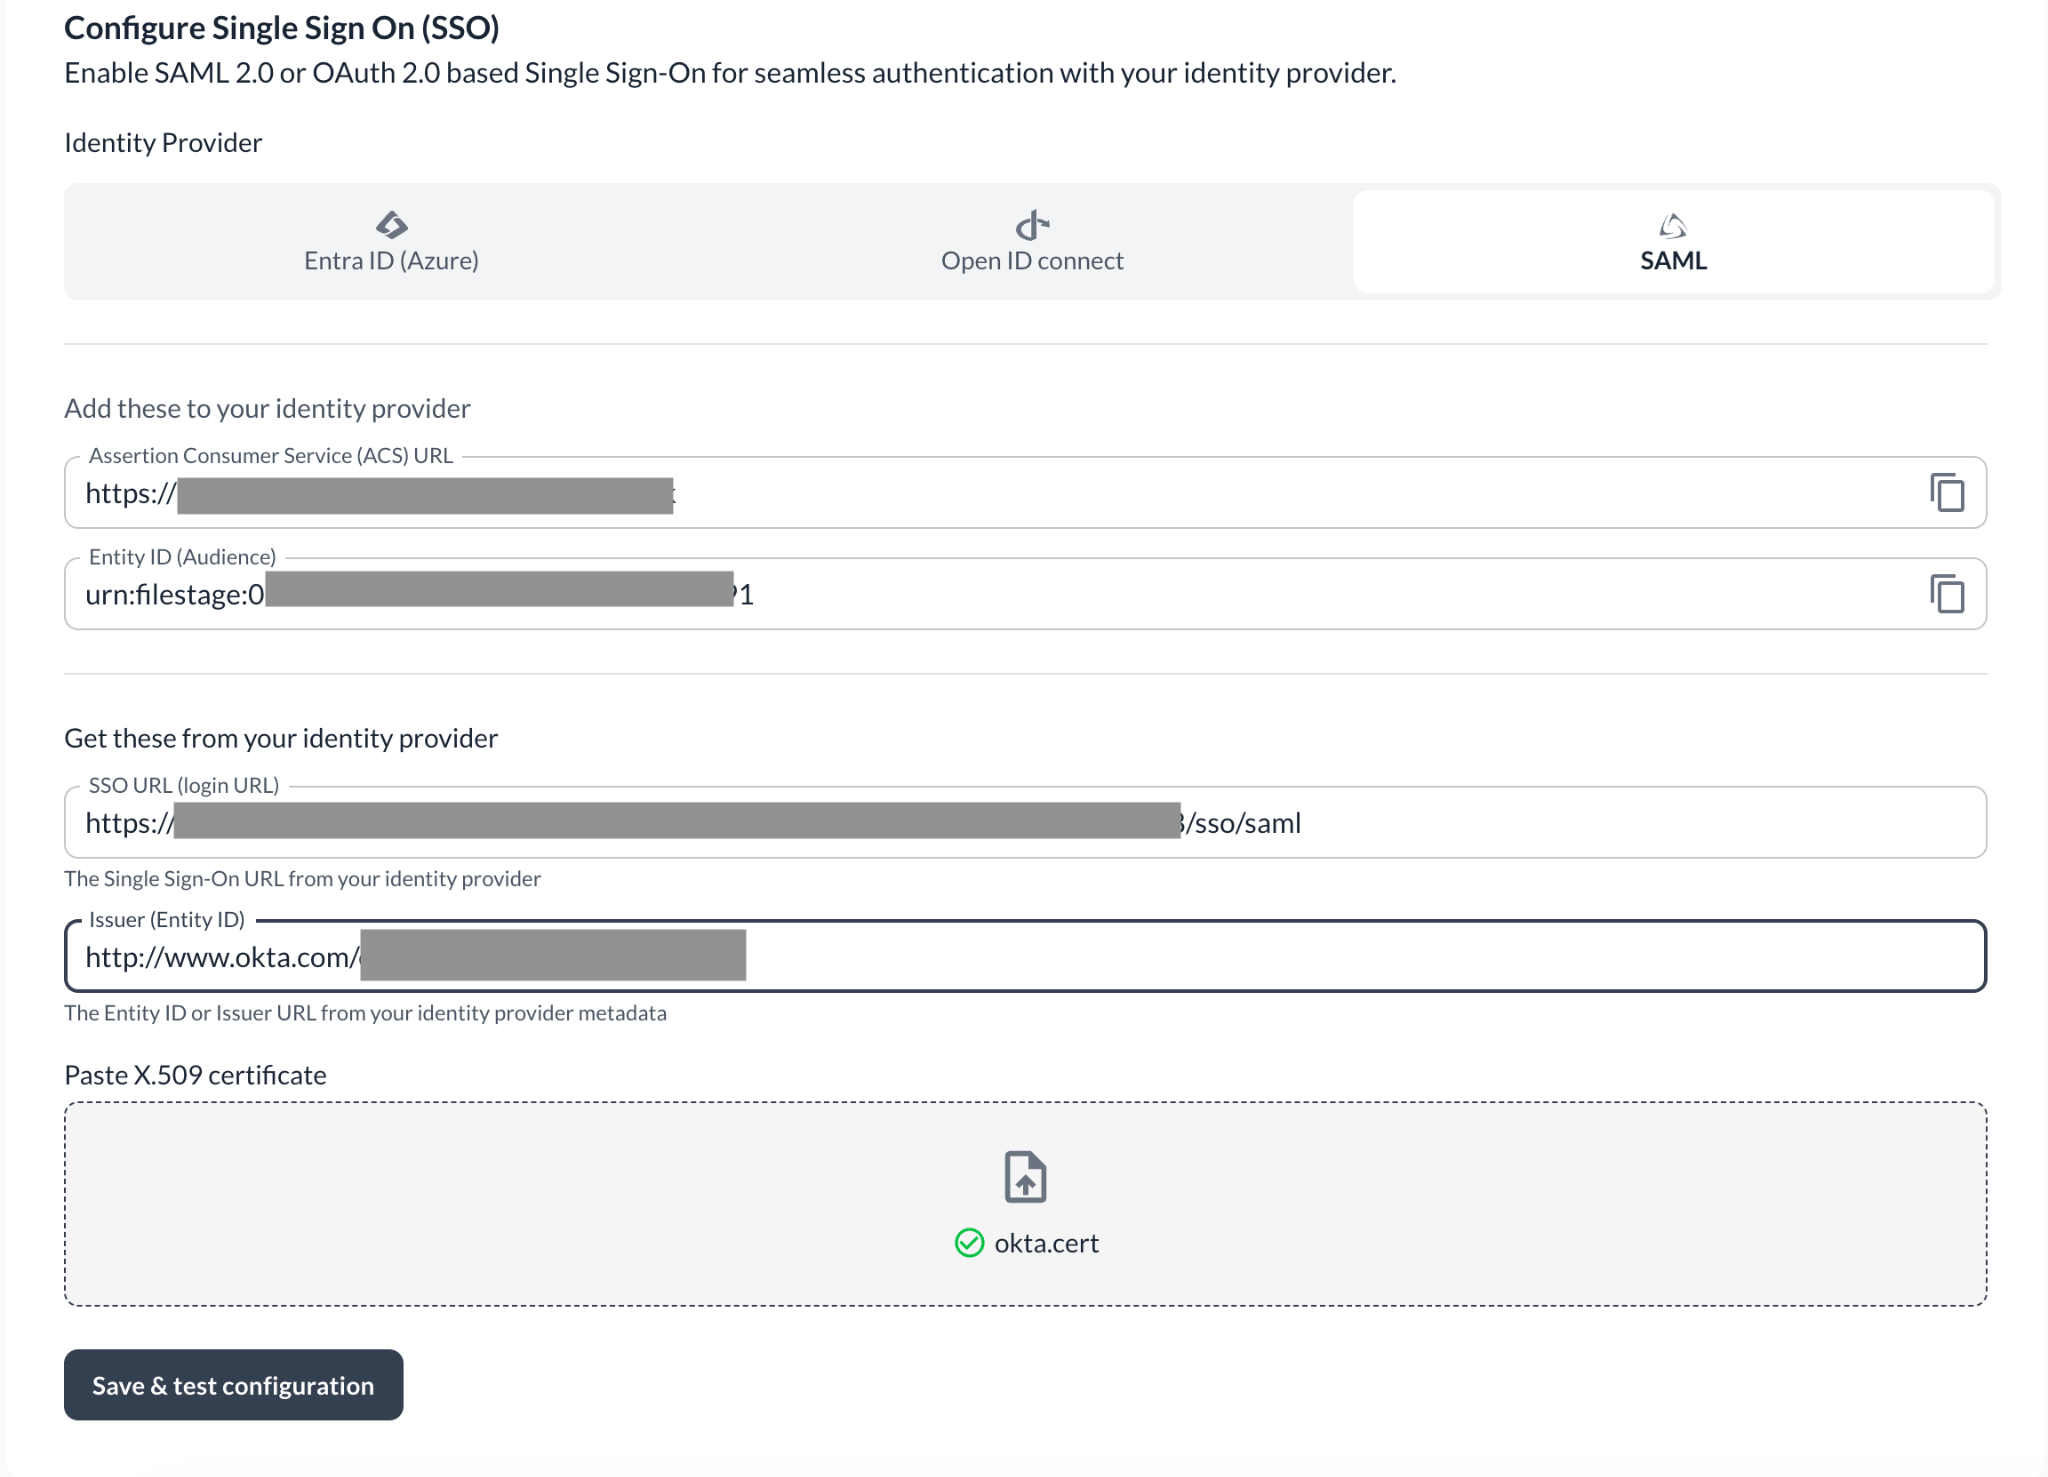
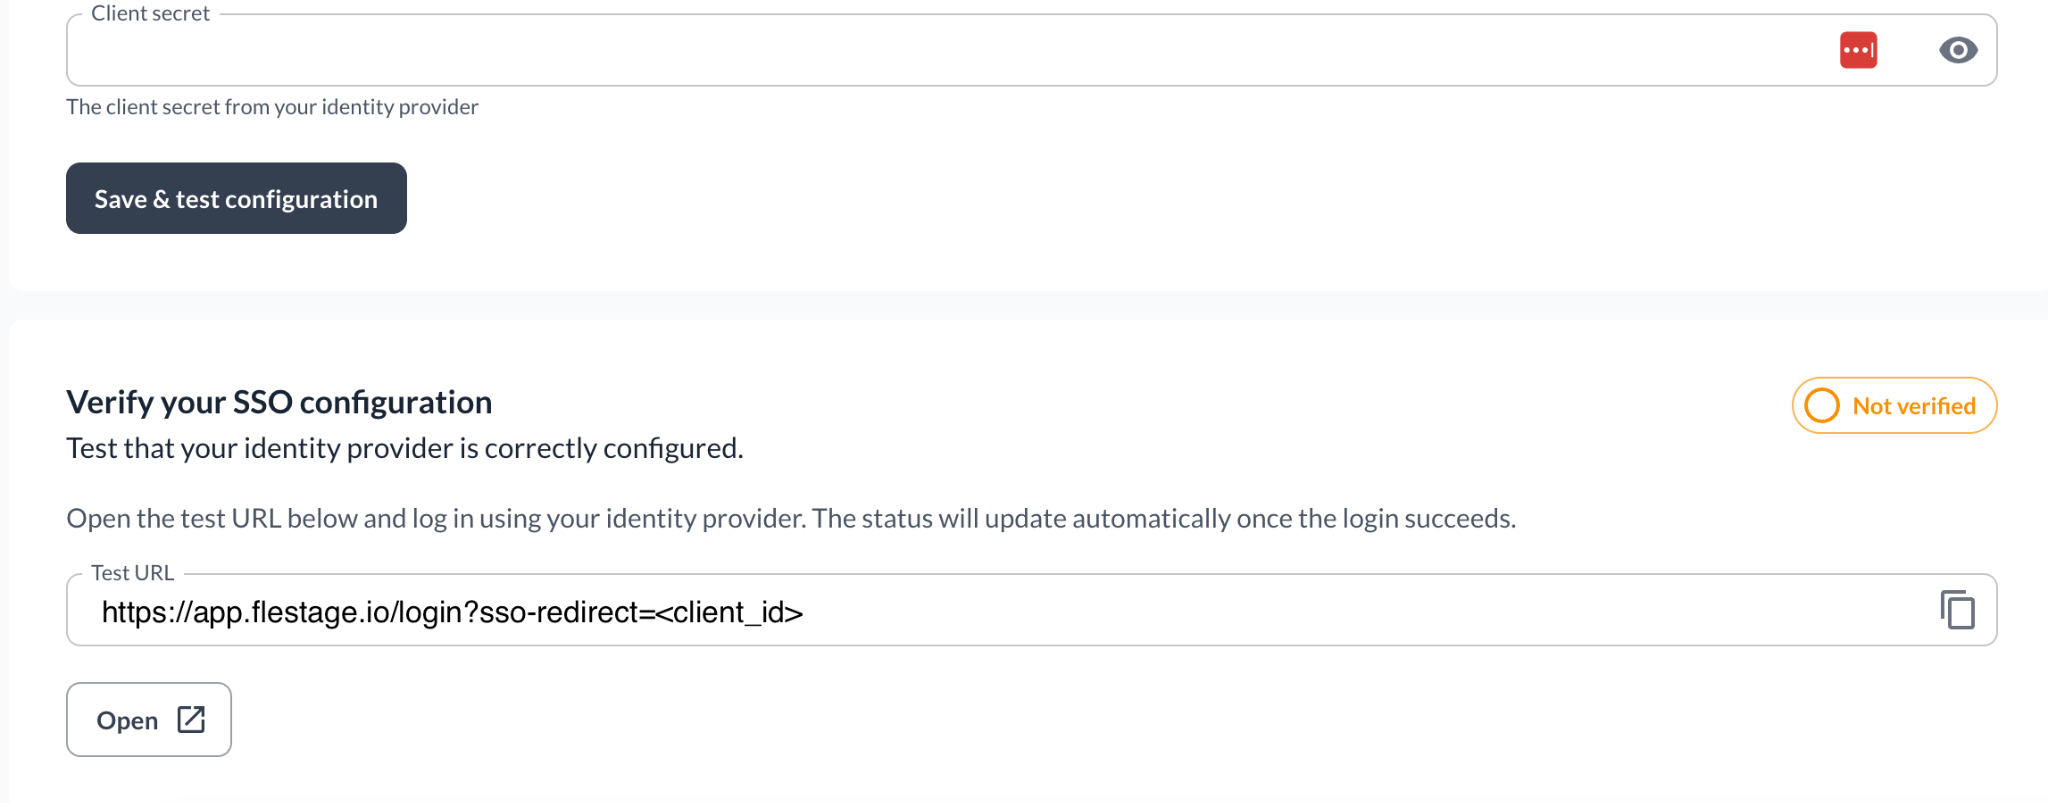
<table style="min-width: 25px;"><colgroup><col style="min-width: 25px;"></colgroup><tbody><tr><td colspan="1" rowspan="1" style="box-sizing: border-box; font-family: proxima-nova, &quot;Helvetica Neue&quot;, system-ui, &quot;Segoe UI&quot;, Roboto, Helvetica, Arial, sans-serif, &quot;Apple Color Emoji&quot;, &quot;Segoe UI Emoji&quot;, &quot;Segoe UI Symbol&quot;; line-height: 1; border: 1px solid rgba(0, 0, 0, 0.1); min-width: 100px; padding: 0.5rem; position: relative; text-align: left; vertical-align: top; margin-top: 0px;"><ol><li><p style="text-align: left;"><span style="color: rgb(0, 0, 0);">Dans Filestage, accédez à </span><a target="_blank" rel="noopener noreferrer nofollow" class="linktype-link link" data-linktype="link" href="https://app.filestage.io/teams/security-and-privacy"><span style="color: rgb(0, 0, 0);"><u>app.filestage.io/teams/security-and-privacy</u></span></a><span style="color: rgb(0, 0, 0);"> - cela ouvre les paramètres de sécurité et de confidentialité de votre dernière équipe sélectionnée.</span></p></li><li><p style="text-align: left;"><span style="color: rgb(0, 0, 0);">Faites défiler jusqu’à la section <strong>Identity and Access Management (IAM)</strong> et cliquez sur <strong>Configure SSO</strong>.</span></p></li></ol><img src="https://staticfiles.gleap.io/g/uE3ZMLWr50g1O2UL8pfxYZg5b7UUg4UfAZpOjKYULiy8fqbC6uIydXI6AGCeFtL2gKjfRLpxd8U.png" style="box-sizing: border-box; font-family: proxima-nova, &quot;Helvetica Neue&quot;, system-ui, &quot;Segoe UI&quot;, Roboto, Helvetica, Arial, sans-serif, &quot;Apple Color Emoji&quot;, &quot;Segoe UI Emoji&quot;, &quot;Segoe UI Symbol&quot;; line-height: 1; height: auto; width: 100%; max-width: 100%; margin-top: 24px; margin-bottom: 24px; border-radius: 8px; align-self: center; cursor: pointer;"><ol start="3"><li><p style="text-align: left;">Sélectionnez l'option <strong>SAML</strong>.</p></li><li><p style="text-align: left;">Renseignez les informations copiées depuis Okta : collez la <strong>Sign on URL</strong> dans <strong>SSO URL (login URL)</strong>, l'<strong>Issuer</strong> dans <strong>Issuer (Entity ID)</strong>, et téléversez le fichier <strong>Signing certificate</strong>.</p></li></ol><img src="https://staticfiles.gleap.io/g/iqrRZQiHrzCNHQ3RfzCvMoNTR8xaRg1xUdKel3Z4R2tjWr3DcpVyXMi9ennuiadD7sNzJjkeBsV.png" style="box-sizing: border-box; font-family: proxima-nova, &quot;Helvetica Neue&quot;, system-ui, &quot;Segoe UI&quot;, Roboto, Helvetica, Arial, sans-serif, &quot;Apple Color Emoji&quot;, &quot;Segoe UI Emoji&quot;, &quot;Segoe UI Symbol&quot;; line-height: 1; height: auto; width: 100%; max-width: 100%; margin-top: 24px; margin-bottom: 24px; border-radius: 8px; align-self: center; cursor: pointer;"><ol start="5"><li><p style="text-align: left;"><span style="color: rgb(0, 0, 0);">Cliquez sur <strong>Save &amp; test configuration</strong> - la section de vérification apparaît en bas de la page.</span></p></li></ol><img src="https://staticfiles.gleap.io/g/bn7BlirgMI0sxZtbi1qB1qeaaWHtSFUTVRoEHVS1wuMCQsNiR3MaUiZwxZwPtoTbX8OZyqyn3Am.png" style="box-sizing: border-box; font-family: proxima-nova, &quot;Helvetica Neue&quot;, system-ui, &quot;Segoe UI&quot;, Roboto, Helvetica, Arial, sans-serif, &quot;Apple Color Emoji&quot;, &quot;Segoe UI Emoji&quot;, &quot;Segoe UI Symbol&quot;; line-height: 1; height: auto; width: 100%; max-width: 100%; margin-top: 24px; margin-bottom: 24px; border-radius: 8px; align-self: center; cursor: pointer;"></td></tr></tbody></table>

### Étape 4 : Vérifiez votre configuration SSO

> **Warning:** Une fois la vérification terminée avec succès, tous les membres de votre équipe devront se connecter à Filestage uniquement via SSO.

<table style="min-width: 25px;"><colgroup><col style="min-width: 25px;"></colgroup><tbody><tr><td colspan="1" rowspan="1" style="box-sizing: border-box; font-family: proxima-nova, &quot;Helvetica Neue&quot;, system-ui, &quot;Segoe UI&quot;, Roboto, Helvetica, Arial, sans-serif, &quot;Apple Color Emoji&quot;, &quot;Segoe UI Emoji&quot;, &quot;Segoe UI Symbol&quot;; line-height: 1; border: 1px solid rgba(0, 0, 0, 0.1); min-width: 100px; padding: 0.5rem; position: relative; text-align: left; vertical-align: top; margin-top: 0px;"><ol><li><p style="text-align: left;"><span style="color: rgb(0, 0, 0);">Copiez la <strong>Test URL</strong> depuis la section de vérification.</span></p></li><li><p style="text-align: left;"><span style="color: rgb(0, 0, 0);">Déconnectez-vous de Filestage ou ouvrez l’URL de test dans une fenêtre de navigation privée de votre navigateur.</span></p></li><li><p style="text-align: left;"><span style="color: rgb(0, 0, 0);">Connectez-vous via votre fournisseur d’identité. Si tout est correctement configuré, le statut passe à <strong>Verified</strong> et vous verrez cette confirmation :</span></p></li></ol><img src="https://staticfiles.gleap.io/g/oACzy4fPlG5d8AxR7DscdsQsJGecEGLKe5mfhnNmlGUlkfbTITLVpdktcOViscnfgvObVfGNacG.png" style="box-sizing: border-box; font-family: proxima-nova, &quot;Helvetica Neue&quot;, system-ui, &quot;Segoe UI&quot;, Roboto, Helvetica, Arial, sans-serif, &quot;Apple Color Emoji&quot;, &quot;Segoe UI Emoji&quot;, &quot;Segoe UI Symbol&quot;; line-height: 1; height: auto; width: 100%; max-width: 100%; margin-top: 24px; margin-bottom: 24px; border-radius: 8px; align-self: center; cursor: pointer;"></td></tr></tbody></table>

Et voilà - désormais, les membres de votre équipe se connectent à Filestage via votre fournisseur d’identité.

💡 Et ensuite ? Découvrez maintenant comment [gérer les membres de votre équipe](https://help.filestage.io/fr/articles/9465096-understand-and-manage-team-members.md) !

Si vous avez des questions, contactez-nous via le chat ou par e-mail à [support@filestage.io](mailto:support@filestage.io). Nous sommes toujours ravis de vous aider !