---
title: "Configura tu inicio de sesión único (SSO) a través de Okta (SAML 2.0)"
description: "Aprende cómo establecer una conexión mediante el protocolo SAML 2.0 para el SSO con Filestage"
url: https://help.filestage.io/es/articles/9465130-configura-tu-inicio-de-sesion-unico-sso-a-traves-de-okta-saml-20
collection: "Configuración, compatibilidad y resolución de problemas"
updated: 2026-08-11
language: es
alternates: [en, de, fr]
---

# Configura tu inicio de sesión único (SSO) a través de Okta (SAML 2.0)

Aprende cómo establecer una conexión mediante el protocolo SAML 2.0 para el SSO con Filestage

> **Info:** Esta función está disponible en nuestro plan Enterprise, o como complemento de pago en nuestro plan Business. Si tienes alguna pregunta adicional, ponte en contacto con nuestro equipo de soporte al cliente a través de [support@filestage.io](mailto:support@filestage.io) o a través de nuestro chat.

* * *

_Con el inicio de sesión único (SSO), tu equipo accede a Filestage con la cuenta de Okta que ya usa cada día. Sin contraseñas adicionales, más seguridad y control total sobre quién puede acceder a tus proyectos - y la conexión a través de SAML 2.0 solo tarda unos minutos._

## Cómo puede ayudarte el inicio de sesión único a través de SAML 2.0

Conectar Filestage con Okta facilita el inicio de sesión a tu equipo y da a tus administradores un control centralizado del acceso:

-   **Sin contraseñas adicionales** - todos inician sesión en Filestage con su cuenta de Okta existente.
    
-   **Control de acceso centralizado** - decide en Okta quién puede acceder a Filestage y retira el acceso desde un solo lugar cuando alguien deja tu organización.
    
-   **Seguridad de nivel empresarial** - tus políticas de autenticación, como la autenticación multifactor, se aplican automáticamente a cada inicio de sesión en Filestage.
    

## Cómo configurar el SSO con SAML 2.0 (a través de Okta)

### Paso 1: Obtén tus datos SAML de Filestage

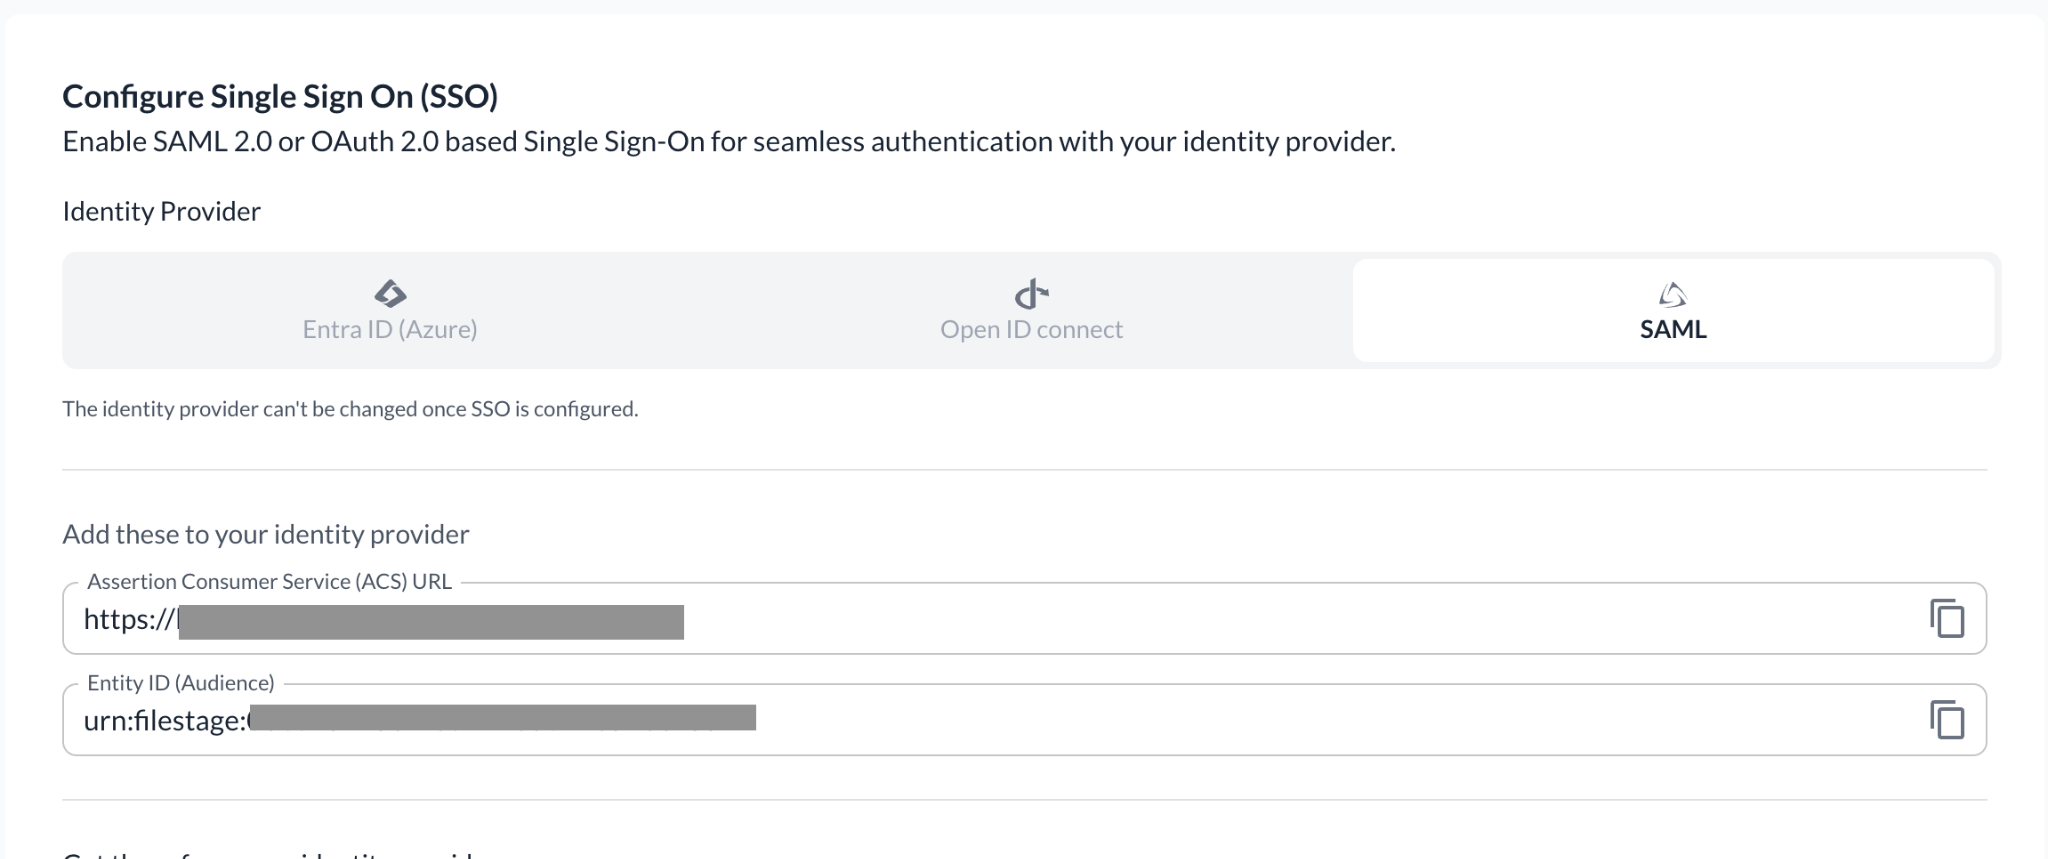
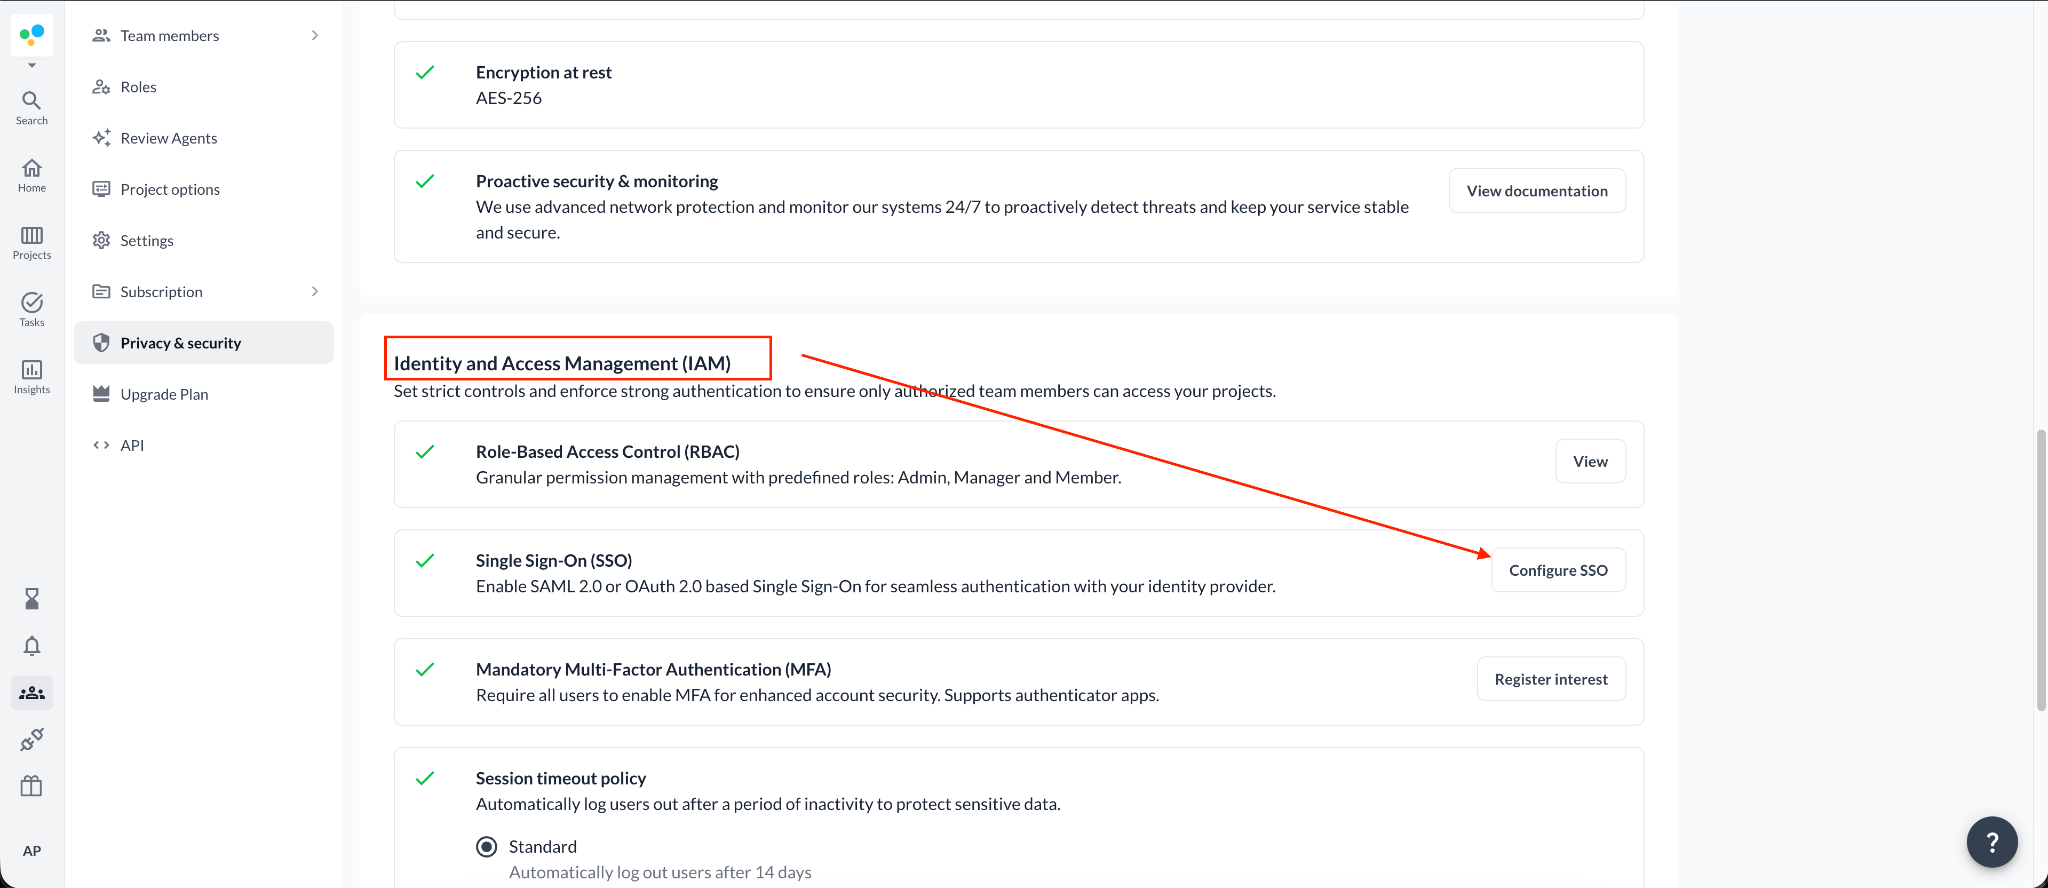
<table style="min-width: 25px;"><colgroup><col style="min-width: 25px;"></colgroup><tbody><tr><td colspan="1" rowspan="1" style="box-sizing: border-box; font-family: proxima-nova, &quot;Helvetica Neue&quot;, system-ui, &quot;Segoe UI&quot;, Roboto, Helvetica, Arial, sans-serif, &quot;Apple Color Emoji&quot;, &quot;Segoe UI Emoji&quot;, &quot;Segoe UI Symbol&quot;; line-height: 1; border: 1px solid rgba(0, 0, 0, 0.1); min-width: 100px; padding: 0.5rem; position: relative; text-align: left; vertical-align: top; margin-top: 0px;"><ol><li><p style="text-align: left;"><span style="color: rgb(0, 0, 0);">En Filestage, ve a </span><a target="_blank" rel="noopener noreferrer nofollow" class="linktype-link link" data-linktype="link" href="https://app.filestage.io/teams/security-and-privacy"><span style="color: rgb(0, 0, 0);"><u>app.filestage.io/teams/security-and-privacy</u></span></a><span style="color: rgb(0, 0, 0);"> - se abrirán los ajustes de seguridad y privacidad de tu último equipo seleccionado.</span></p></li><li><p style="text-align: left;"><span style="color: rgb(0, 0, 0);">Baja hasta la sección <strong>Identity and Access Management (IAM)</strong> y haz clic en <strong>Configure SSO</strong>.</span></p></li><li><p style="text-align: left;">Selecciona la pestaña <strong>SAML</strong>.</p></li><li><p style="text-align: left;">Copia los dos valores que aparecen bajo <strong>Add these to your identity provider</strong>: la <strong>Assertion Consumer Service (ACS) URL</strong> y el <strong>Entity ID (Audience)</strong> - necesitarás ambos en Okta.</p></li></ol><img src="https://staticfiles.gleap.io/g/KALQiXS5g2aIdtaoSbGuE4xtlQWKmSTmVK4feRV65mWgJAys0LjYo5eYVVeACjucKaLpR8Icth1.png" style="box-sizing: border-box; font-family: proxima-nova, &quot;Helvetica Neue&quot;, system-ui, &quot;Segoe UI&quot;, Roboto, Helvetica, Arial, sans-serif, &quot;Apple Color Emoji&quot;, &quot;Segoe UI Emoji&quot;, &quot;Segoe UI Symbol&quot;; line-height: 1; height: auto; width: 100%; max-width: 100%; margin-top: 24px; margin-bottom: 24px; border-radius: 8px; align-self: center; cursor: pointer;"></td></tr></tbody></table>

### Paso 2: Crea la aplicación SAML en Okta

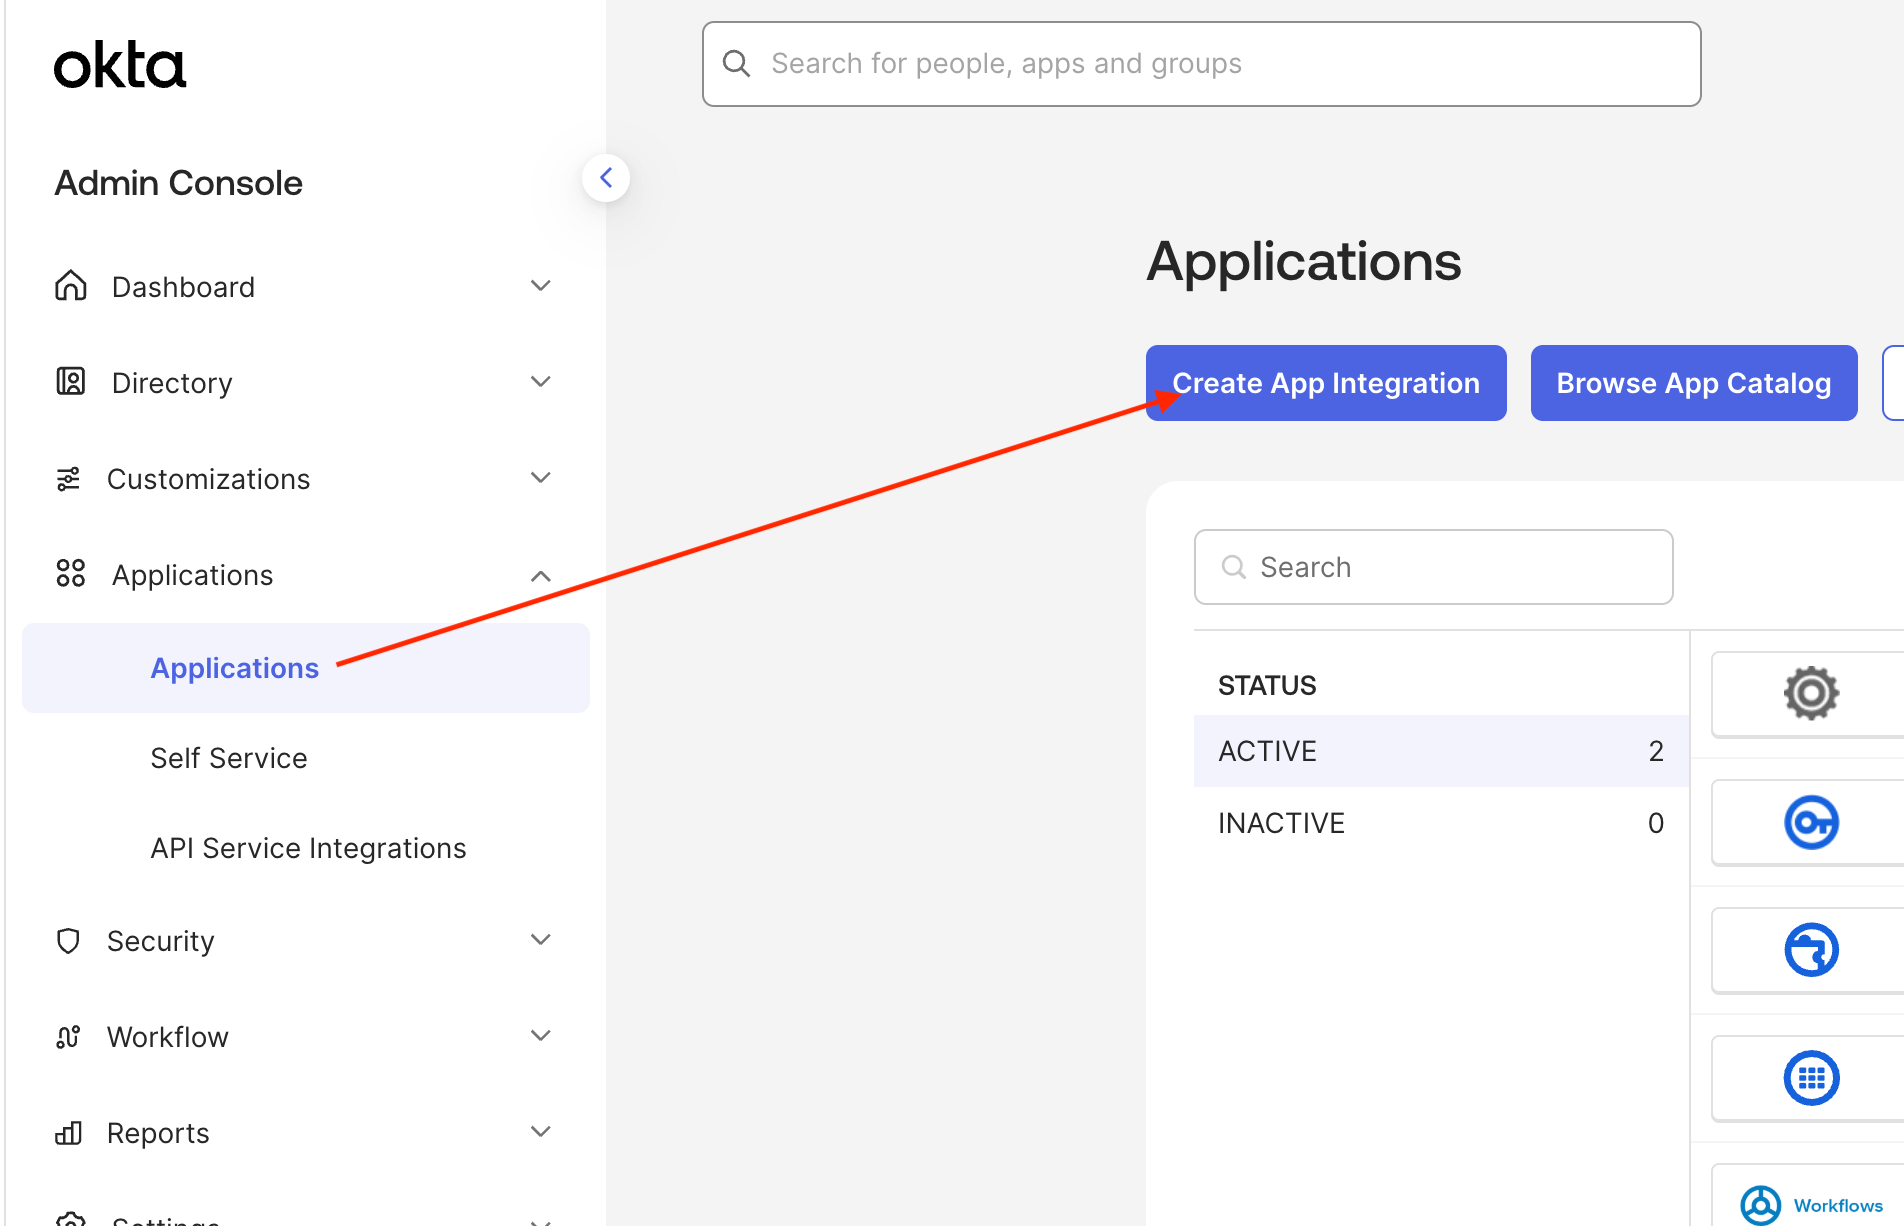
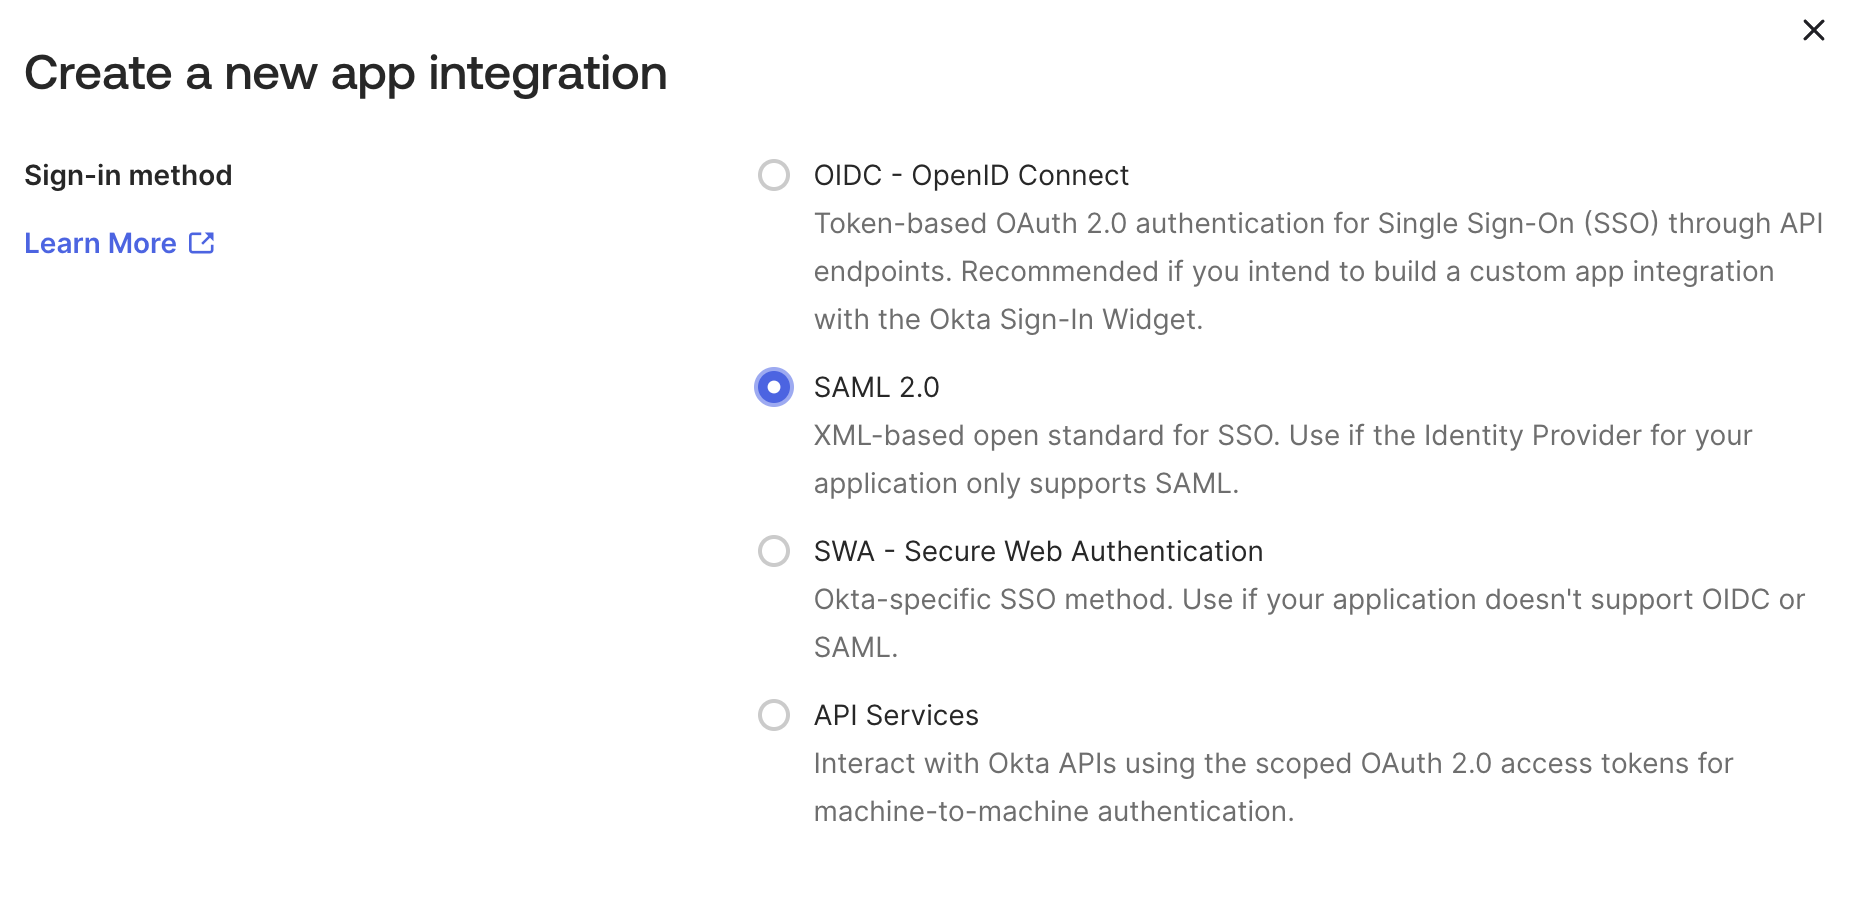
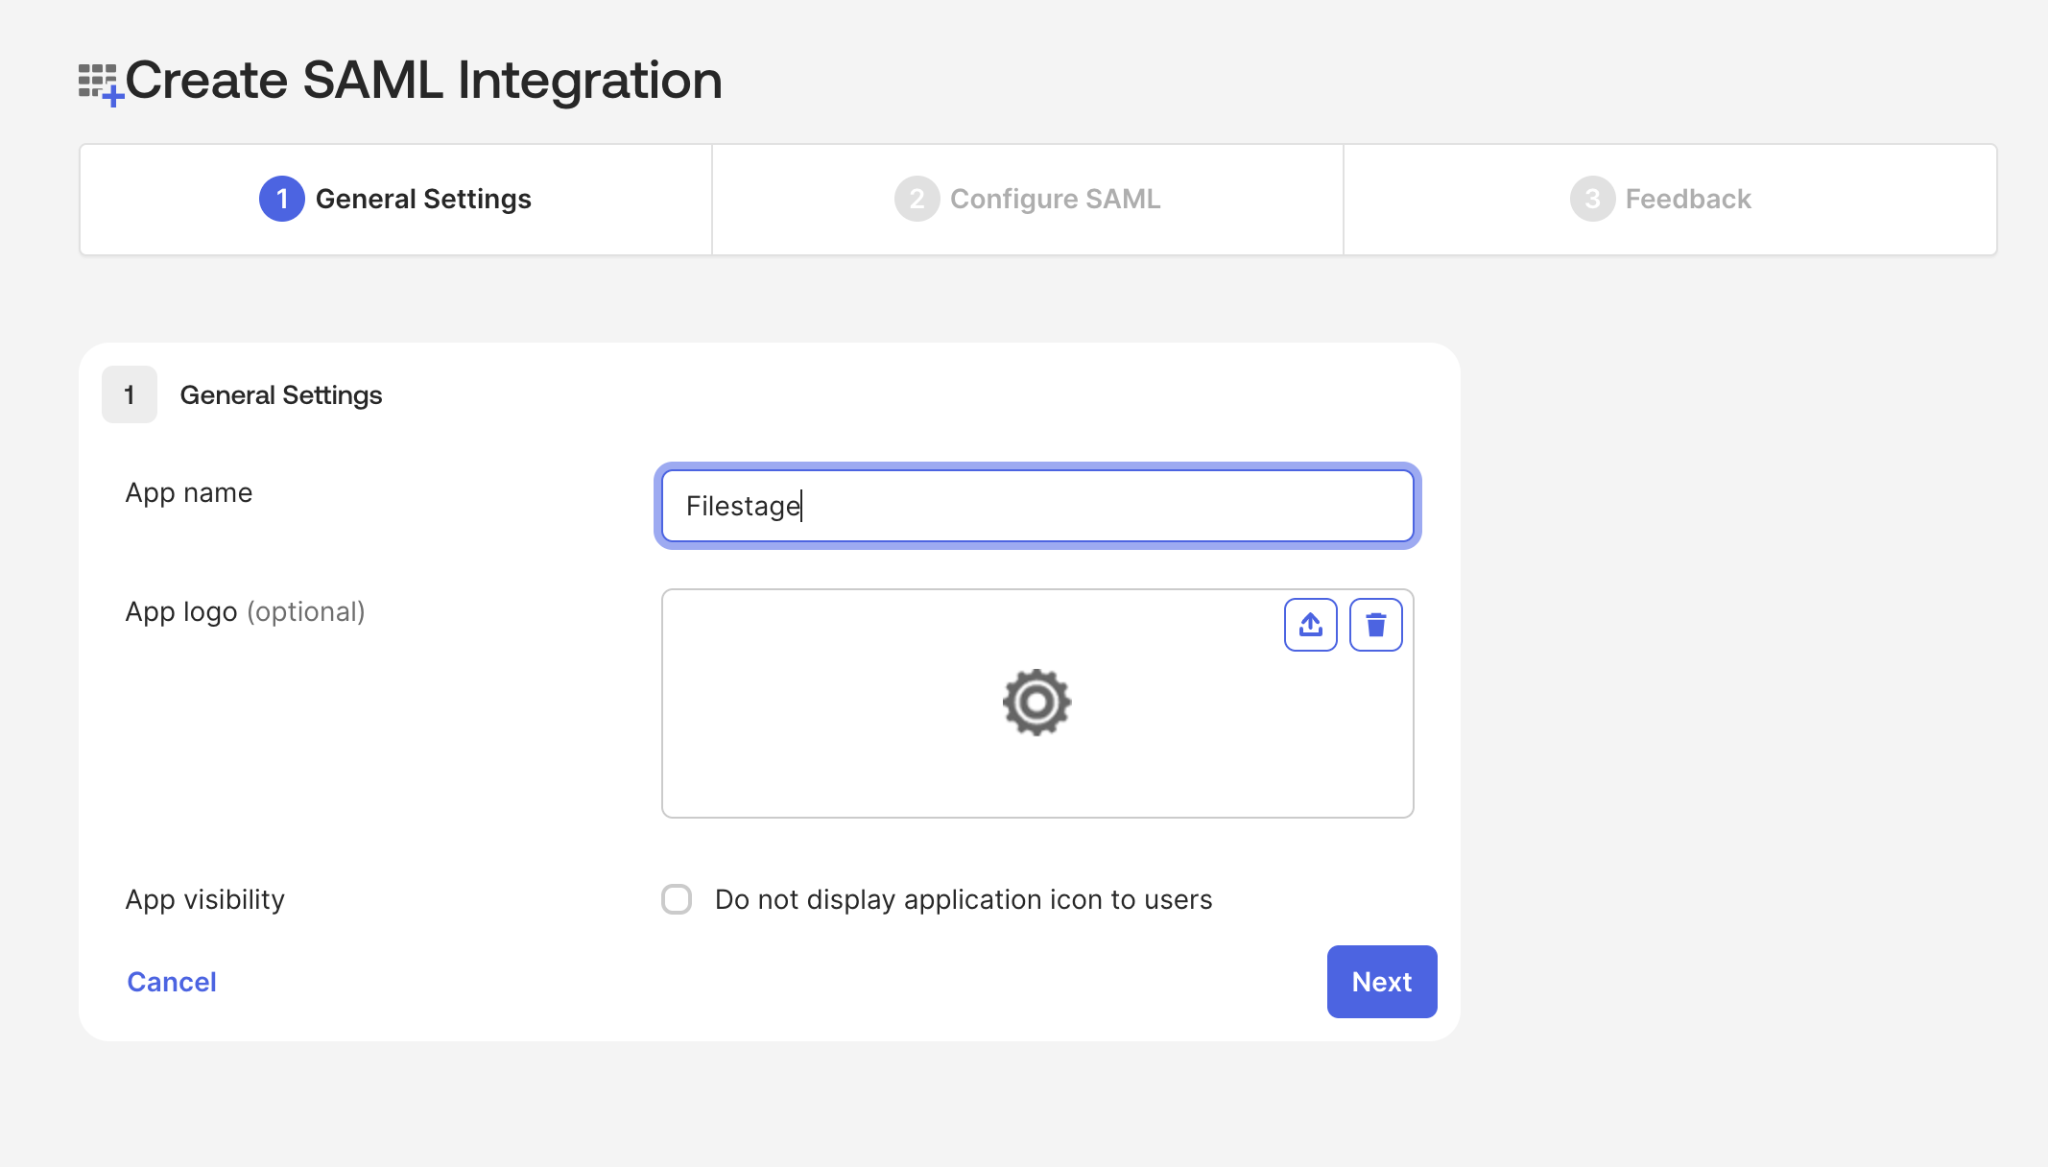
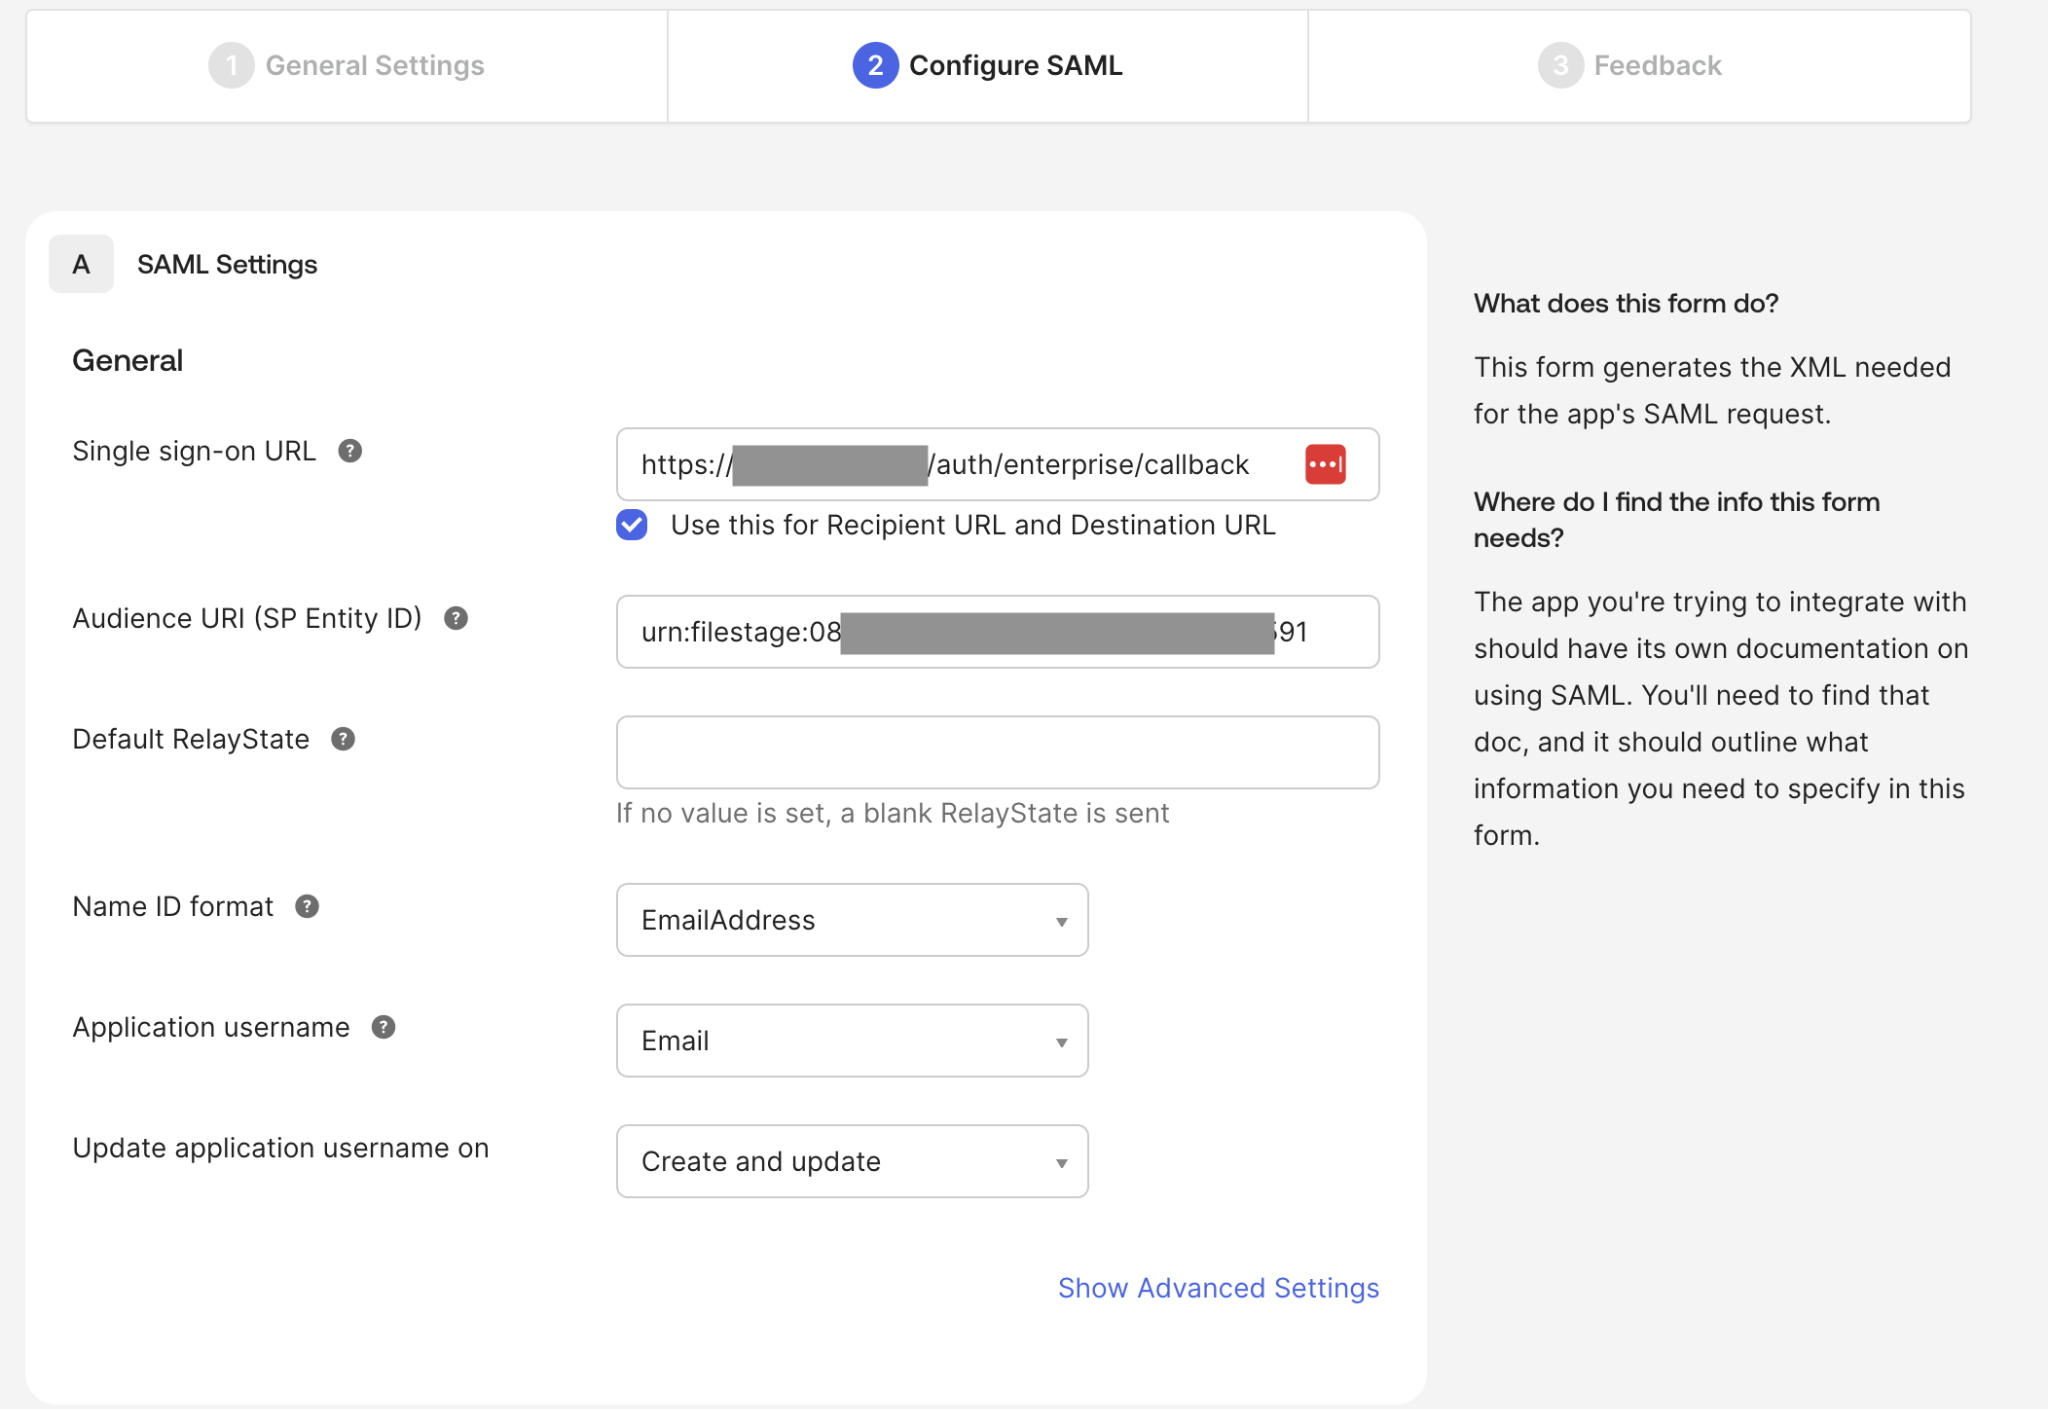
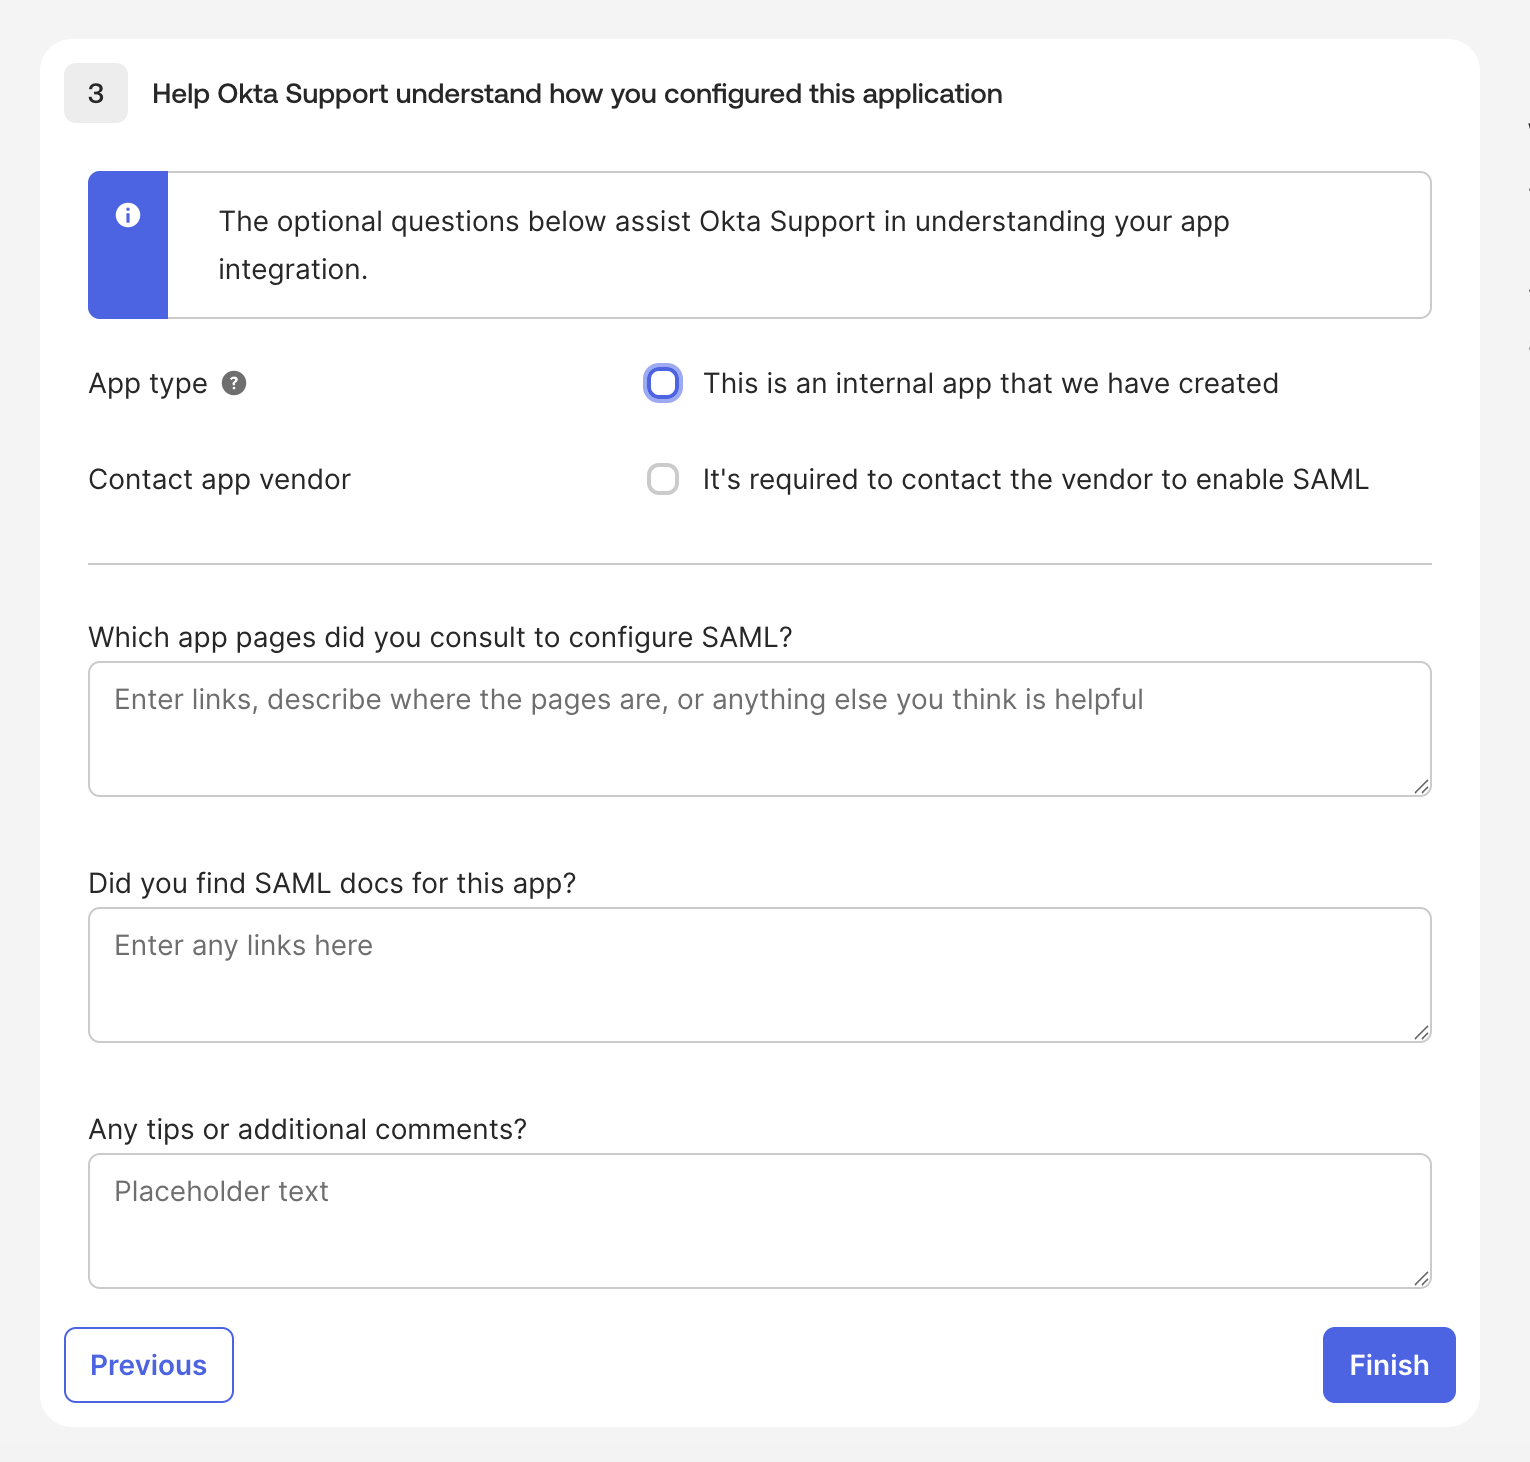
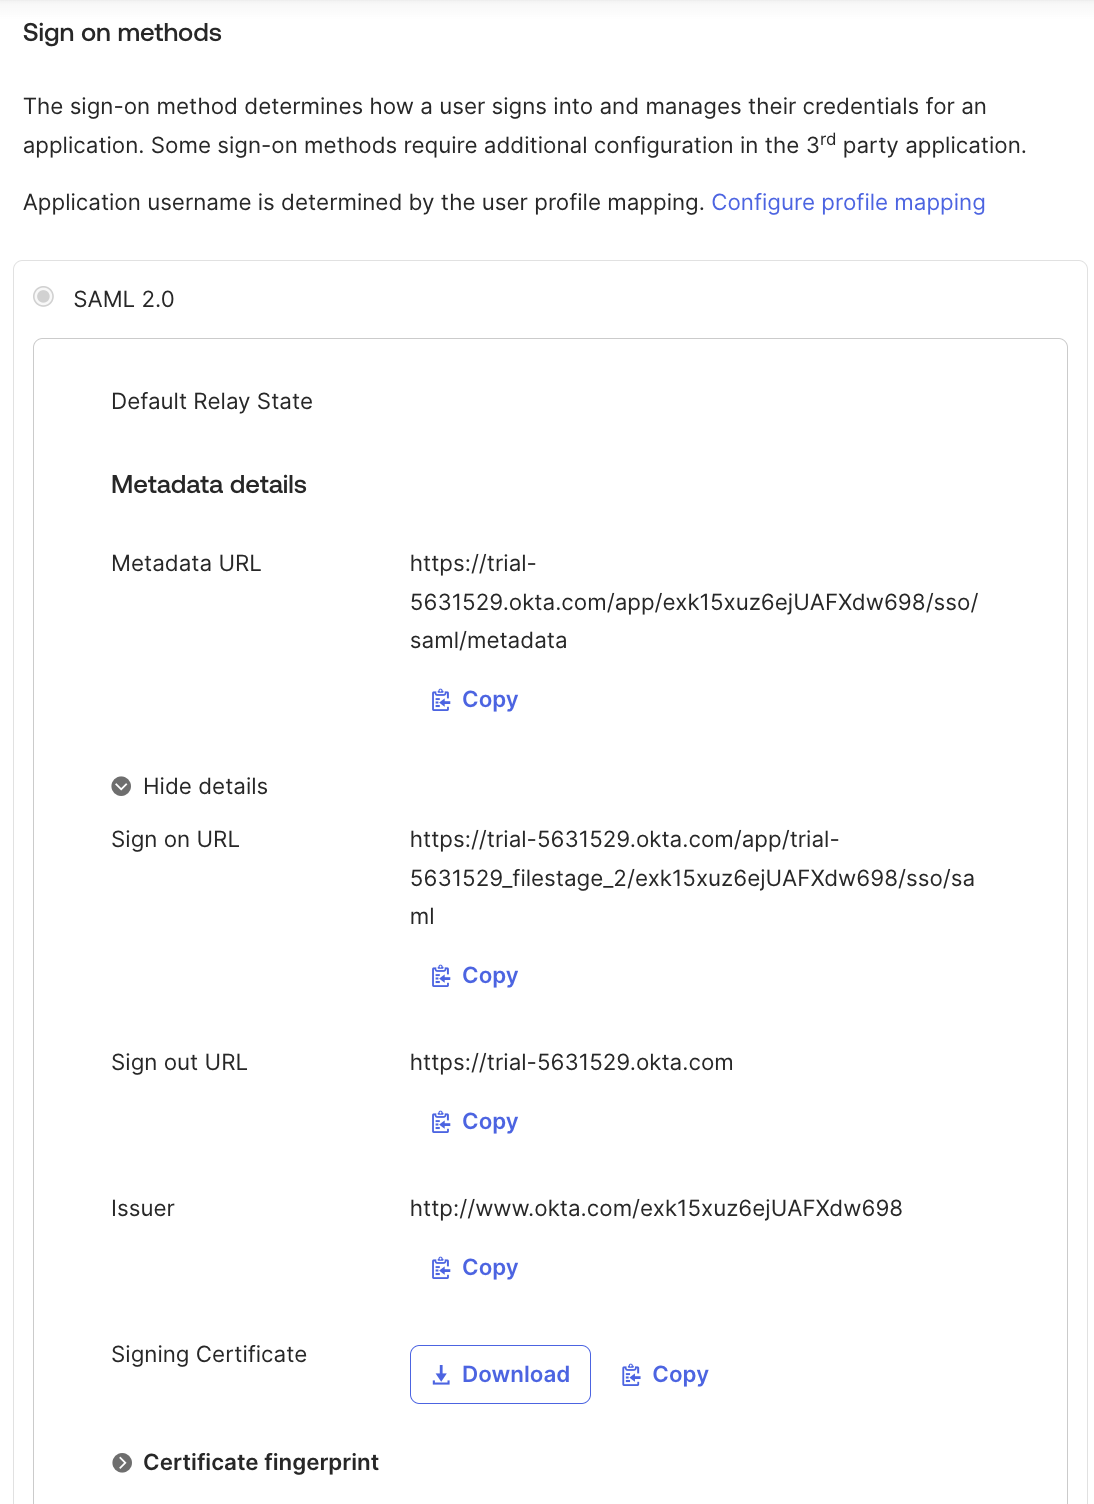
<table style="min-width: 25px;"><colgroup><col style="min-width: 25px;"></colgroup><tbody><tr><td colspan="1" rowspan="1" style="box-sizing: border-box; font-family: proxima-nova, &quot;Helvetica Neue&quot;, system-ui, &quot;Segoe UI&quot;, Roboto, Helvetica, Arial, sans-serif, &quot;Apple Color Emoji&quot;, &quot;Segoe UI Emoji&quot;, &quot;Segoe UI Symbol&quot;; line-height: 1; border: 1px solid rgba(0, 0, 0, 0.1); min-width: 100px; padding: 0.5rem; position: relative; text-align: left; vertical-align: top; margin-top: 0px;"><ol><li><p style="text-align: left;"><span style="color: rgb(0, 0, 0);">Inicia sesión en tu <strong>Okta Admin Dashboard</strong>.</span></p></li><li><p style="text-align: left;"><span style="color: rgb(0, 0, 0);">Ve a <strong>Applications &gt; Applications</strong> y haz clic en <strong>Create App Integration</strong>.</span></p></li></ol><img src="https://staticfiles.gleap.io/g/nAFaTlkBu1auWrrjdhqhYtgjm79twmf3Xu0ErKO4JFUAjATrZmzsgVfbR985PwIB4T7GmcmdnDh.png" style="box-sizing: border-box; font-family: proxima-nova, &quot;Helvetica Neue&quot;, system-ui, &quot;Segoe UI&quot;, Roboto, Helvetica, Arial, sans-serif, &quot;Apple Color Emoji&quot;, &quot;Segoe UI Emoji&quot;, &quot;Segoe UI Symbol&quot;; line-height: 1; height: auto; width: 100%; max-width: 100%; margin-top: 24px; margin-bottom: 24px; border-radius: 8px; align-self: center; cursor: pointer;"><ol start="3"><li><p style="text-align: left;">Selecciona <strong>SAML 2.0</strong> como método de inicio de sesión y haz clic en <strong>Next</strong>.</p></li></ol><img src="https://staticfiles.gleap.io/g/B9htfrznp6AzSi8vcndvoit7puwX8x1jYLihAl2l6FWS8OgDOjAmretCN9cYM4oqUfpYB1wYktB.png" style="box-sizing: border-box; font-family: proxima-nova, &quot;Helvetica Neue&quot;, system-ui, &quot;Segoe UI&quot;, Roboto, Helvetica, Arial, sans-serif, &quot;Apple Color Emoji&quot;, &quot;Segoe UI Emoji&quot;, &quot;Segoe UI Symbol&quot;; line-height: 1; height: auto; width: 100%; max-width: 100%; margin-top: 24px; margin-bottom: 24px; border-radius: 8px; align-self: center; cursor: pointer;"><ol start="4"><li><p style="text-align: left;">Introduce un <strong>App name</strong> que te ayude a identificar la aplicación (p. ej. Filestage) y haz clic en <strong>Next</strong>.</p></li></ol><img src="https://staticfiles.gleap.io/g/9eUe2Um9Ej3z7Cv51UPyI30CjaOP6iPOaXL5Orh8jrLccUy6QEBKqKQX8Y1SlwDI1CCfvfj0PnG.png" style="box-sizing: border-box; font-family: proxima-nova, &quot;Helvetica Neue&quot;, system-ui, &quot;Segoe UI&quot;, Roboto, Helvetica, Arial, sans-serif, &quot;Apple Color Emoji&quot;, &quot;Segoe UI Emoji&quot;, &quot;Segoe UI Symbol&quot;; line-height: 1; height: auto; width: 100%; max-width: 100%; margin-top: 24px; margin-bottom: 24px; border-radius: 8px; align-self: center; cursor: pointer;"><ol start="5"><li><p style="text-align: left;">En el paso Configure SAML, introduce en <strong>Single sign-on URL</strong> la <strong>Assertion Consumer Service (ACS) URL</strong> que copiaste de Filestage.</p></li><li><p style="text-align: left;">Introduce en <strong>Audience URI (SP Entity ID)</strong> el <strong>Entity ID (Audience)</strong> de Filestage.</p></li><li><p style="text-align: left;">Configura el <strong>Name ID format</strong> como <strong>EmailAddress</strong> y el <strong>Application username</strong> como <strong>Email</strong>; después haz clic en <strong>Next</strong>.</p></li></ol><img src="https://staticfiles.gleap.io/g/vfLLQejc3bJo93m4DTYcFAZY0KBgRre6fN6kQItiBa88lb7jFD3ZDcJcicCWyevZWQQwVx6OQqJ.png" style="box-sizing: border-box; font-family: proxima-nova, &quot;Helvetica Neue&quot;, system-ui, &quot;Segoe UI&quot;, Roboto, Helvetica, Arial, sans-serif, &quot;Apple Color Emoji&quot;, &quot;Segoe UI Emoji&quot;, &quot;Segoe UI Symbol&quot;; line-height: 1; height: auto; width: 100%; max-width: 100%; margin-top: 24px; margin-bottom: 24px; border-radius: 8px; align-self: center; cursor: pointer;"><ol start="8"><li><p style="text-align: left;">En el paso <strong>Feedback</strong>, todos los campos son opcionales - haz clic en <strong>Finish</strong>.</p></li></ol><img src="https://staticfiles.gleap.io/g/9MF18chzXfMLB3LsX2c03wu6l1su8KqAli5N2peuqUSm0Co2o4tCacd9guF3cOofEVeWiSI7HaJ.png" style="box-sizing: border-box; font-family: proxima-nova, &quot;Helvetica Neue&quot;, system-ui, &quot;Segoe UI&quot;, Roboto, Helvetica, Arial, sans-serif, &quot;Apple Color Emoji&quot;, &quot;Segoe UI Emoji&quot;, &quot;Segoe UI Symbol&quot;; line-height: 1; height: auto; width: 100%; max-width: 100%; margin-top: 24px; margin-bottom: 24px; border-radius: 8px; align-self: center; cursor: pointer;"><ol start="9"><li><p style="text-align: left;">Abre la aplicación que acabas de crear, ve a la pestaña <strong>Sign On</strong> y haz clic en <strong>More details</strong>.</p></li></ol><img src="https://staticfiles.gleap.io/g/eouzb3OURNA6ZUiIN81dmxFLk8YgGMDueK1VOuq0S1kebFhpqGQla7yByPsHc1fqgGETxfQU6bN.png" style="box-sizing: border-box; font-family: proxima-nova, &quot;Helvetica Neue&quot;, system-ui, &quot;Segoe UI&quot;, Roboto, Helvetica, Arial, sans-serif, &quot;Apple Color Emoji&quot;, &quot;Segoe UI Emoji&quot;, &quot;Segoe UI Symbol&quot;; line-height: 1; height: auto; width: 100%; max-width: 100%; margin-top: 24px; margin-bottom: 24px; border-radius: 8px; align-self: center; cursor: pointer;"><ol start="10"><li><p style="text-align: left;">Anota la <strong>Sign on URL</strong> y el <strong>Issuer</strong>, y descarga el <strong>Signing Certificate</strong> - los necesitarás en Filestage.</p></li></ol></td></tr></tbody></table>

### Paso 3: Configura el SSO en Filestage

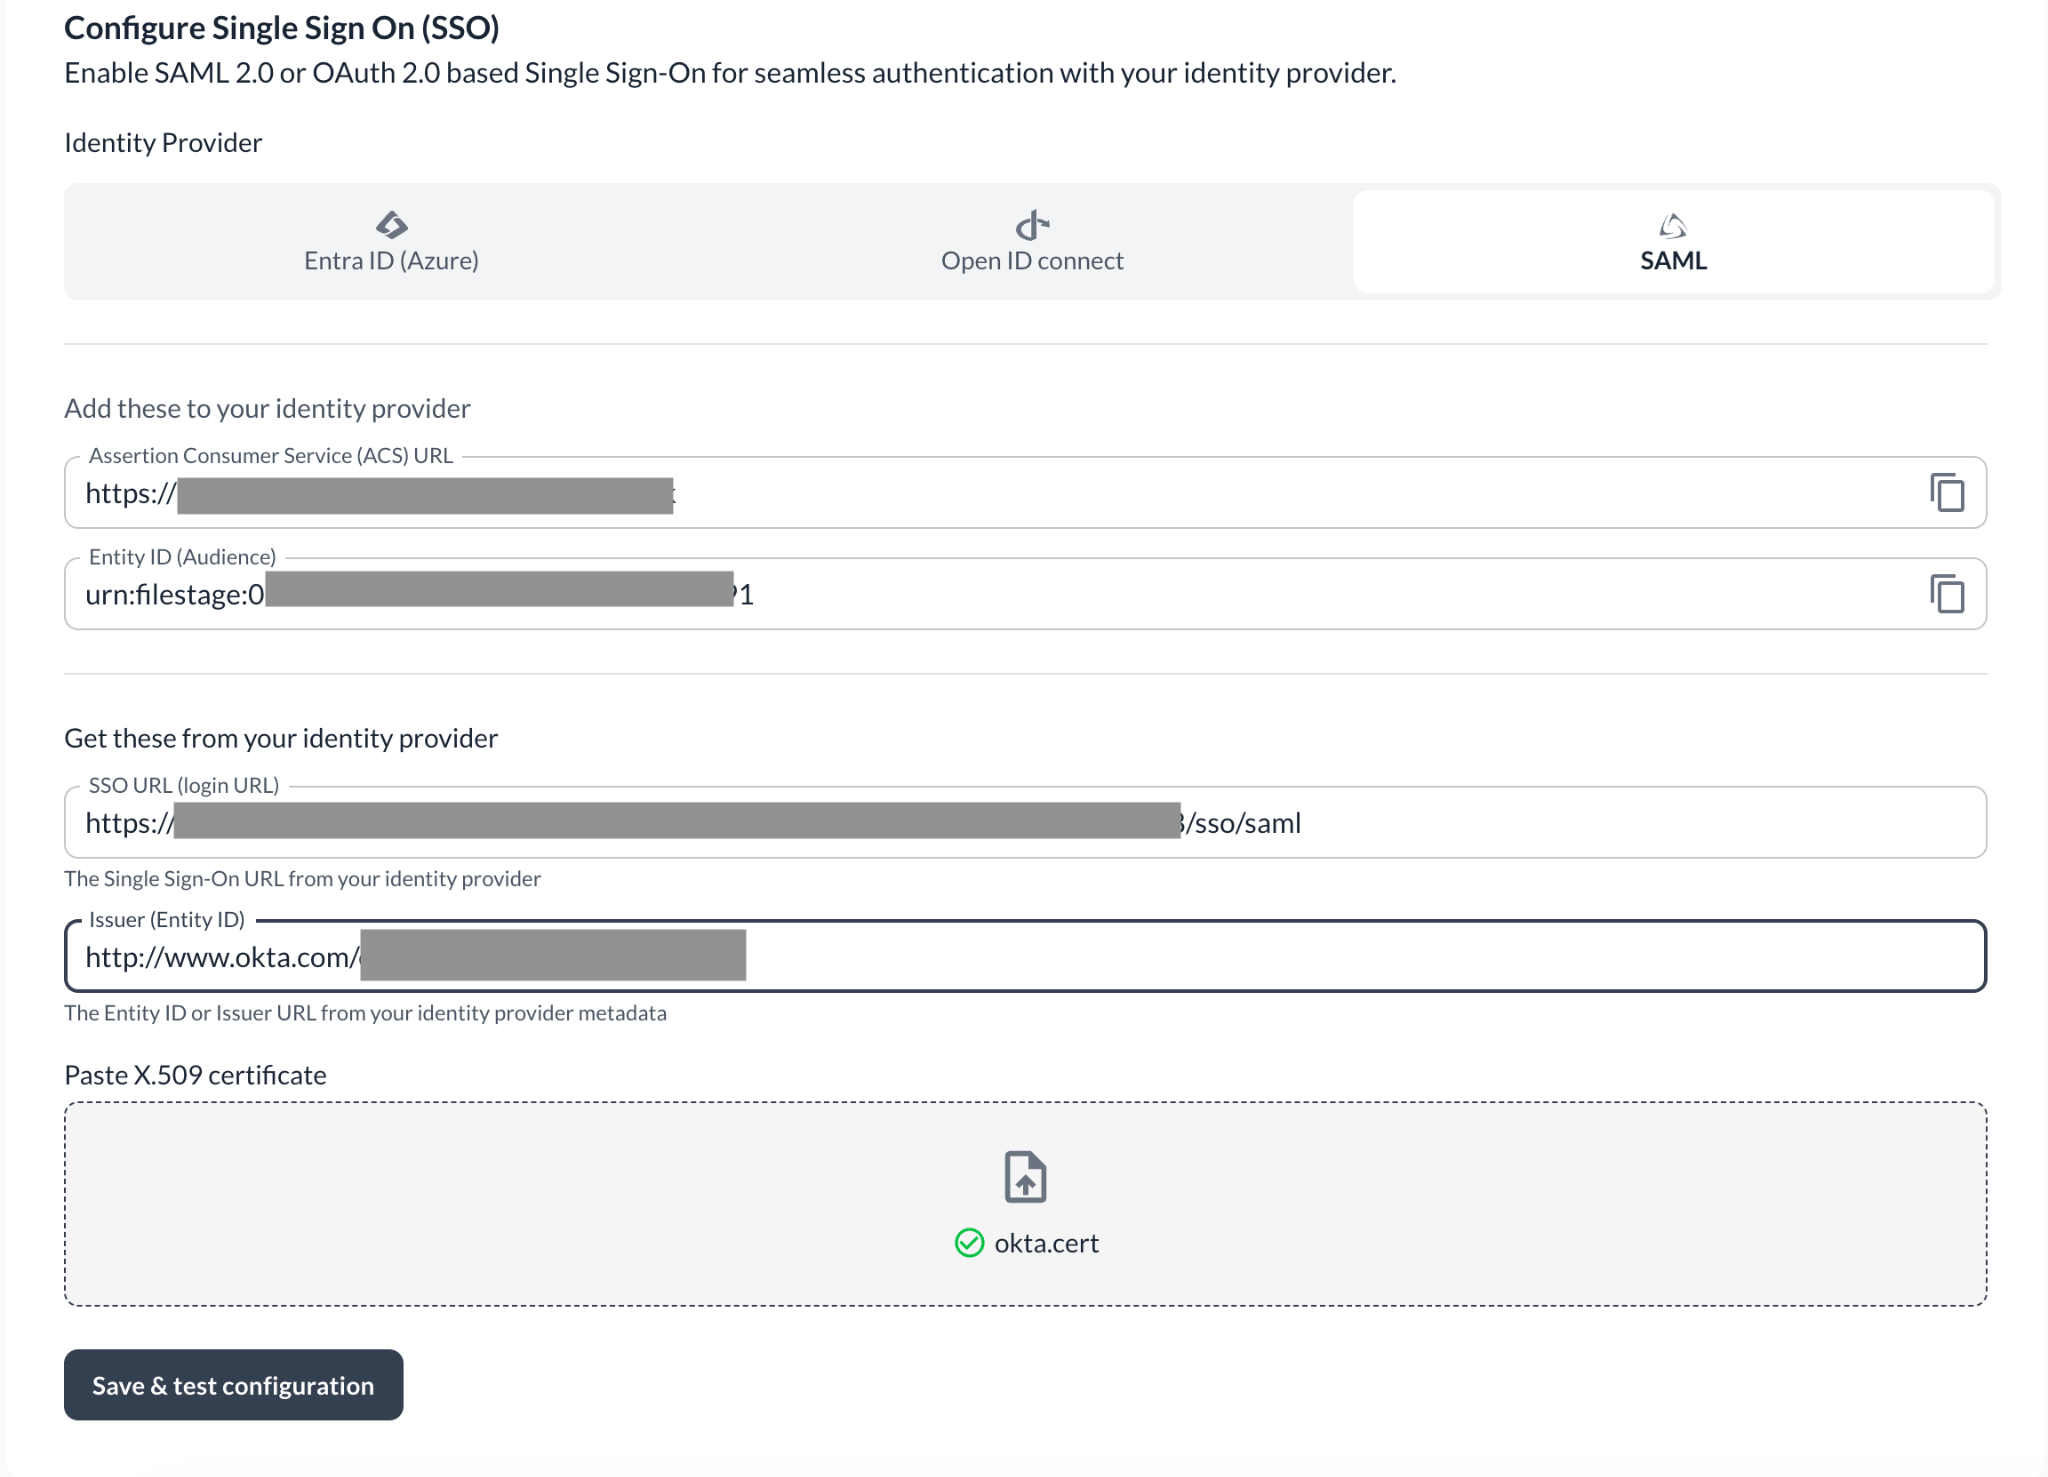
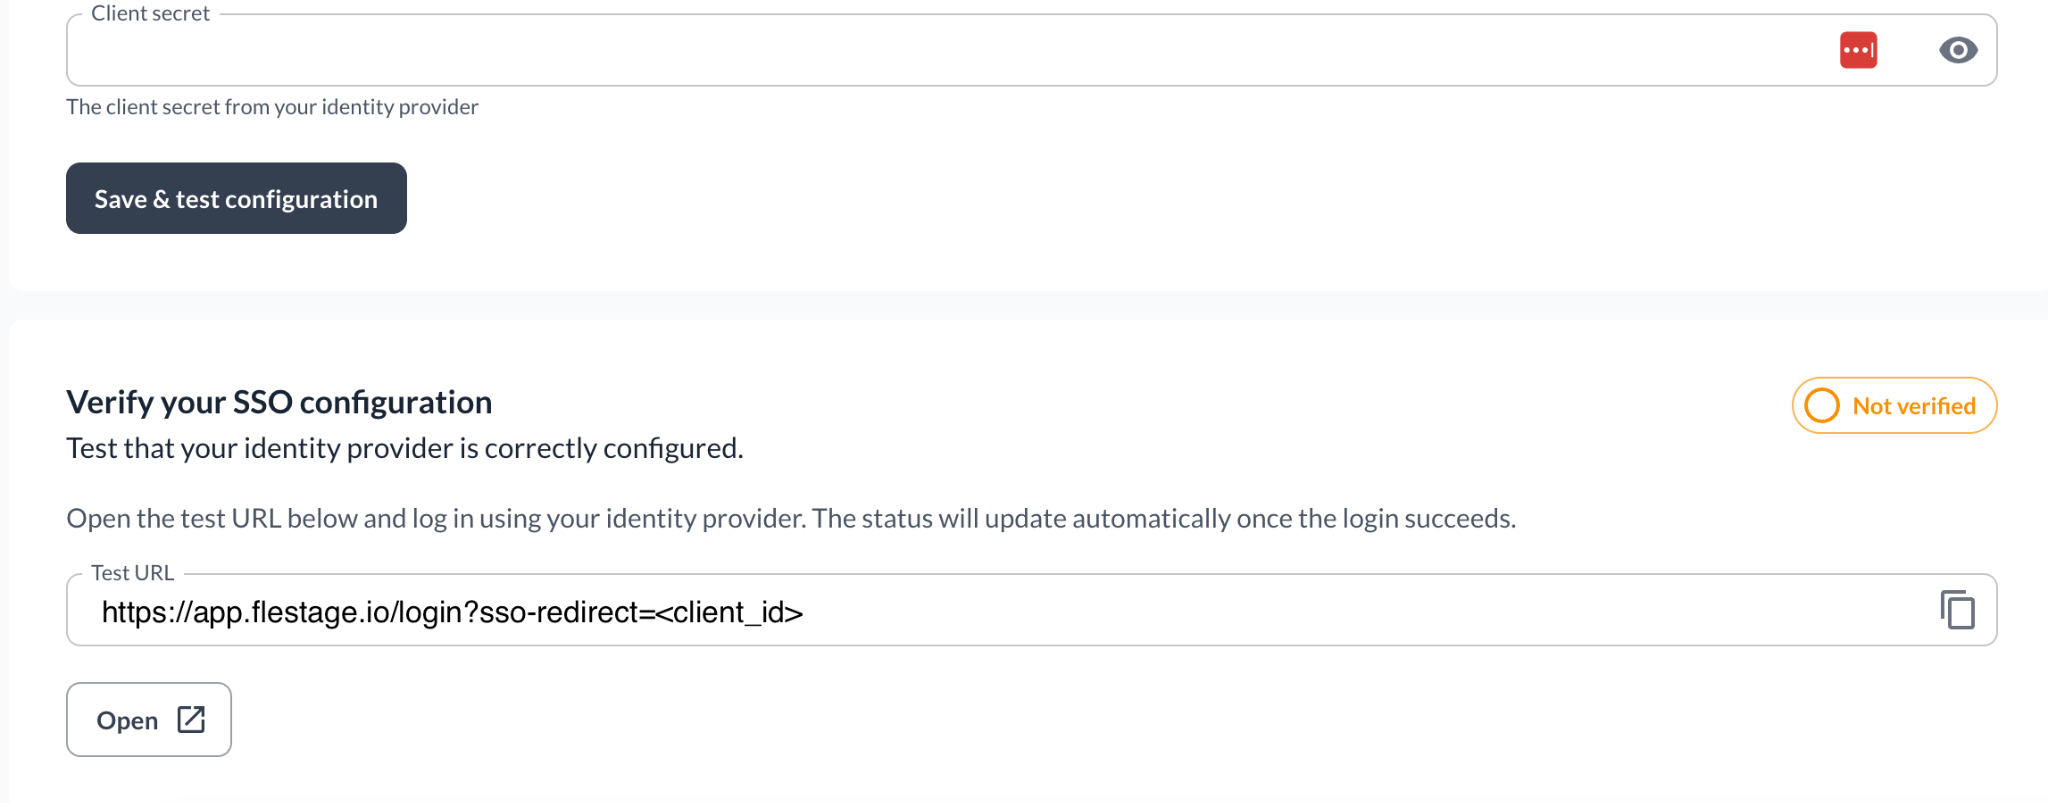
<table style="min-width: 25px;"><colgroup><col style="min-width: 25px;"></colgroup><tbody><tr><td colspan="1" rowspan="1" style="box-sizing: border-box; font-family: proxima-nova, &quot;Helvetica Neue&quot;, system-ui, &quot;Segoe UI&quot;, Roboto, Helvetica, Arial, sans-serif, &quot;Apple Color Emoji&quot;, &quot;Segoe UI Emoji&quot;, &quot;Segoe UI Symbol&quot;; line-height: 1; border: 1px solid rgba(0, 0, 0, 0.1); min-width: 100px; padding: 0.5rem; position: relative; text-align: left; vertical-align: top; margin-top: 0px;"><ol><li><p style="text-align: left;"><span style="color: rgb(0, 0, 0);">En Filestage, ve a </span><a target="_blank" rel="noopener noreferrer nofollow" class="linktype-link link" data-linktype="link" href="https://app.filestage.io/teams/security-and-privacy"><span style="color: rgb(0, 0, 0);"><u>app.filestage.io/teams/security-and-privacy</u></span></a><span style="color: rgb(0, 0, 0);"> - se abrirán los ajustes de seguridad y privacidad de tu último equipo seleccionado.</span></p></li><li><p style="text-align: left;"><span style="color: rgb(0, 0, 0);">Baja hasta la sección <strong>Identity and Access Management (IAM)</strong> y haz clic en <strong>Configure SSO</strong>.</span></p></li></ol><img src="https://staticfiles.gleap.io/g/uE3ZMLWr50g1O2UL8pfxYZg5b7UUg4UfAZpOjKYULiy8fqbC6uIydXI6AGCeFtL2gKjfRLpxd8U.png" style="box-sizing: border-box; font-family: proxima-nova, &quot;Helvetica Neue&quot;, system-ui, &quot;Segoe UI&quot;, Roboto, Helvetica, Arial, sans-serif, &quot;Apple Color Emoji&quot;, &quot;Segoe UI Emoji&quot;, &quot;Segoe UI Symbol&quot;; line-height: 1; height: auto; width: 100%; max-width: 100%; margin-top: 24px; margin-bottom: 24px; border-radius: 8px; align-self: center; cursor: pointer;"><ol start="3"><li><p style="text-align: left;">Selecciona la opción <strong>SAML</strong>.</p></li><li><p style="text-align: left;">Introduce los datos que copiaste de Okta: pega la <strong>Sign on URL</strong> en <strong>SSO URL (login URL)</strong>, el <strong>Issuer</strong> en <strong>Issuer (Entity ID)</strong>, y sube el archivo del <strong>Signing certificate</strong>.</p></li></ol><img src="https://staticfiles.gleap.io/g/iqrRZQiHrzCNHQ3RfzCvMoNTR8xaRg1xUdKel3Z4R2tjWr3DcpVyXMi9ennuiadD7sNzJjkeBsV.png" style="box-sizing: border-box; font-family: proxima-nova, &quot;Helvetica Neue&quot;, system-ui, &quot;Segoe UI&quot;, Roboto, Helvetica, Arial, sans-serif, &quot;Apple Color Emoji&quot;, &quot;Segoe UI Emoji&quot;, &quot;Segoe UI Symbol&quot;; line-height: 1; height: auto; width: 100%; max-width: 100%; margin-top: 24px; margin-bottom: 24px; border-radius: 8px; align-self: center; cursor: pointer;"><ol start="5"><li><p style="text-align: left;"><span style="color: rgb(0, 0, 0);">Haz clic en <strong>Save &amp; test configuration</strong> - la sección de verificación aparecerá al final de la página.</span></p></li></ol><img src="https://staticfiles.gleap.io/g/bn7BlirgMI0sxZtbi1qB1qeaaWHtSFUTVRoEHVS1wuMCQsNiR3MaUiZwxZwPtoTbX8OZyqyn3Am.png" style="box-sizing: border-box; font-family: proxima-nova, &quot;Helvetica Neue&quot;, system-ui, &quot;Segoe UI&quot;, Roboto, Helvetica, Arial, sans-serif, &quot;Apple Color Emoji&quot;, &quot;Segoe UI Emoji&quot;, &quot;Segoe UI Symbol&quot;; line-height: 1; height: auto; width: 100%; max-width: 100%; margin-top: 24px; margin-bottom: 24px; border-radius: 8px; align-self: center; cursor: pointer;"></td></tr></tbody></table>

### Paso 4: Verifica tu configuración de SSO

> **Warning:** Una vez completada la verificación con éxito, todos los miembros de tu equipo tendrán que iniciar sesión en Filestage únicamente a través de SSO.

<table style="min-width: 25px;"><colgroup><col style="min-width: 25px;"></colgroup><tbody><tr><td colspan="1" rowspan="1" style="box-sizing: border-box; font-family: proxima-nova, &quot;Helvetica Neue&quot;, system-ui, &quot;Segoe UI&quot;, Roboto, Helvetica, Arial, sans-serif, &quot;Apple Color Emoji&quot;, &quot;Segoe UI Emoji&quot;, &quot;Segoe UI Symbol&quot;; line-height: 1; border: 1px solid rgba(0, 0, 0, 0.1); min-width: 100px; padding: 0.5rem; position: relative; text-align: left; vertical-align: top; margin-top: 0px;"><ol><li><p style="text-align: left;"><span style="color: rgb(0, 0, 0);">Copia la <strong>Test URL</strong> de la sección de verificación.</span></p></li><li><p style="text-align: left;"><span style="color: rgb(0, 0, 0);">Cierra sesión en Filestage o abre la URL de prueba en una ventana de incógnito de tu navegador.</span></p></li><li><p style="text-align: left;"><span style="color: rgb(0, 0, 0);">Inicia sesión a través de tu proveedor de identidad. Si todo está configurado correctamente, el estado cambia a <strong>Verified</strong> y verás esta confirmación:</span></p></li></ol><img src="https://staticfiles.gleap.io/g/oACzy4fPlG5d8AxR7DscdsQsJGecEGLKe5mfhnNmlGUlkfbTITLVpdktcOViscnfgvObVfGNacG.png" style="box-sizing: border-box; font-family: proxima-nova, &quot;Helvetica Neue&quot;, system-ui, &quot;Segoe UI&quot;, Roboto, Helvetica, Arial, sans-serif, &quot;Apple Color Emoji&quot;, &quot;Segoe UI Emoji&quot;, &quot;Segoe UI Symbol&quot;; line-height: 1; height: auto; width: 100%; max-width: 100%; margin-top: 24px; margin-bottom: 24px; border-radius: 8px; align-self: center; cursor: pointer;"></td></tr></tbody></table>

Y eso es todo - a partir de ahora, los miembros de tu equipo inician sesión en Filestage a través de tu proveedor de identidad.

💡 ¿Qué sigue? Cuando termines, echa un vistazo a cómo [gestionar a los miembros de tu equipo](https://help.filestage.io/es/articles/9465096-understand-and-manage-team-members.md).

Si tienes cualquier pregunta, escríbenos por el chat o envíanos un correo a [support@filestage.io](mailto:support@filestage.io). ¡Estamos encantados de ayudarte!