---
title: "Configura tu inicio de sesión único (SSO) a través de Okta (OpenID Connect)"
description: "Aprende cómo establecer una conexión mediante el protocolo OpenID Connect para el SSO con Filestage"
url: https://help.filestage.io/es/articles/9465128-configura-tu-inicio-de-sesion-unico-sso-a-traves-de-okta-openid-connect
collection: "Configuración, compatibilidad y resolución de problemas"
updated: 2026-08-11
language: es
alternates: [en, de, fr]
---

# Configura tu inicio de sesión único (SSO) a través de Okta (OpenID Connect)

Aprende cómo establecer una conexión mediante el protocolo OpenID Connect para el SSO con Filestage

> **Info:** Esta función está disponible en nuestro plan Enterprise, o como complemento de pago en nuestro plan Business. Si tienes alguna pregunta adicional, ponte en contacto con nuestro equipo de soporte al cliente a través de [support@filestage.io](mailto:support@filestage.io) o a través de nuestro chat.

* * *

_Con el inicio de sesión único (SSO), tu equipo accede a Filestage con la cuenta de Okta que ya usa cada día. Sin contraseñas adicionales, más seguridad y control total sobre quién puede acceder a tus proyectos - y la conexión a través de OpenID Connect solo tarda unos minutos._

## Cómo puede ayudarte el inicio de sesión único a través de OpenID Connect

Conectar Filestage con Okta facilita el inicio de sesión a tu equipo y da a tus administradores un control centralizado del acceso:

-   **Sin contraseñas adicionales** - todos inician sesión en Filestage con su cuenta de Okta existente.
    
-   **Control de acceso centralizado** - decide en Okta quién puede acceder a Filestage y retira el acceso desde un solo lugar cuando alguien deja tu organización.
    
-   **Seguridad de nivel empresarial** - tus políticas de autenticación, como la autenticación multifactor, se aplican automáticamente a cada inicio de sesión en Filestage.
    

## Cómo configurar el SSO con OpenID Connect (a través de Okta)

### Paso 1: Crea la integración de la aplicación en Okta

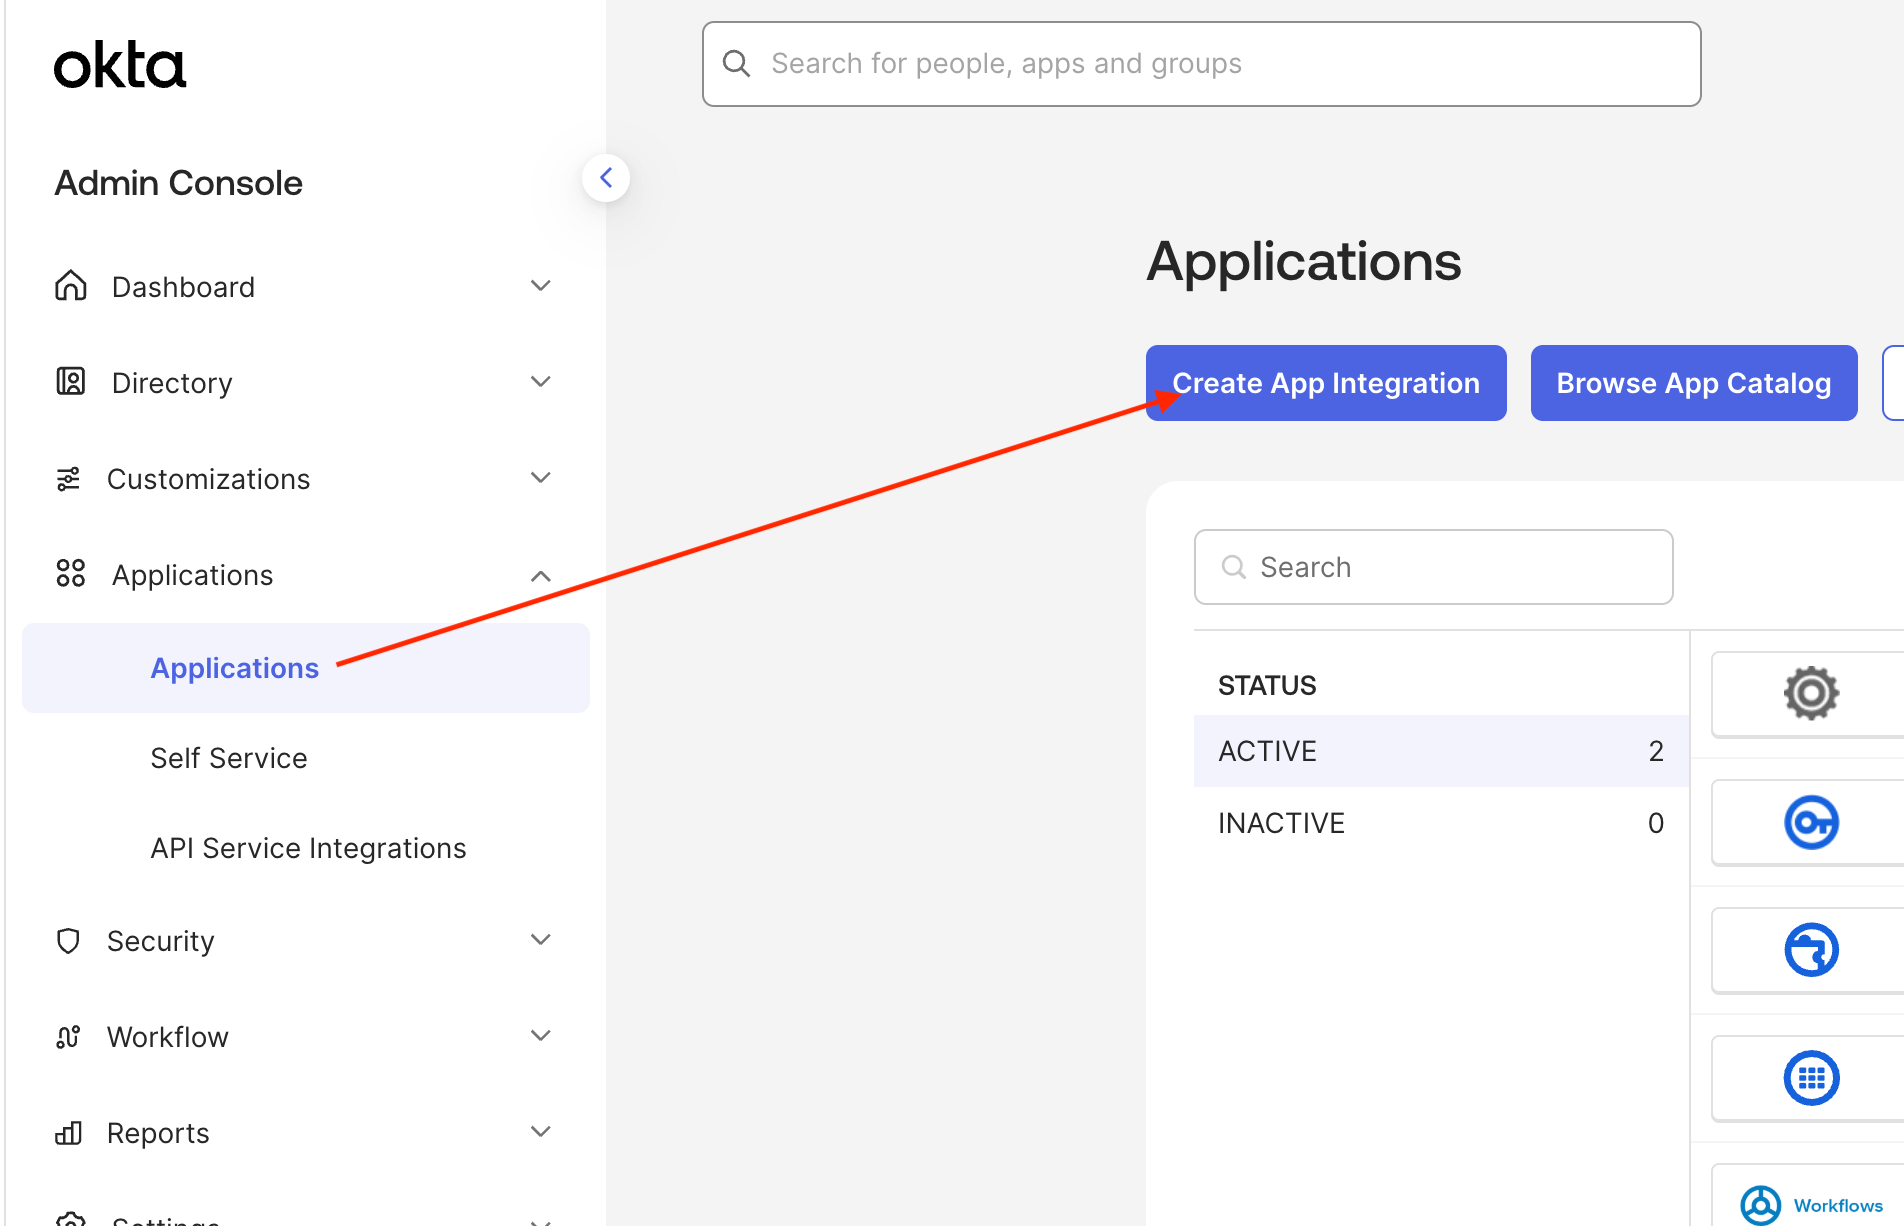
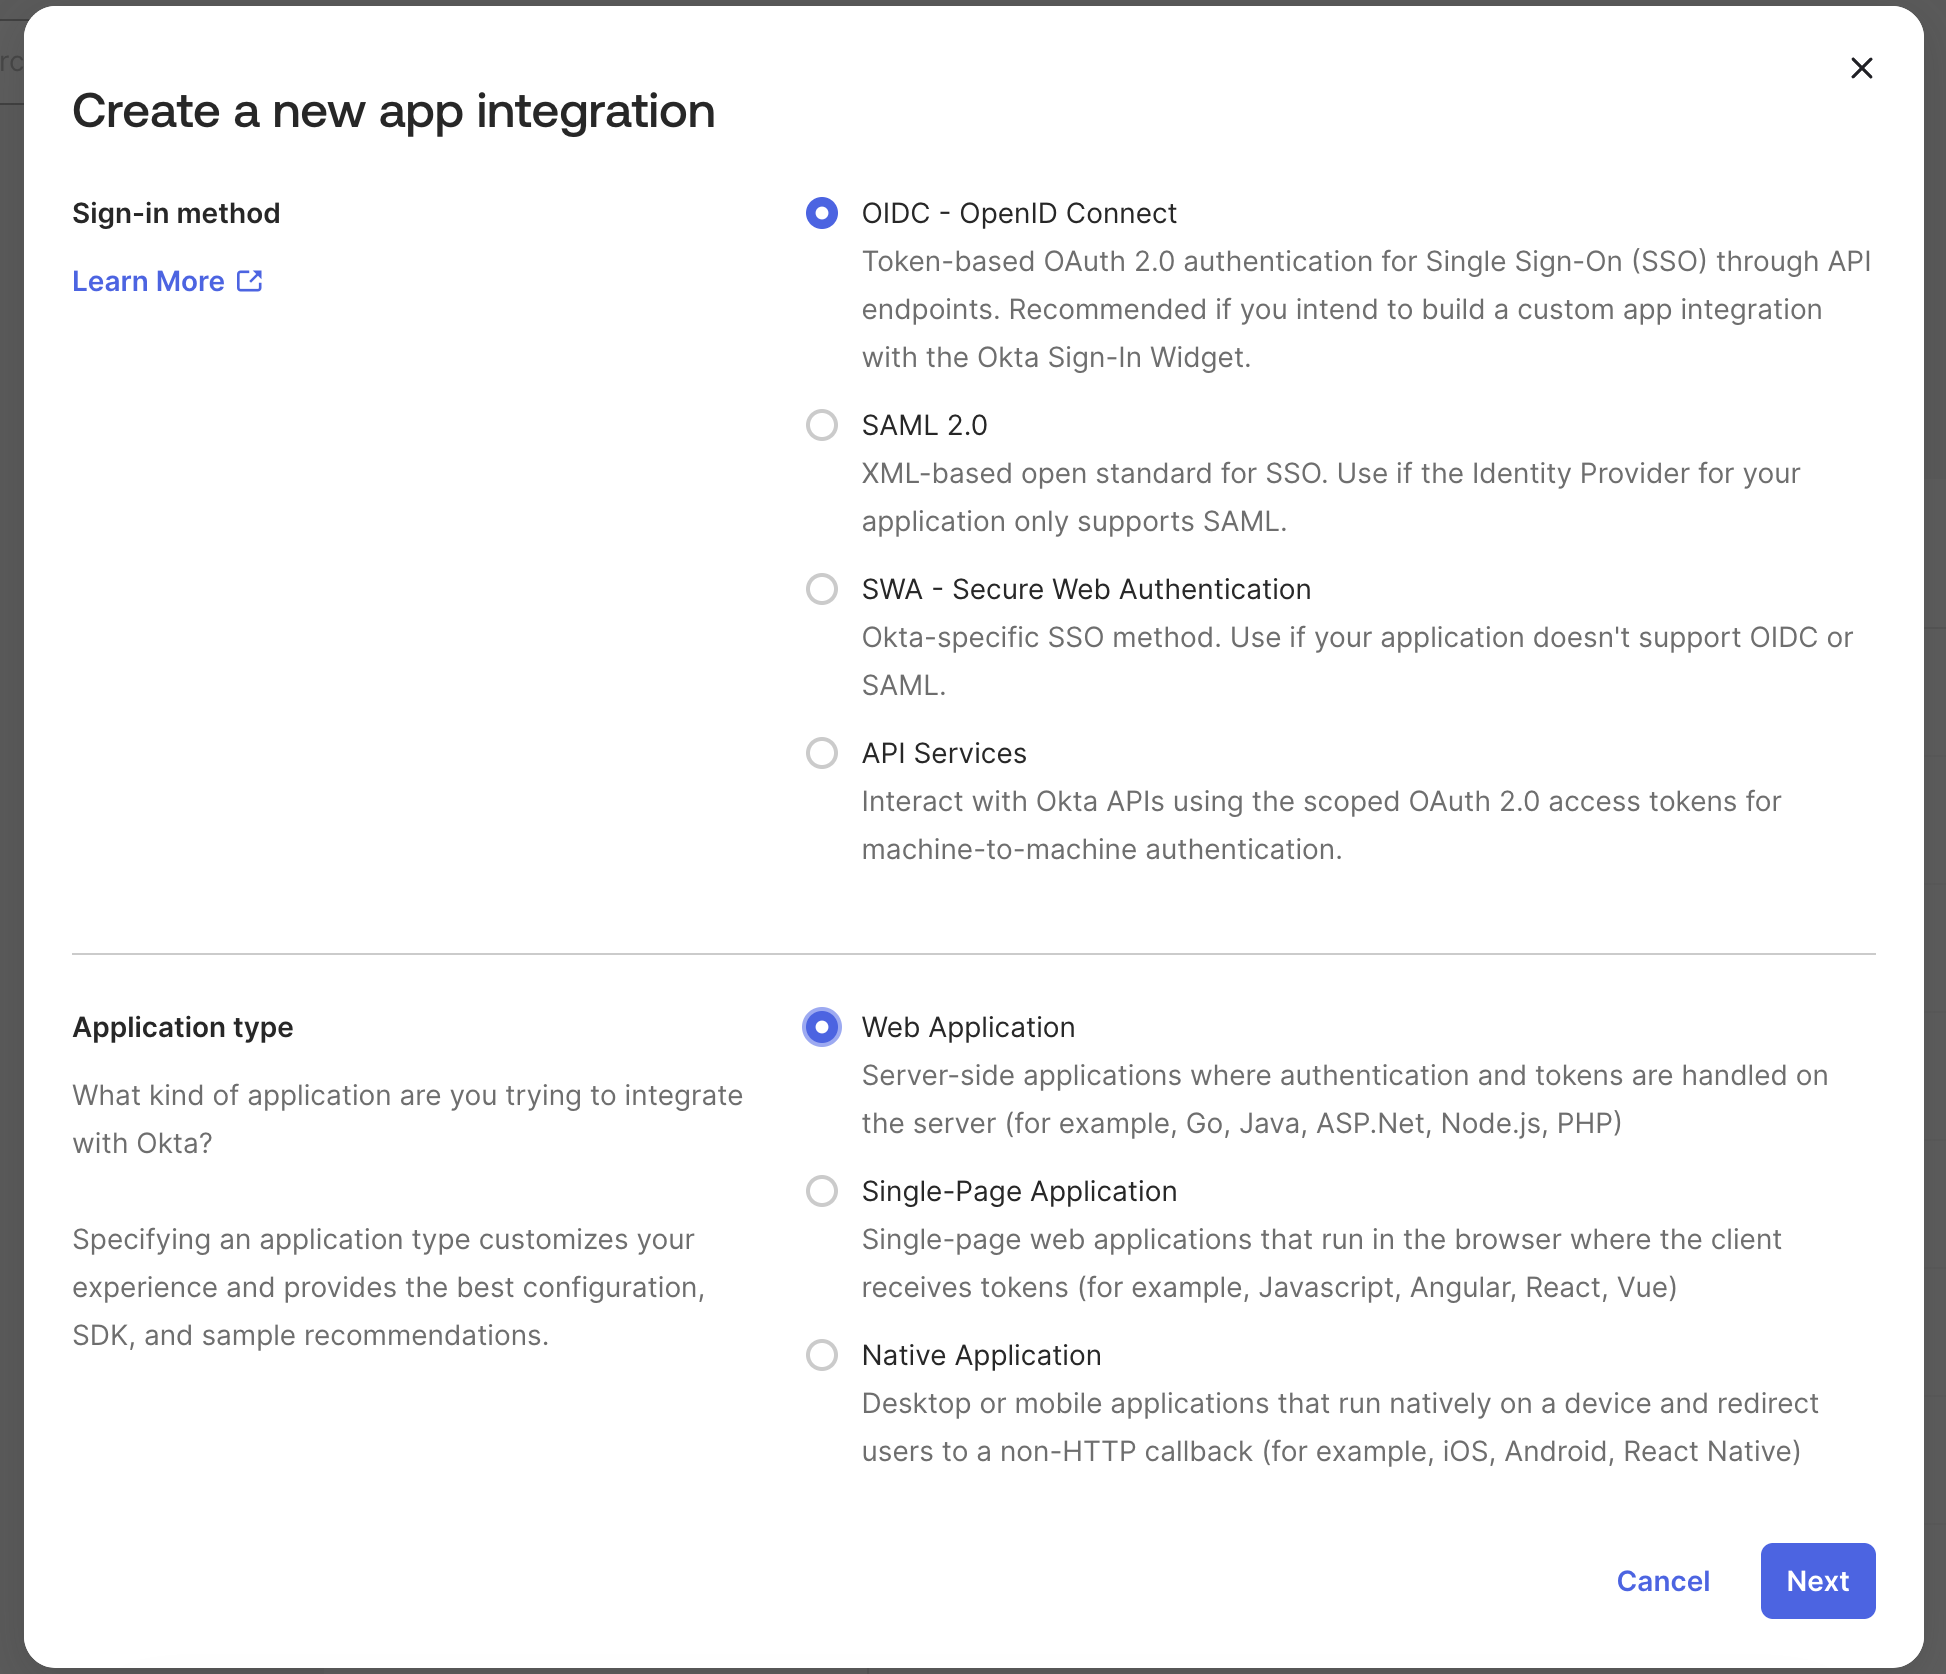
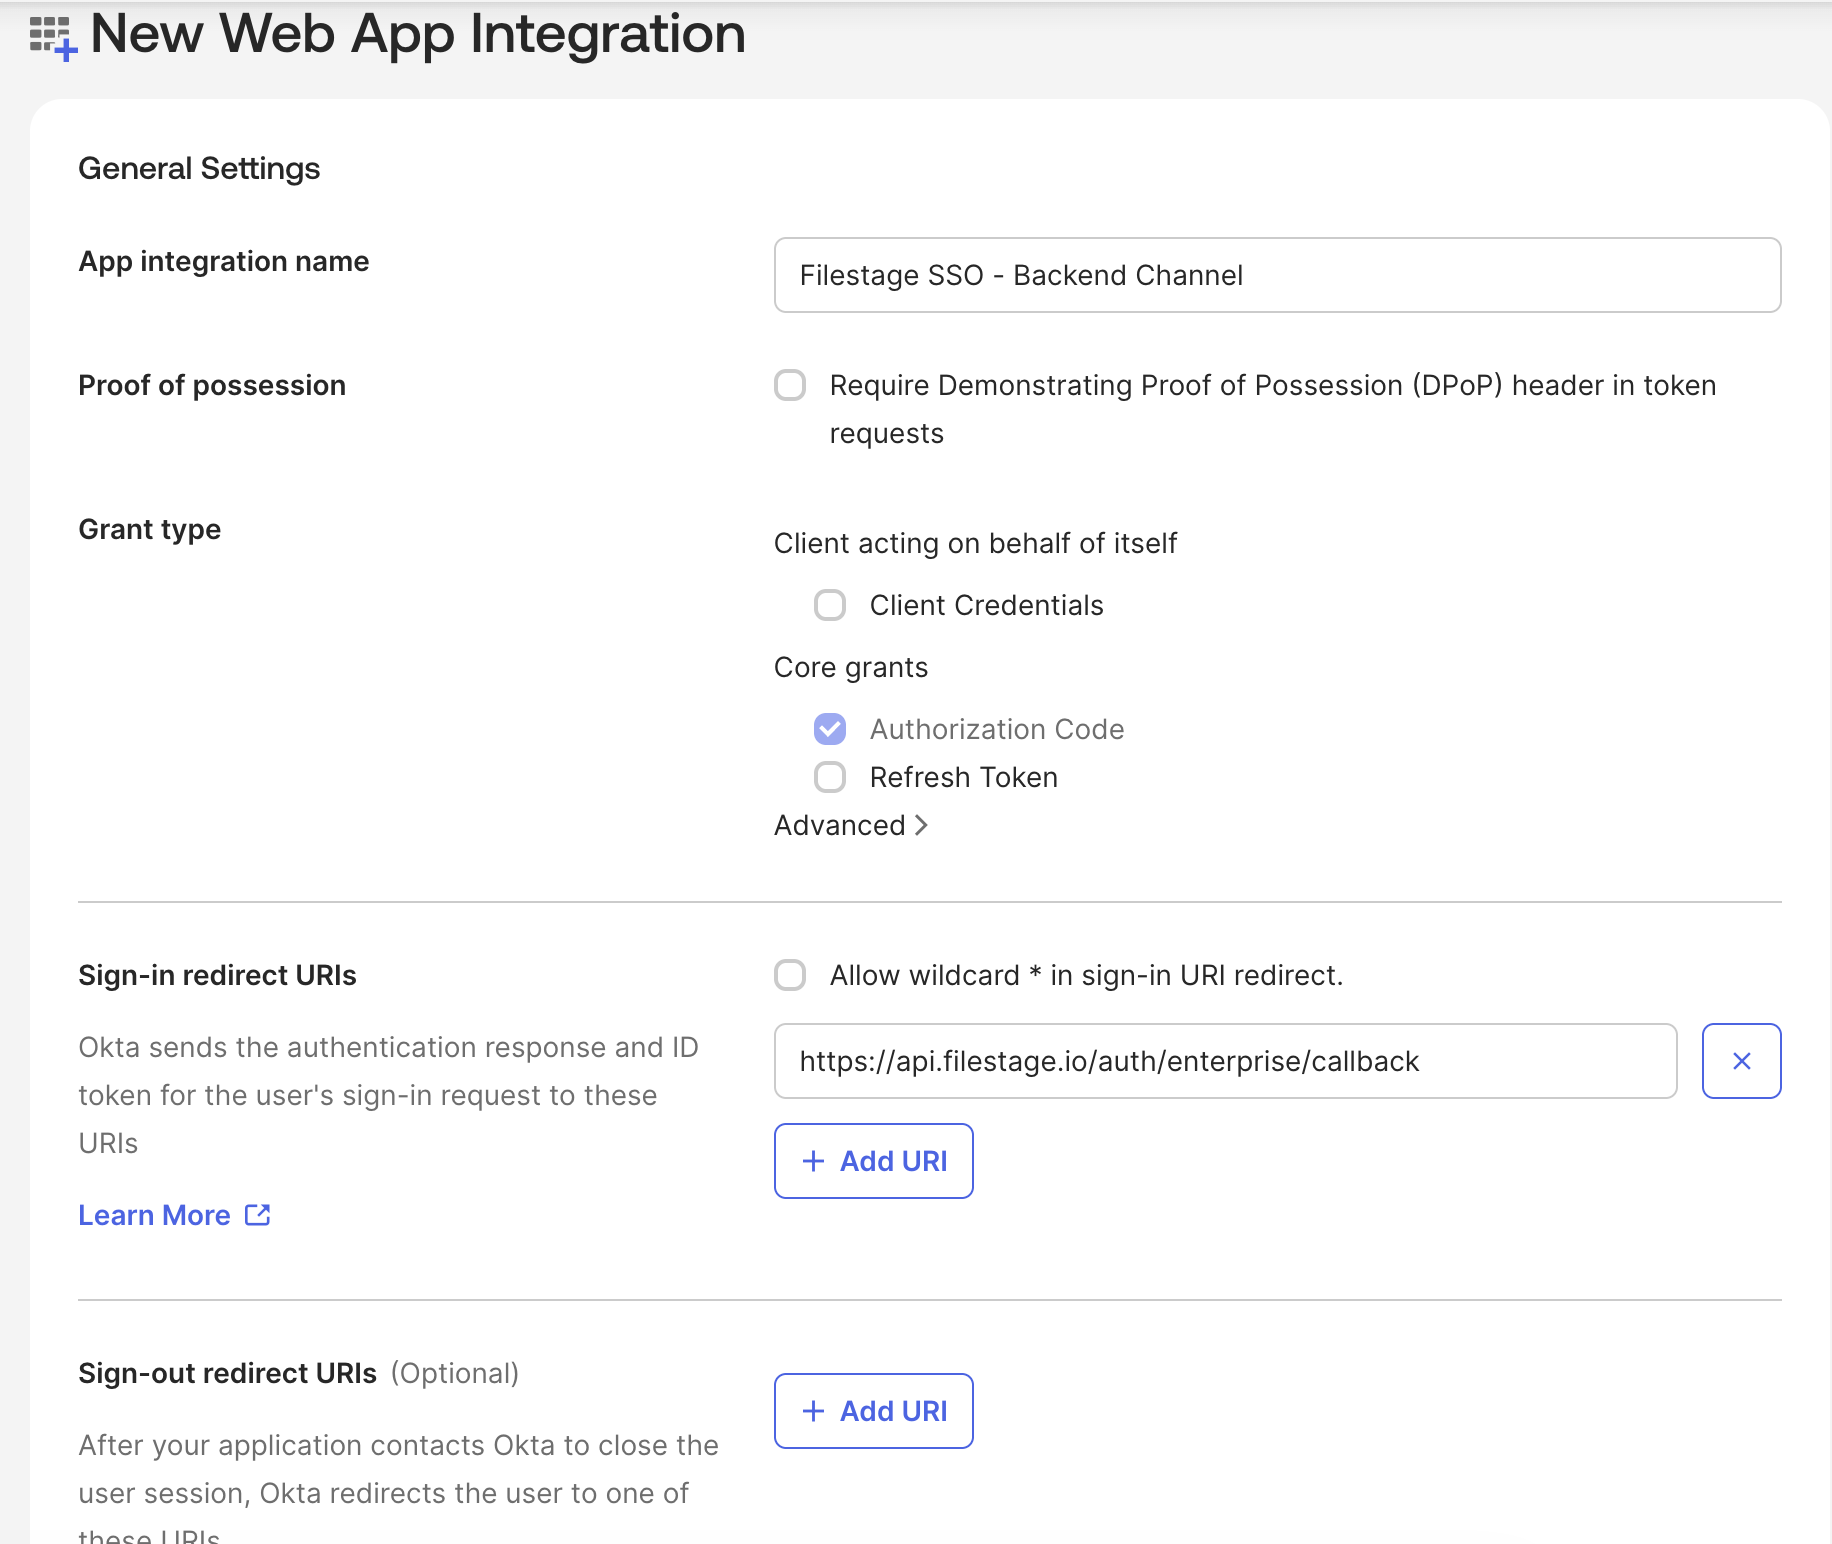
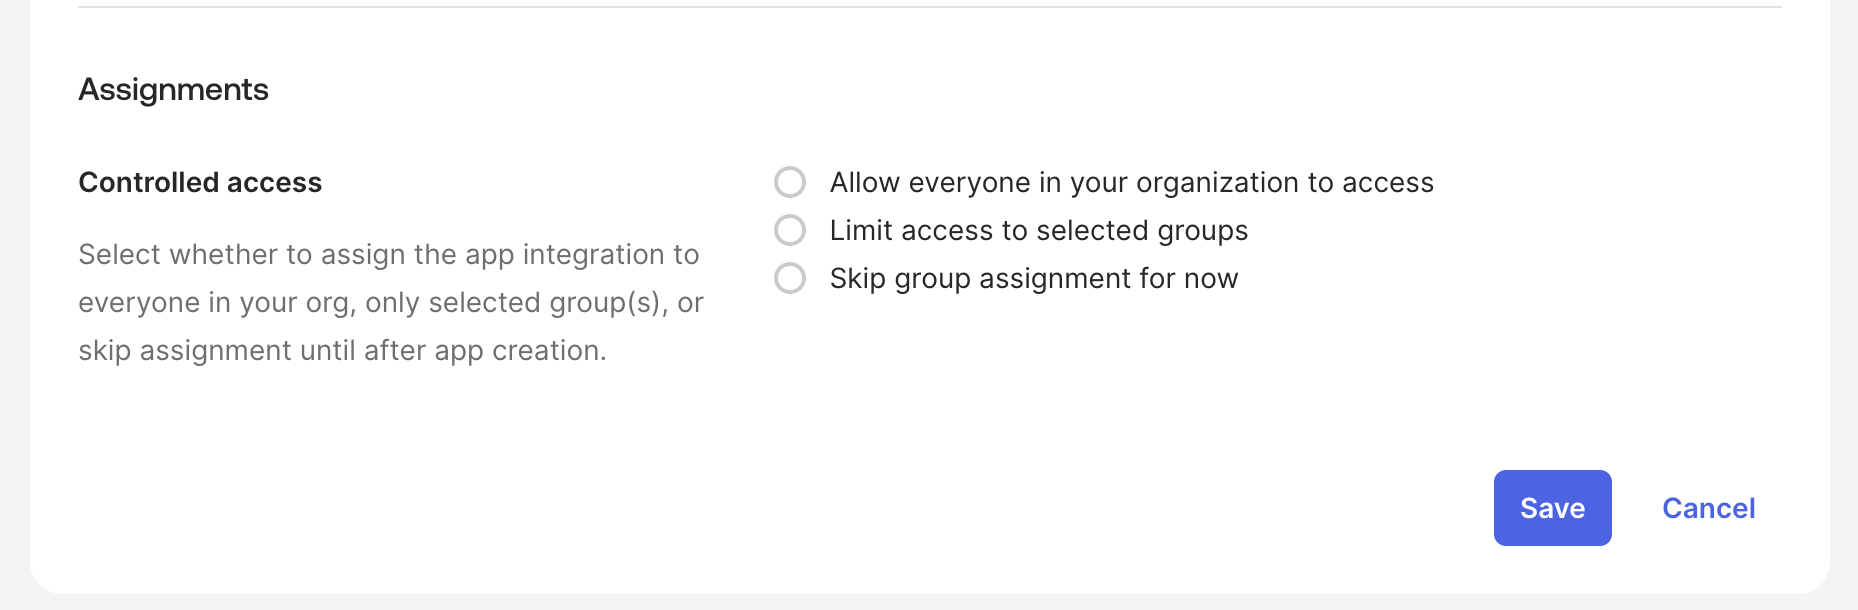
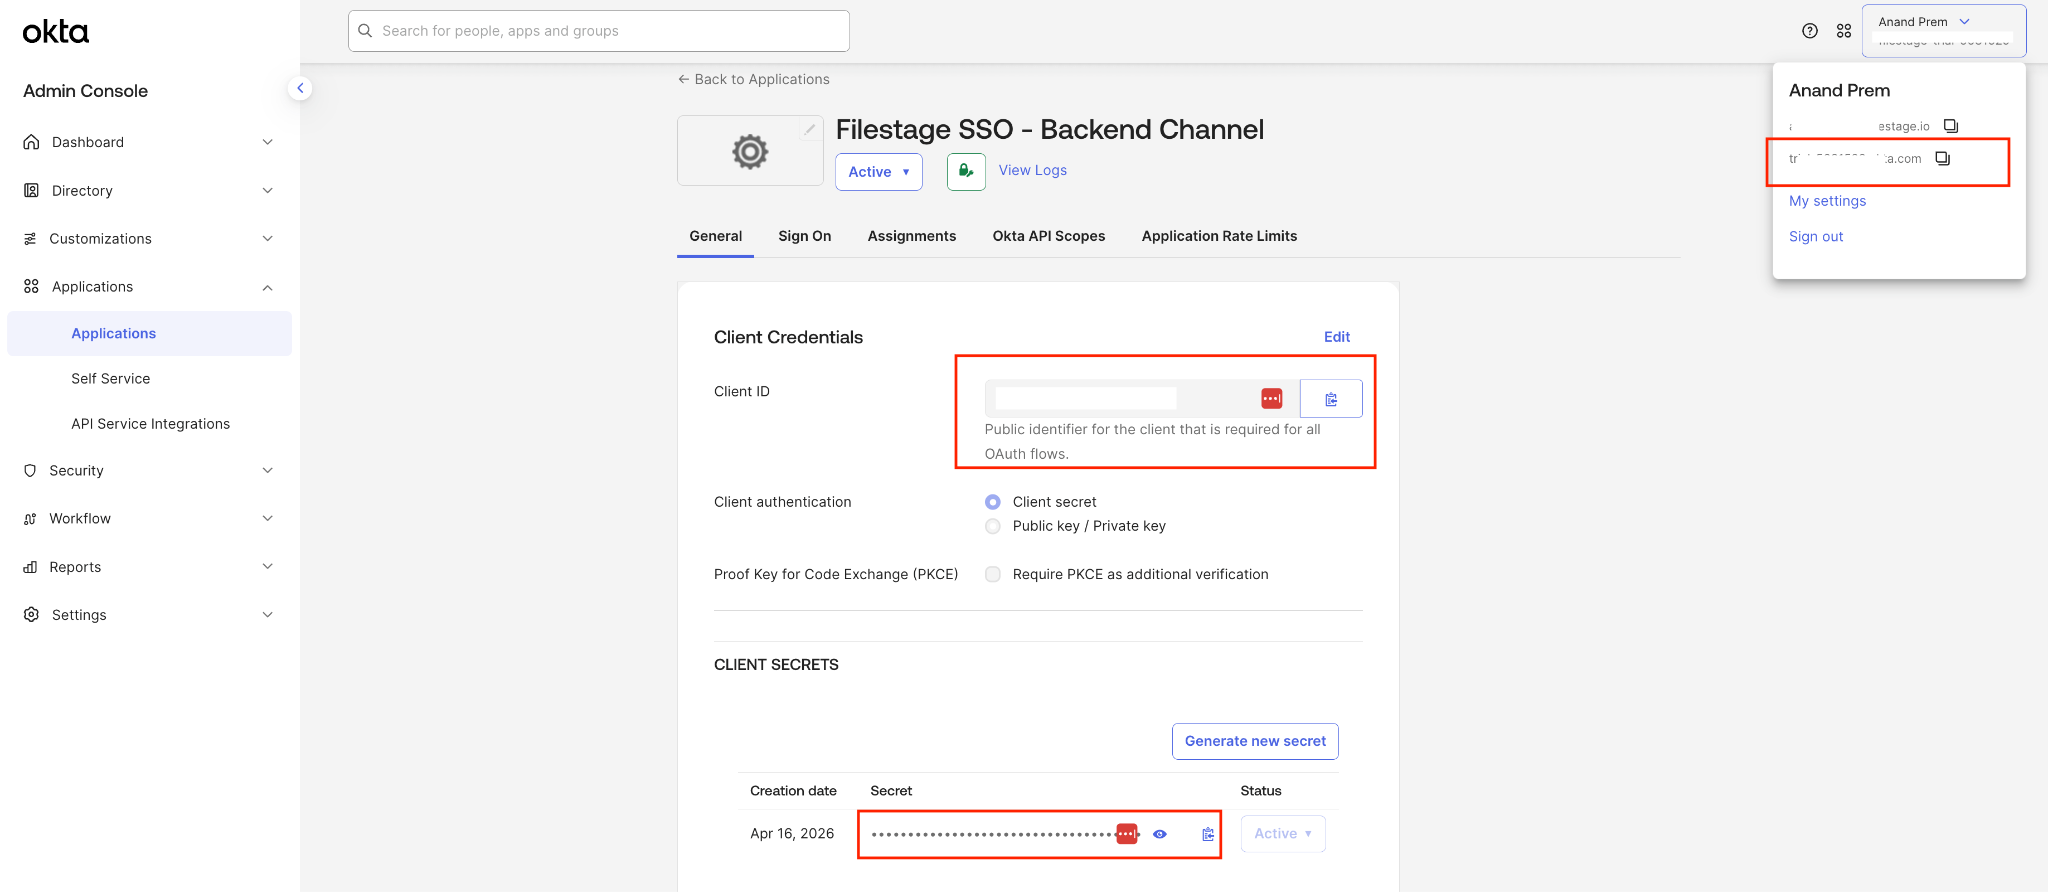
<table data-id="a64a2d5a-913e-49af-a87a-1206594b42cb" style="min-width: 25px;"><colgroup><col style="min-width: 25px;"></colgroup><tbody><tr><td colspan="1" rowspan="1" style="box-sizing: border-box; font-family: proxima-nova, &quot;Helvetica Neue&quot;, system-ui, &quot;Segoe UI&quot;, Roboto, Helvetica, Arial, sans-serif, &quot;Apple Color Emoji&quot;, &quot;Segoe UI Emoji&quot;, &quot;Segoe UI Symbol&quot;; line-height: 1; border: 1px solid rgba(0, 0, 0, 0.1); min-width: 100px; padding: 0.5rem; position: relative; text-align: left; vertical-align: top; margin-top: 0px;"><ol><li><p data-id="3fda3a3a-f9ba-4586-b4ab-39f10cd31604" style="text-align: left;"><span style="color: rgb(0, 0, 0);">Inicia sesión en tu <strong>Okta Admin Dashboard</strong>.</span></p></li><li><p data-id="31d2b0bc-1c27-440e-a825-521cea5747af" style="text-align: left;"><span style="color: rgb(0, 0, 0);">Ve a <strong>Applications &gt; Applications</strong> y haz clic en <strong>Create App Integration</strong>.</span></p></li></ol><img src="https://staticfiles.gleap.io/g/nAFaTlkBu1auWrrjdhqhYtgjm79twmf3Xu0ErKO4JFUAjATrZmzsgVfbR985PwIB4T7GmcmdnDh.png" alt="Create App Integration button in the Okta Admin Dashboard" style="box-sizing: border-box; font-family: proxima-nova, &quot;Helvetica Neue&quot;, system-ui, &quot;Segoe UI&quot;, Roboto, Helvetica, Arial, sans-serif, &quot;Apple Color Emoji&quot;, &quot;Segoe UI Emoji&quot;, &quot;Segoe UI Symbol&quot;; line-height: 1; height: auto; width: 100%; max-width: 100%; margin-top: 24px; margin-bottom: 24px; border-radius: 8px; align-self: center; cursor: pointer;"><ol start="3"><li><p data-id="ff9bacf8-7cb9-47cf-ac9c-5ffc31c72b49" style="text-align: left;"><span style="color: rgb(0, 0, 0);">Selecciona <strong>OIDC - OpenID Connect</strong> como método de inicio de sesión y <strong>Web Application</strong> como tipo de aplicación; después haz clic en <strong>Next</strong>.</span></p></li></ol><img src="https://staticfiles.gleap.io/g/n9LZoM7Z4XWlKpuuFnQZKHqZ5udg0aei158vVXefcPcs9RwV4juMRfK8b59M9uQUgB28NxY5cyc.png" alt="Selecting OIDC - OpenID Connect and Web Application in Okta" style="box-sizing: border-box; font-family: proxima-nova, &quot;Helvetica Neue&quot;, system-ui, &quot;Segoe UI&quot;, Roboto, Helvetica, Arial, sans-serif, &quot;Apple Color Emoji&quot;, &quot;Segoe UI Emoji&quot;, &quot;Segoe UI Symbol&quot;; line-height: 1; height: auto; width: 100%; max-width: 100%; margin-top: 24px; margin-bottom: 24px; border-radius: 8px; align-self: center; cursor: pointer;"><ol start="4"><li><p data-id="75c315fc-b6fb-4ad6-9a99-4d94b4adcecb" style="text-align: left;"><span style="color: rgb(0, 0, 0);">Introduce un <strong>App integration name</strong> que te ayude a identificar la conexión (p. ej. Filestage).</span></p></li><li><p data-id="147f669c-f004-4afe-aec9-9bf67fb9e063" style="text-align: left;"><span style="color: rgb(0, 0, 0);">En Grant type, selecciona la opción <strong>Authorization Code</strong>.</span></p></li><li><p data-id="772a3781-fed3-4bda-83e8-22a8995bb457" style="text-align: left;"><span style="color: rgb(0, 0, 0);">Añade la siguiente <strong>Sign-in redirect URI</strong>: https://api.filestage.io/auth/enterprise/callback</span></p></li></ol><img src="https://staticfiles.gleap.io/g/VnOF9Ub8M3LSEpyuddeIinz4sWCgviuO6dVkeVJHq7jdbniOCoFA5WAWK7yfGoairGJjV9USGj5.png" alt="New Web App Integration settings in Okta with the Filestage redirect URI" style="box-sizing: border-box; font-family: proxima-nova, &quot;Helvetica Neue&quot;, system-ui, &quot;Segoe UI&quot;, Roboto, Helvetica, Arial, sans-serif, &quot;Apple Color Emoji&quot;, &quot;Segoe UI Emoji&quot;, &quot;Segoe UI Symbol&quot;; line-height: 1; height: auto; width: 100%; max-width: 100%; margin-top: 24px; margin-bottom: 24px; border-radius: 8px; align-self: center; cursor: pointer;"><ol start="7"><li><p data-id="1f04caf0-591b-43c2-845e-c8e4dc40addf" style="text-align: left;"><span style="color: rgb(0, 0, 0);">En Assignments, elige quién de tu organización debe tener acceso a Filestage.</span></p></li></ol><img src="https://staticfiles.gleap.io/g/A3Fd1GErzhVkI71gIjG1nMGOCd6iE1bn1p3JEu9q6qrPN8gJdRQFR4KnzhpxP2CjPUKinm25DHK.png" alt="Assignments section with controlled access options in Okta" style="box-sizing: border-box; font-family: proxima-nova, &quot;Helvetica Neue&quot;, system-ui, &quot;Segoe UI&quot;, Roboto, Helvetica, Arial, sans-serif, &quot;Apple Color Emoji&quot;, &quot;Segoe UI Emoji&quot;, &quot;Segoe UI Symbol&quot;; line-height: 1; height: auto; width: 100%; max-width: 100%; margin-top: 24px; margin-bottom: 24px; border-radius: 8px; align-self: center; cursor: pointer;"><ol start="8"><li><p data-id="3a0a28e2-acdd-4762-bacb-946568e28fdf" style="text-align: left;"><span style="color: rgb(0, 0, 0);">Haz clic en <strong>Save</strong> para guardar la aplicación.</span></p></li><li><p data-id="a86a23e1-e43a-432a-a578-6d07e3e2571f" style="text-align: left;"><span style="color: rgb(0, 0, 0);">En la página General de la aplicación, copia el <strong>Client ID</strong> y el <strong>Client Secret</strong>. También necesitarás tu <strong>Okta domain URI</strong> - la encontrarás en el menú desplegable bajo tu nombre de usuario/icono de perfil, arriba a la derecha.</span></p></li></ol><img src="https://staticfiles.gleap.io/g/r49TnLmvxFWecacjd7264v3P6mRcH206RHgyezHc1unB9piSIBuih9DDHB3aOVbCUyvusnqvr3Q.png" alt="Client ID, client secret, and Okta domain in the Okta app settings" style="box-sizing: border-box; font-family: proxima-nova, &quot;Helvetica Neue&quot;, system-ui, &quot;Segoe UI&quot;, Roboto, Helvetica, Arial, sans-serif, &quot;Apple Color Emoji&quot;, &quot;Segoe UI Emoji&quot;, &quot;Segoe UI Symbol&quot;; line-height: 1; height: auto; width: 100%; max-width: 100%; margin-top: 24px; margin-bottom: 24px; border-radius: 8px; align-self: center; cursor: pointer;"></td></tr></tbody></table>

Y eso es todo en el lado de Okta - con el Client ID, el Client Secret y tu Okta domain URI tienes todo lo necesario para conectar Filestage.

### Paso 2: Configura el SSO en Filestage

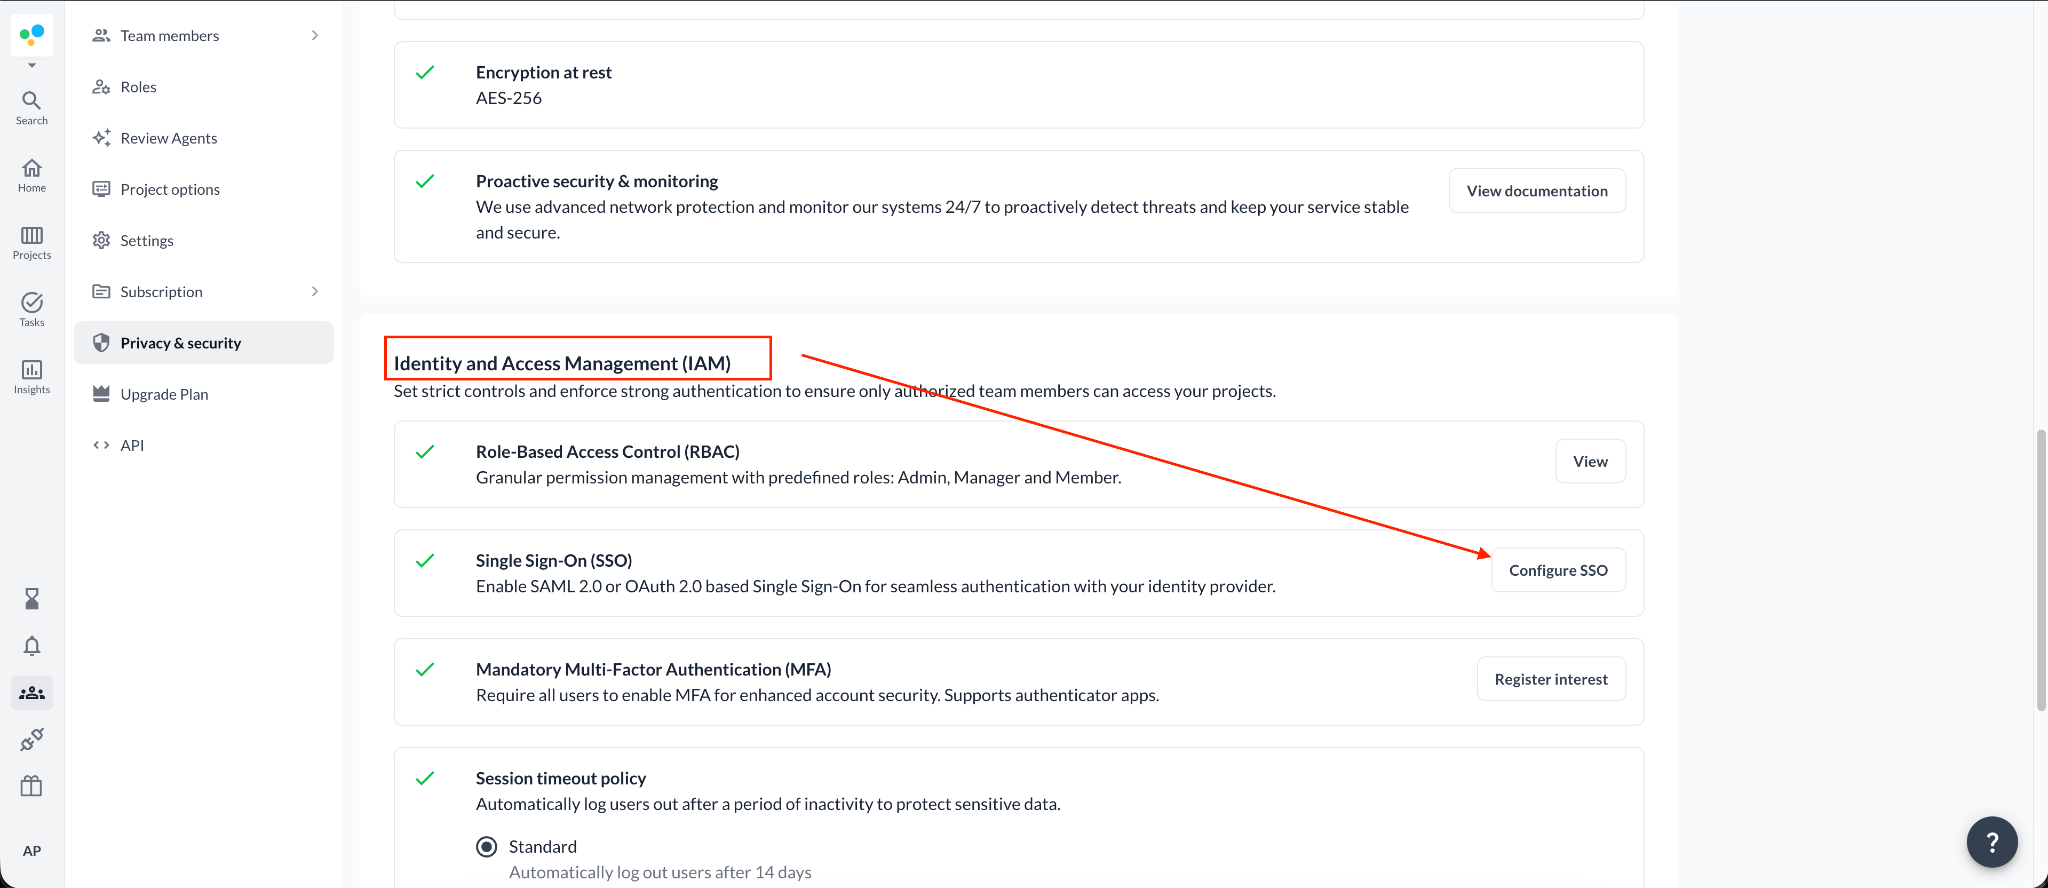
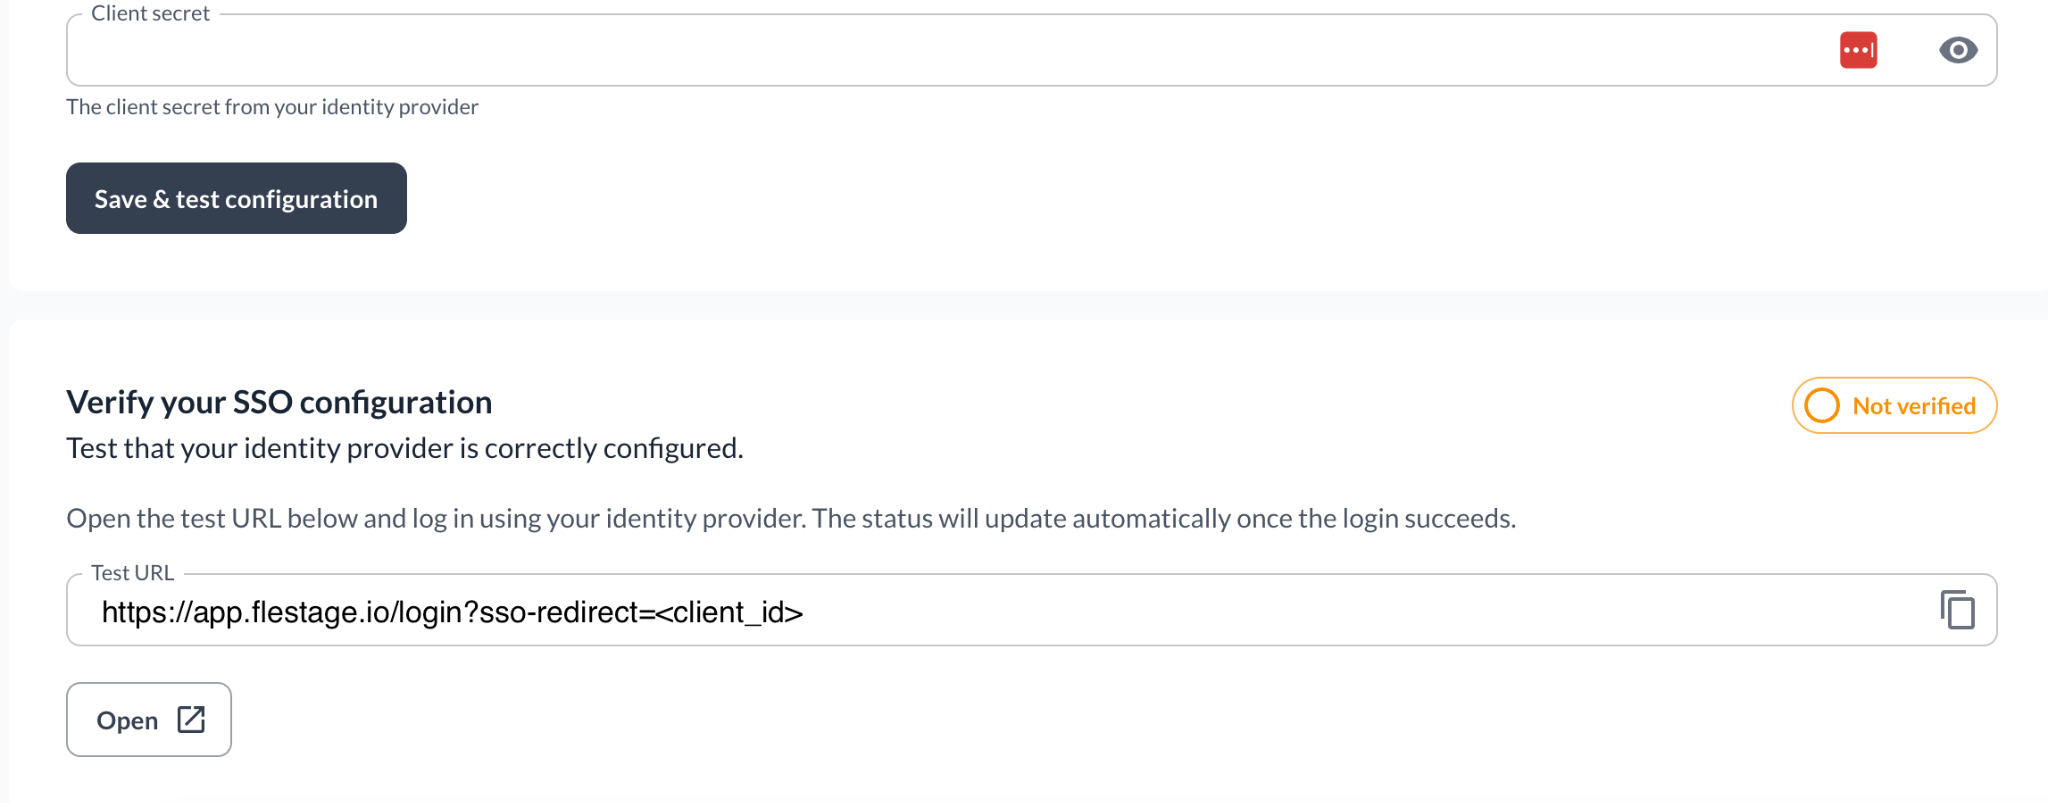
<table data-id="f955f6e8-854a-463e-8bd1-2f9f6538c37a" style="min-width: 25px;"><colgroup><col style="min-width: 25px;"></colgroup><tbody><tr><td colspan="1" rowspan="1" style="box-sizing: border-box; font-family: proxima-nova, &quot;Helvetica Neue&quot;, system-ui, &quot;Segoe UI&quot;, Roboto, Helvetica, Arial, sans-serif, &quot;Apple Color Emoji&quot;, &quot;Segoe UI Emoji&quot;, &quot;Segoe UI Symbol&quot;; line-height: 1; border: 1px solid rgba(0, 0, 0, 0.1); min-width: 100px; padding: 0.5rem; position: relative; text-align: left; vertical-align: top; margin-top: 0px;"><ol><li><p data-id="67d08442-b538-46cd-91a7-7a265c94c859" style="text-align: left;"><span style="color: rgb(0, 0, 0);">En Filestage, ve a </span><a target="_blank" rel="noopener noreferrer nofollow" class="linktype-link link" data-linktype="link" href="https://app.filestage.io/teams/security-and-privacy"><span style="color: rgb(0, 0, 0);"><u>app.filestage.io/teams/security-and-privacy</u></span></a><span style="color: rgb(0, 0, 0);"> - se abrirán los ajustes de seguridad y privacidad de tu último equipo seleccionado.</span></p></li><li><p data-id="733d4b53-6481-4b38-8731-0436a7962326" style="text-align: left;"><span style="color: rgb(0, 0, 0);">Baja hasta la sección <strong>Identity and Access Management (IAM)</strong> y haz clic en <strong>Configure SSO</strong>.</span></p></li></ol><img src="https://staticfiles.gleap.io/g/uE3ZMLWr50g1O2UL8pfxYZg5b7UUg4UfAZpOjKYULiy8fqbC6uIydXI6AGCeFtL2gKjfRLpxd8U.png" alt="Identity and Access Management section with the Configure SSO button in Filestage" style="box-sizing: border-box; font-family: proxima-nova, &quot;Helvetica Neue&quot;, system-ui, &quot;Segoe UI&quot;, Roboto, Helvetica, Arial, sans-serif, &quot;Apple Color Emoji&quot;, &quot;Segoe UI Emoji&quot;, &quot;Segoe UI Symbol&quot;; line-height: 1; height: auto; width: 100%; max-width: 100%; margin-top: 24px; margin-bottom: 24px; border-radius: 8px; align-self: center; cursor: pointer;"><ol start="3"><li><p data-id="22d2bc6a-a2ba-4f3b-ab4d-0fab1fd749e2" style="text-align: left;"><span style="color: rgb(0, 0, 0);">Selecciona la opción <strong>OpenID Connect</strong>.</span></p></li><li><p data-id="46ef097b-dd1f-4da4-897c-9b220bd759e0" style="text-align: left;"><span style="color: rgb(0, 0, 0);">Introduce los datos que copiaste de Okta: <strong>Issuer URL</strong></span> (tu Okta domain URI)<span style="color: rgb(0, 0, 0);">, <strong>Client ID</strong> y <strong>Client Secret</strong>.</span></p></li><li><p data-id="86d8c92a-394b-4c2a-89b7-10df4ee4db9c" style="text-align: left;"><span style="color: rgb(0, 0, 0);">Haz clic en <strong>Save &amp; test configuration</strong> - la sección de verificación aparecerá al final de la página.</span></p></li></ol><img src="https://staticfiles.gleap.io/g/bn7BlirgMI0sxZtbi1qB1qeaaWHtSFUTVRoEHVS1wuMCQsNiR3MaUiZwxZwPtoTbX8OZyqyn3Am.png" alt="Verify your SSO configuration section with the test URL in Filestage" style="box-sizing: border-box; font-family: proxima-nova, &quot;Helvetica Neue&quot;, system-ui, &quot;Segoe UI&quot;, Roboto, Helvetica, Arial, sans-serif, &quot;Apple Color Emoji&quot;, &quot;Segoe UI Emoji&quot;, &quot;Segoe UI Symbol&quot;; line-height: 1; height: auto; width: 100%; max-width: 100%; margin-top: 24px; margin-bottom: 24px; border-radius: 8px; align-self: center; cursor: pointer;"></td></tr></tbody></table>

### Paso 3: Verifica tu configuración de SSO

> **Warning:** Una vez completada la verificación con éxito, todos los miembros de tu equipo tendrán que iniciar sesión en Filestage únicamente a través de SSO.

<table data-id="e3ff5737-e7b1-44d8-aadf-ba63a955b705" style="min-width: 25px;"><colgroup><col style="min-width: 25px;"></colgroup><tbody><tr><td colspan="1" rowspan="1" style="box-sizing: border-box; font-family: proxima-nova, &quot;Helvetica Neue&quot;, system-ui, &quot;Segoe UI&quot;, Roboto, Helvetica, Arial, sans-serif, &quot;Apple Color Emoji&quot;, &quot;Segoe UI Emoji&quot;, &quot;Segoe UI Symbol&quot;; line-height: 1; border: 1px solid rgba(0, 0, 0, 0.1); min-width: 100px; padding: 0.5rem; position: relative; text-align: left; vertical-align: top; margin-top: 0px;"><ol><li><p data-id="621b2e93-66b5-44b8-a327-8150d24f2d36" style="text-align: left;"><span style="color: rgb(0, 0, 0);">Copia la <strong>Test URL</strong> de la sección de verificación.</span></p></li><li><p data-id="7164eaca-cce5-4e7f-bfb7-e41652a2e99f" style="text-align: left;"><span style="color: rgb(0, 0, 0);">Cierra sesión en Filestage o abre la URL de prueba en una ventana de incógnito de tu navegador.</span></p></li><li><p data-id="224be99a-c671-4f9b-aee2-ef9b51fef387" style="text-align: left;"><span style="color: rgb(0, 0, 0);">Inicia sesión a través de tu proveedor de identidad. Si todo está configurado correctamente, el estado cambia a <strong>Verified</strong> y verás esta confirmación:</span></p></li></ol><img src="https://staticfiles.gleap.io/g/oACzy4fPlG5d8AxR7DscdsQsJGecEGLKe5mfhnNmlGUlkfbTITLVpdktcOViscnfgvObVfGNacG.png" alt="Your SSO configuration has been verified successfully message in Filestage" style="box-sizing: border-box; font-family: proxima-nova, &quot;Helvetica Neue&quot;, system-ui, &quot;Segoe UI&quot;, Roboto, Helvetica, Arial, sans-serif, &quot;Apple Color Emoji&quot;, &quot;Segoe UI Emoji&quot;, &quot;Segoe UI Symbol&quot;; line-height: 1; height: auto; width: 100%; max-width: 100%; margin-top: 24px; margin-bottom: 24px; border-radius: 8px; align-self: center; cursor: pointer;"></td></tr></tbody></table>

Y eso es todo - a partir de ahora, los miembros de tu equipo inician sesión en Filestage a través de tu proveedor de identidad.

💡 ¿Qué sigue? Cuando termines, echa un vistazo a cómo [gestionar a los miembros de tu equipo](https://help.filestage.io/es/articles/9465096-understand-and-manage-team-members.md).

Si tienes cualquier pregunta, escríbenos por el chat o envíanos un correo a [support@filestage.io](mailto:support@filestage.io). ¡Estamos encantados de ayudarte!