---
title: "Richte dein Single Sign-On (SSO) über Okta (SAML 2.0) ein"
description: "Erfahre, wie du eine Verbindung über das SAML-2.0-Protokoll für SSO mit Filestage herstellst"
url: https://help.filestage.io/de/articles/9465130-richte-dein-single-sign-on-sso-uber-okta-saml-20-ein
collection: "Einrichtung, Kompatibilität und Fehlerbehebung"
updated: 2026-08-11
language: de
alternates: [en, fr, es]
---

# Richte dein Single Sign-On (SSO) über Okta (SAML 2.0) ein

Erfahre, wie du eine Verbindung über das SAML-2.0-Protokoll für SSO mit Filestage herstellst

> **Info:** Diese Funktion ist in unserem Enterprise-Plan oder als kostenpflichtiges Add-on in unserem Business-Plan verfügbar. Bei weiteren Fragen wende dich bitte an unseren Kundensupport unter [support@filestage.io](mailto:support@filestage.io) oder über unseren Chat.

* * *

_Mit Single Sign-On (SSO) meldet sich dein Team bei Filestage mit dem Okta-Konto an, das es ohnehin jeden Tag nutzt. Keine zusätzlichen Passwörter, mehr Sicherheit und volle Kontrolle darüber, wer auf deine Projekte zugreifen kann - und die Verbindung über SAML 2.0 ist in wenigen Minuten eingerichtet._

## Wie dir Single Sign-On über SAML 2.0 helfen kann

Die Verbindung zwischen Filestage und Okta macht das Anmelden für dein Team einfacher und gibt deinen Admins zentrale Kontrolle über den Zugriff:

-   **Keine zusätzlichen Passwörter** - alle melden sich mit ihrem bestehenden Okta-Konto bei Filestage an.
    
-   **Zentrale Zugriffskontrolle** - entscheide in Okta, wer auf Filestage zugreifen kann, und entferne Zugriffe an einer Stelle, wenn jemand deine Organisation verlässt.
    
-   **Enterprise-Sicherheit** - deine Authentifizierungsrichtlinien, wie Multi-Faktor-Authentifizierung, gelten automatisch für jede Filestage-Anmeldung.
    

## So richtest du SSO mit SAML 2.0 (über Okta) ein

### Schritt 1: Hole dir deine SAML-Daten aus Filestage

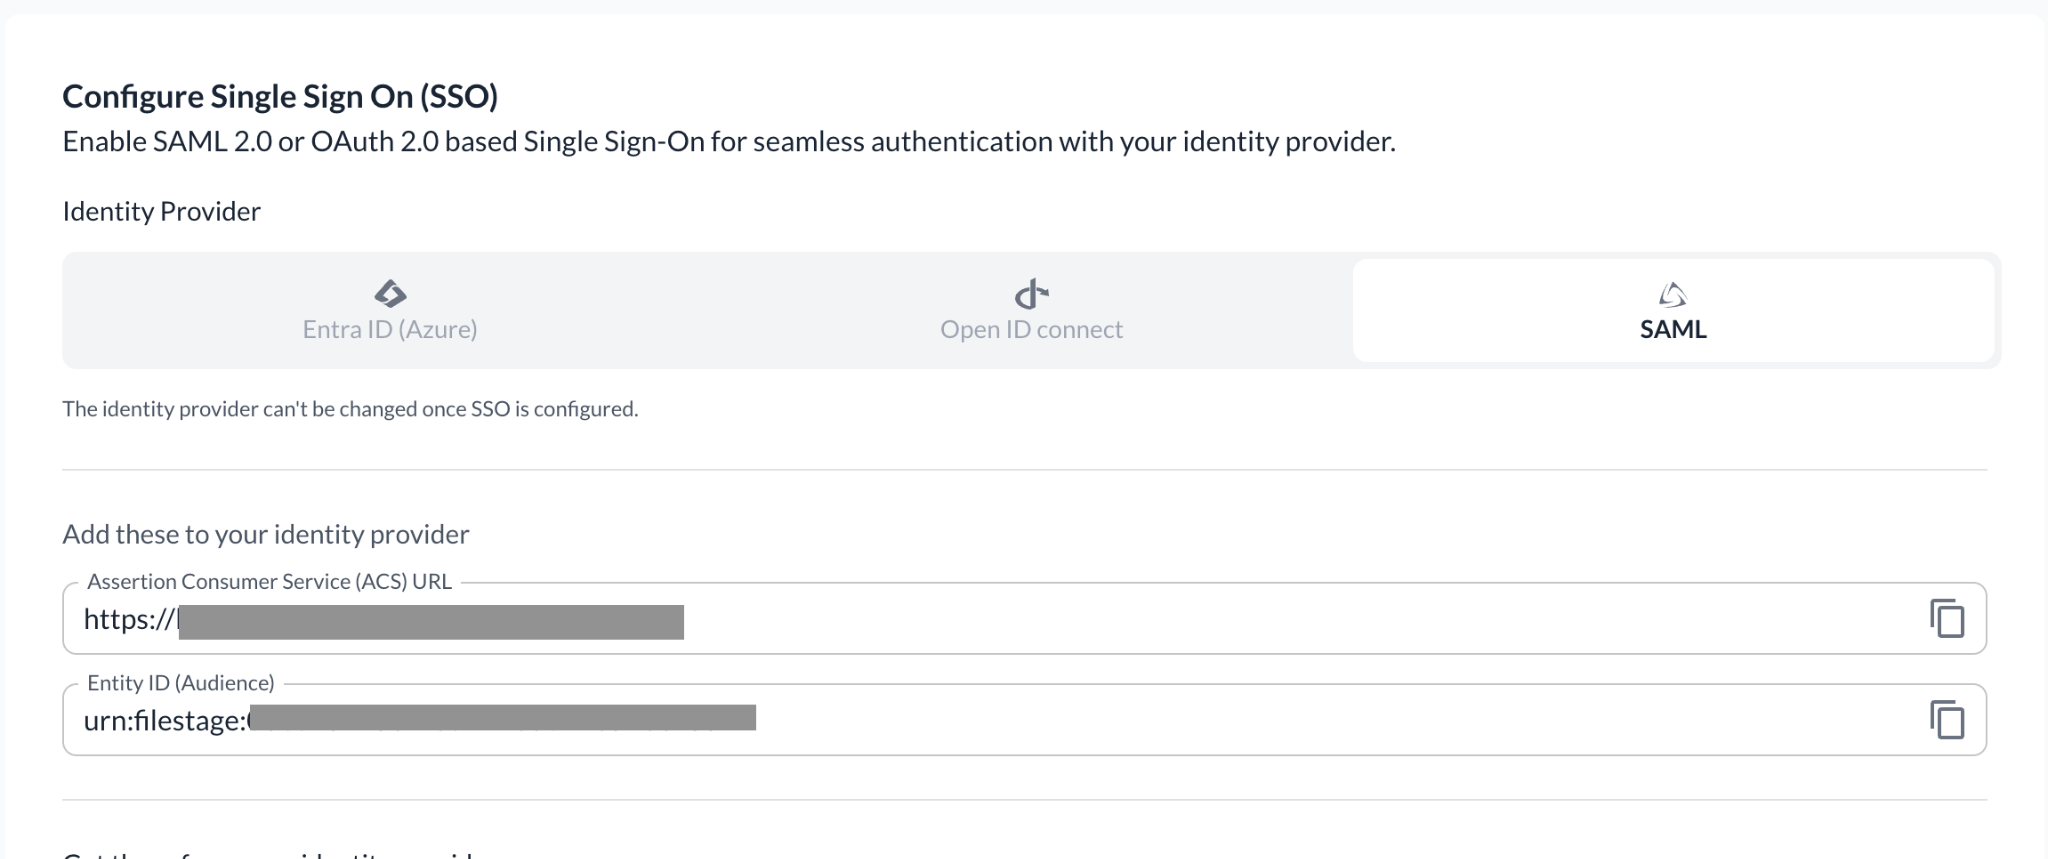
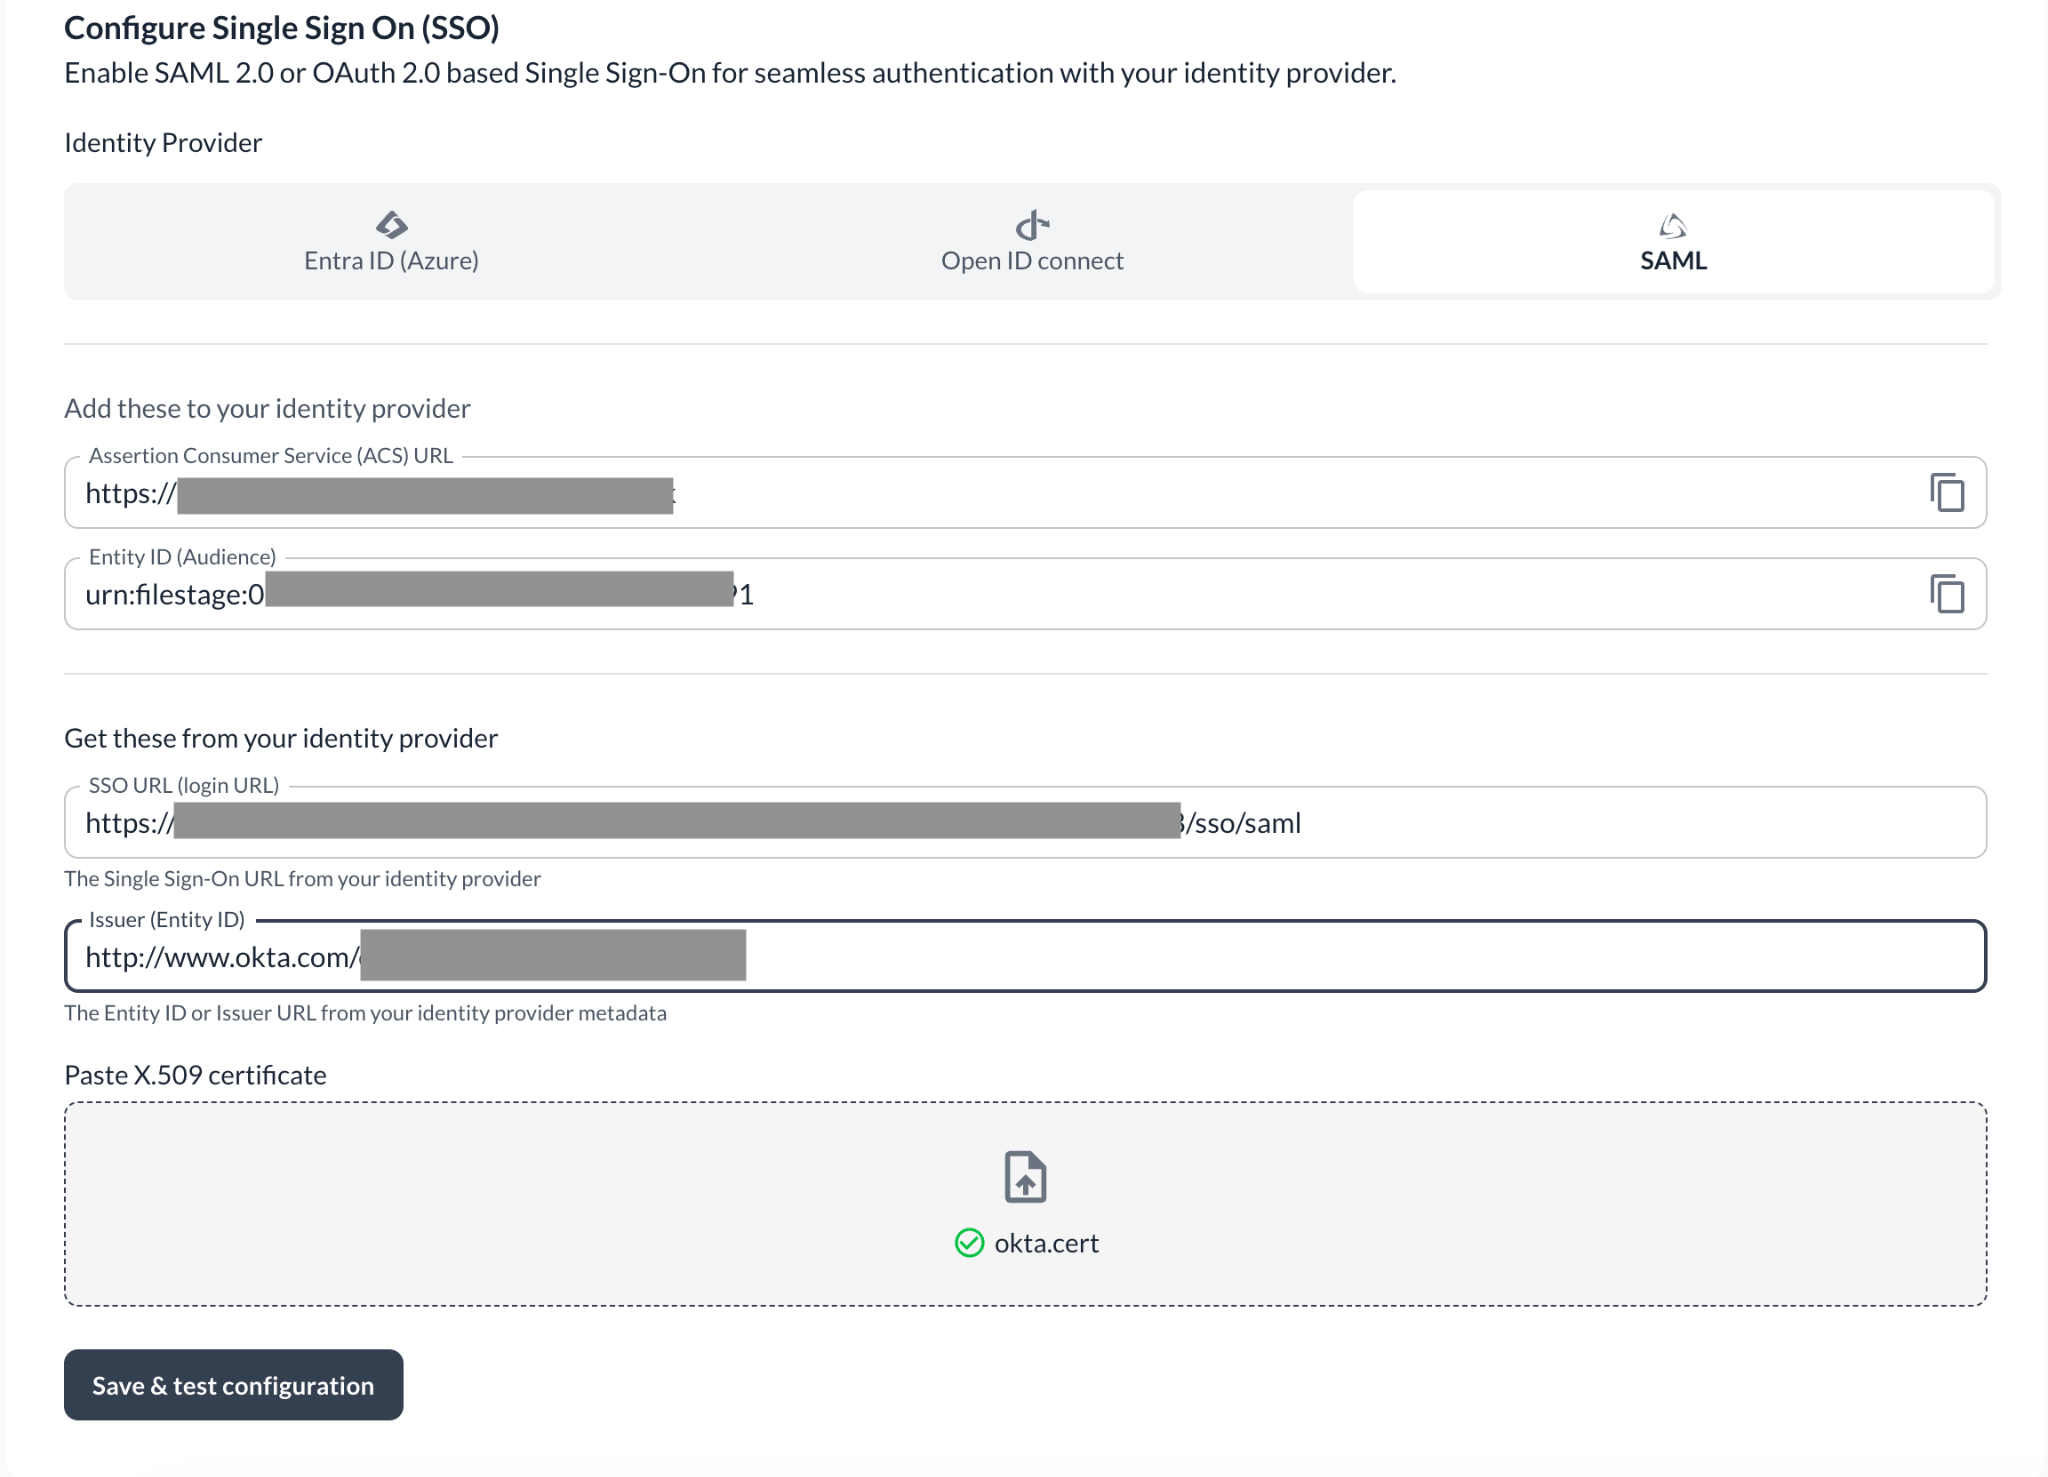
<table style="min-width: 25px;"><colgroup><col style="min-width: 25px;"></colgroup><tbody><tr><td colspan="1" rowspan="1" style="box-sizing: border-box; font-family: proxima-nova, &quot;Helvetica Neue&quot;, system-ui, &quot;Segoe UI&quot;, Roboto, Helvetica, Arial, sans-serif, &quot;Apple Color Emoji&quot;, &quot;Segoe UI Emoji&quot;, &quot;Segoe UI Symbol&quot;; line-height: 1; border: 1px solid rgba(0, 0, 0, 0.1); min-width: 100px; padding: 0.5rem; position: relative; text-align: left; vertical-align: top; margin-top: 0px;"><ol><li><p style="text-align: left;"><span style="color: rgb(0, 0, 0);">Gehe in Filestage zu </span><a target="_blank" rel="noopener noreferrer nofollow" class="linktype-link link" data-linktype="link" href="https://app.filestage.io/teams/security-and-privacy"><span style="color: rgb(0, 0, 0);"><u>app.filestage.io/teams/security-and-privacy</u></span></a><span style="color: rgb(0, 0, 0);"> - dort öffnen sich die Sicherheits- und Datenschutzeinstellungen deines zuletzt ausgewählten Teams.</span></p></li><li><p style="text-align: left;"><span style="color: rgb(0, 0, 0);">Scrolle nach unten zum Bereich <strong>Identity and Access Management (IAM)</strong> und klicke auf <strong>Configure SSO</strong>.</span></p></li><li><p style="text-align: left;">Wähle den Tab <strong>SAML</strong>.</p></li><li><p style="text-align: left;">Kopiere die beiden Werte unter <strong>Add these to your identity provider</strong>: die <strong>Assertion Consumer Service (ACS) URL</strong> und die <strong>Entity ID (Audience)</strong> - beide brauchst du gleich in Okta.</p></li></ol><img src="https://staticfiles.gleap.io/g/KALQiXS5g2aIdtaoSbGuE4xtlQWKmSTmVK4feRV65mWgJAys0LjYo5eYVVeACjucKaLpR8Icth1.png" style="box-sizing: border-box; font-family: proxima-nova, &quot;Helvetica Neue&quot;, system-ui, &quot;Segoe UI&quot;, Roboto, Helvetica, Arial, sans-serif, &quot;Apple Color Emoji&quot;, &quot;Segoe UI Emoji&quot;, &quot;Segoe UI Symbol&quot;; line-height: 1; height: auto; width: 100%; max-width: 100%; margin-top: 24px; margin-bottom: 24px; border-radius: 8px; align-self: center; cursor: pointer;"></td></tr></tbody></table>

### Schritt 2: Erstelle die SAML-App in Okta

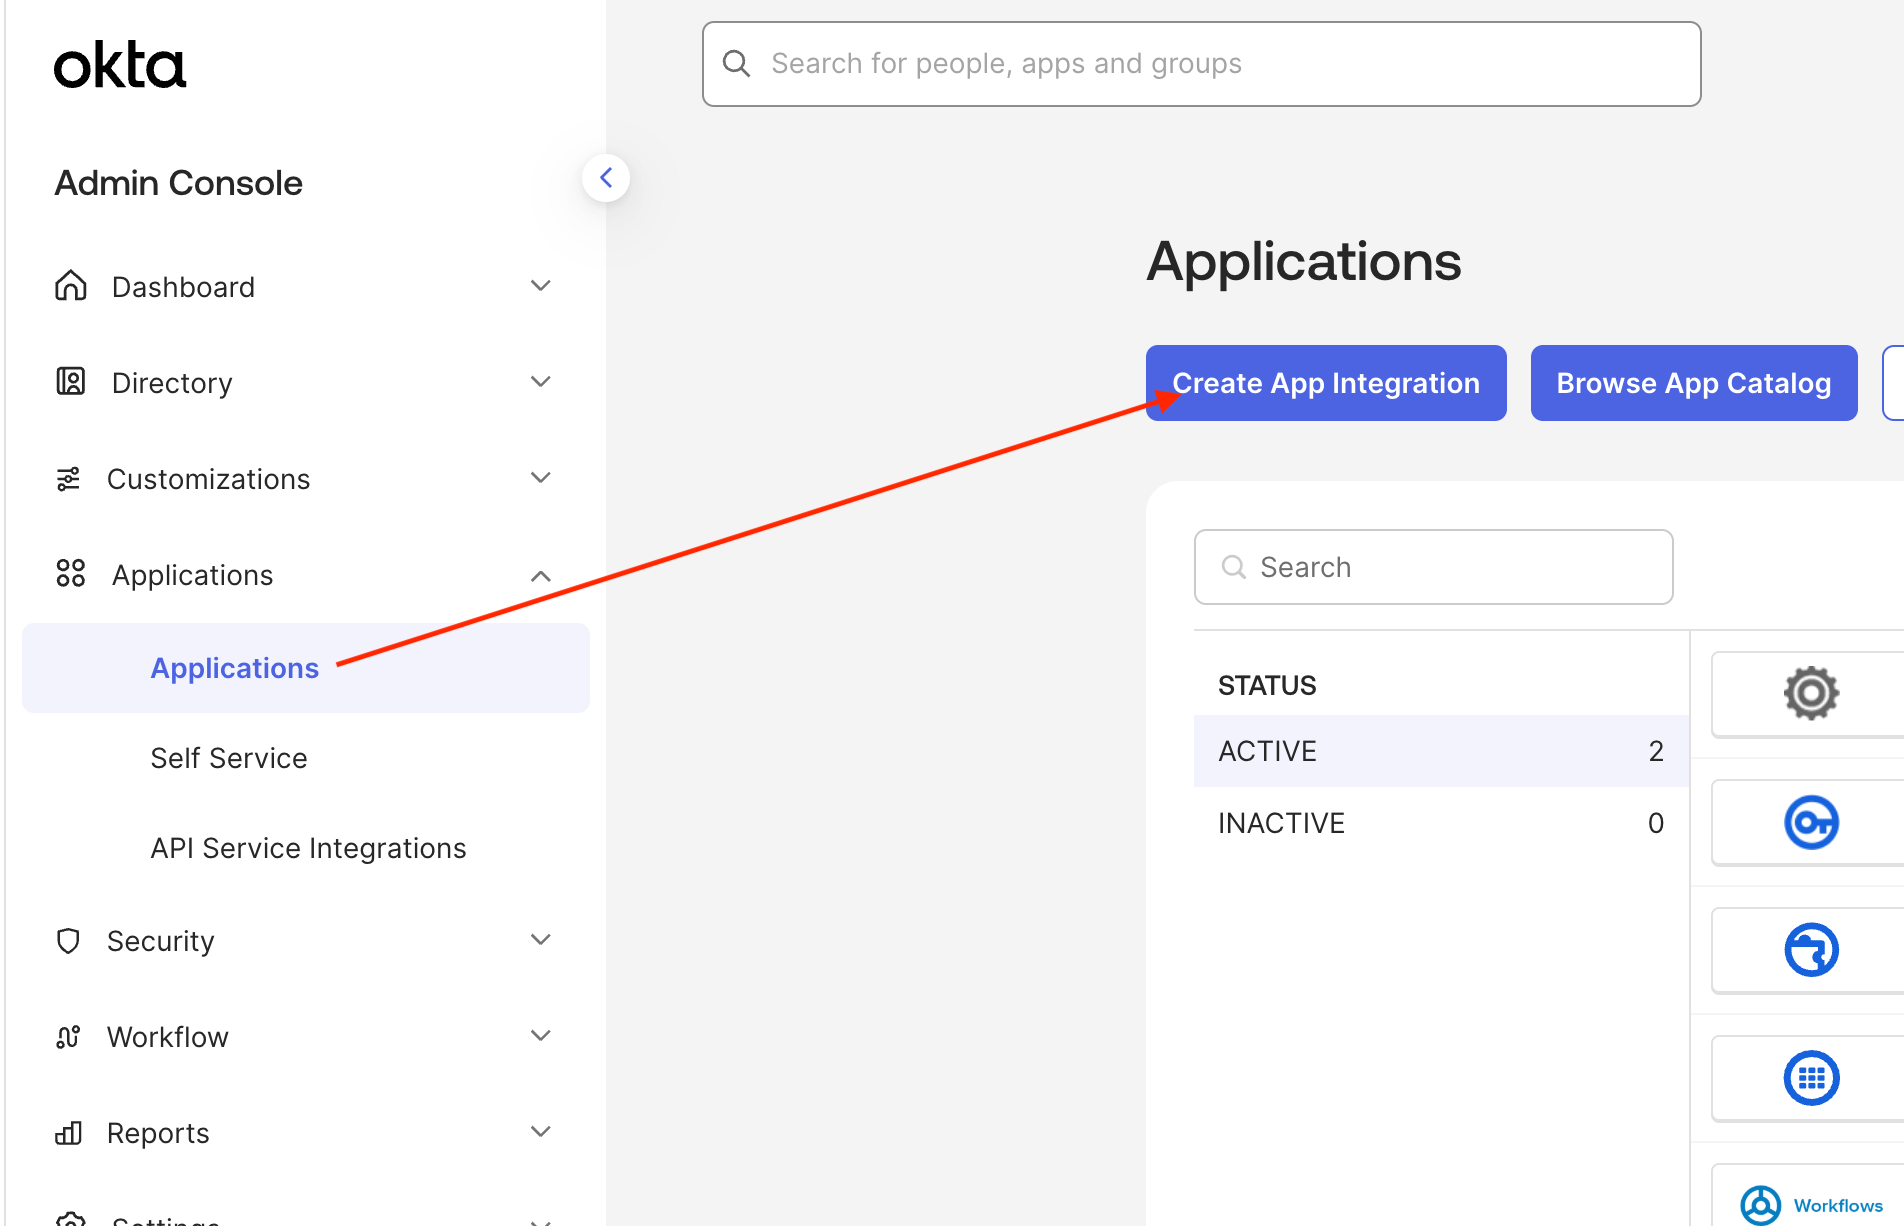
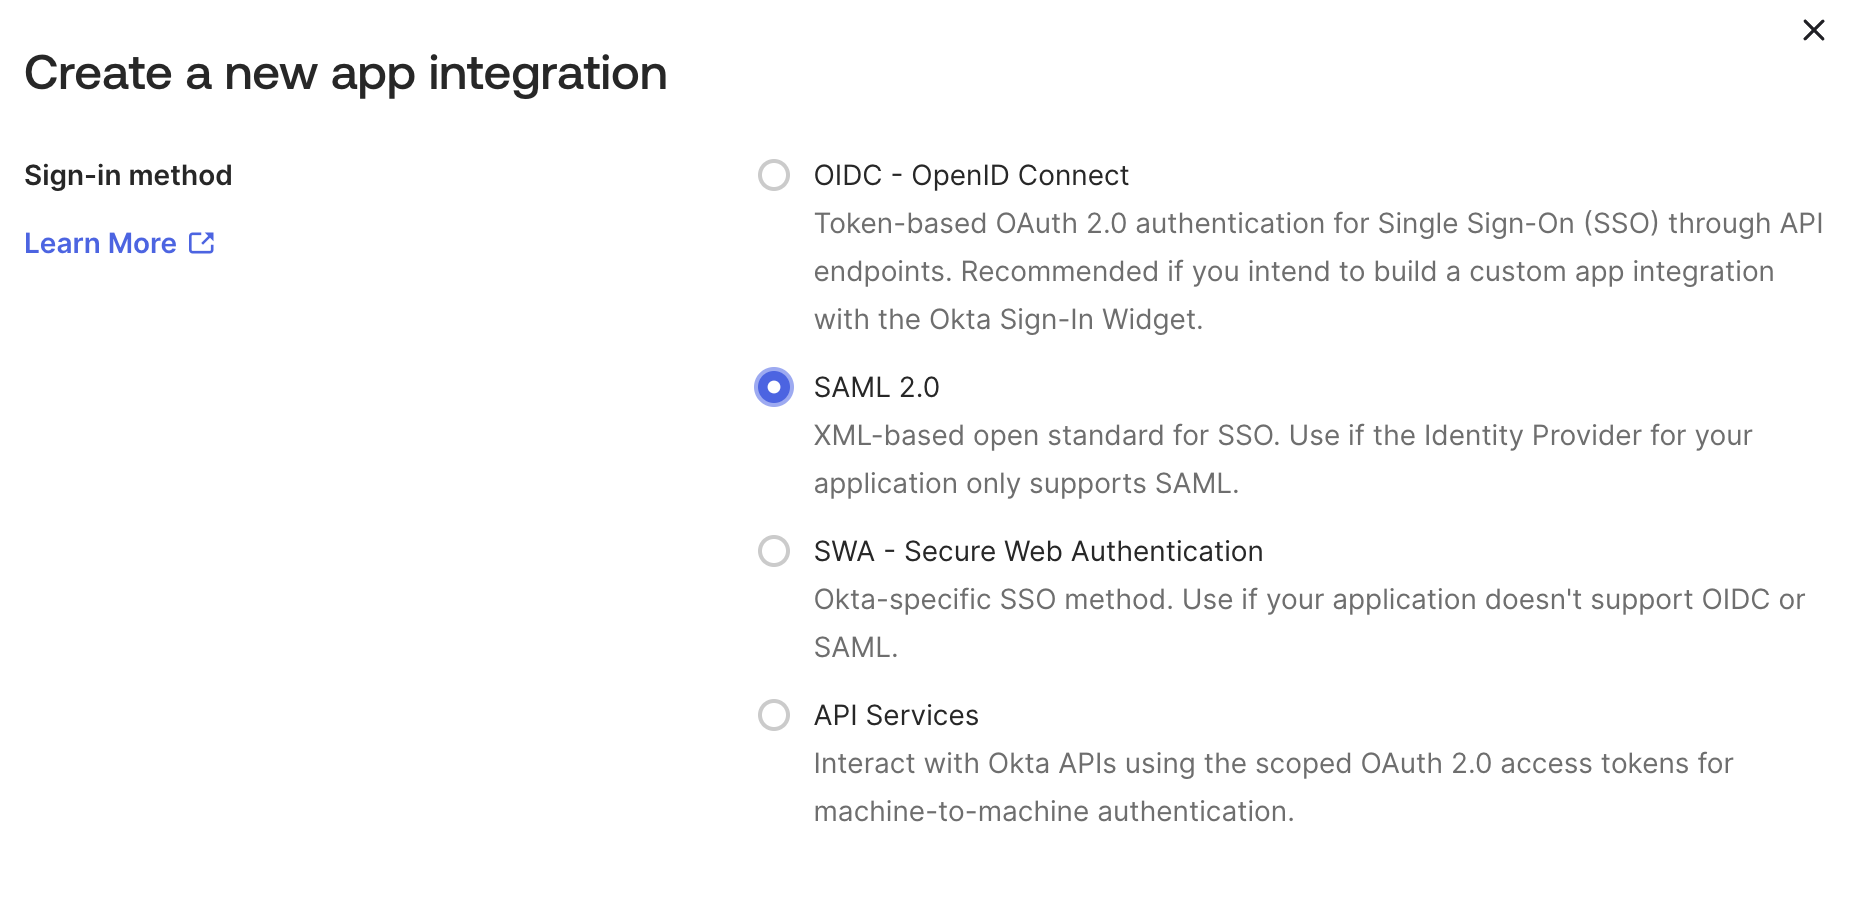
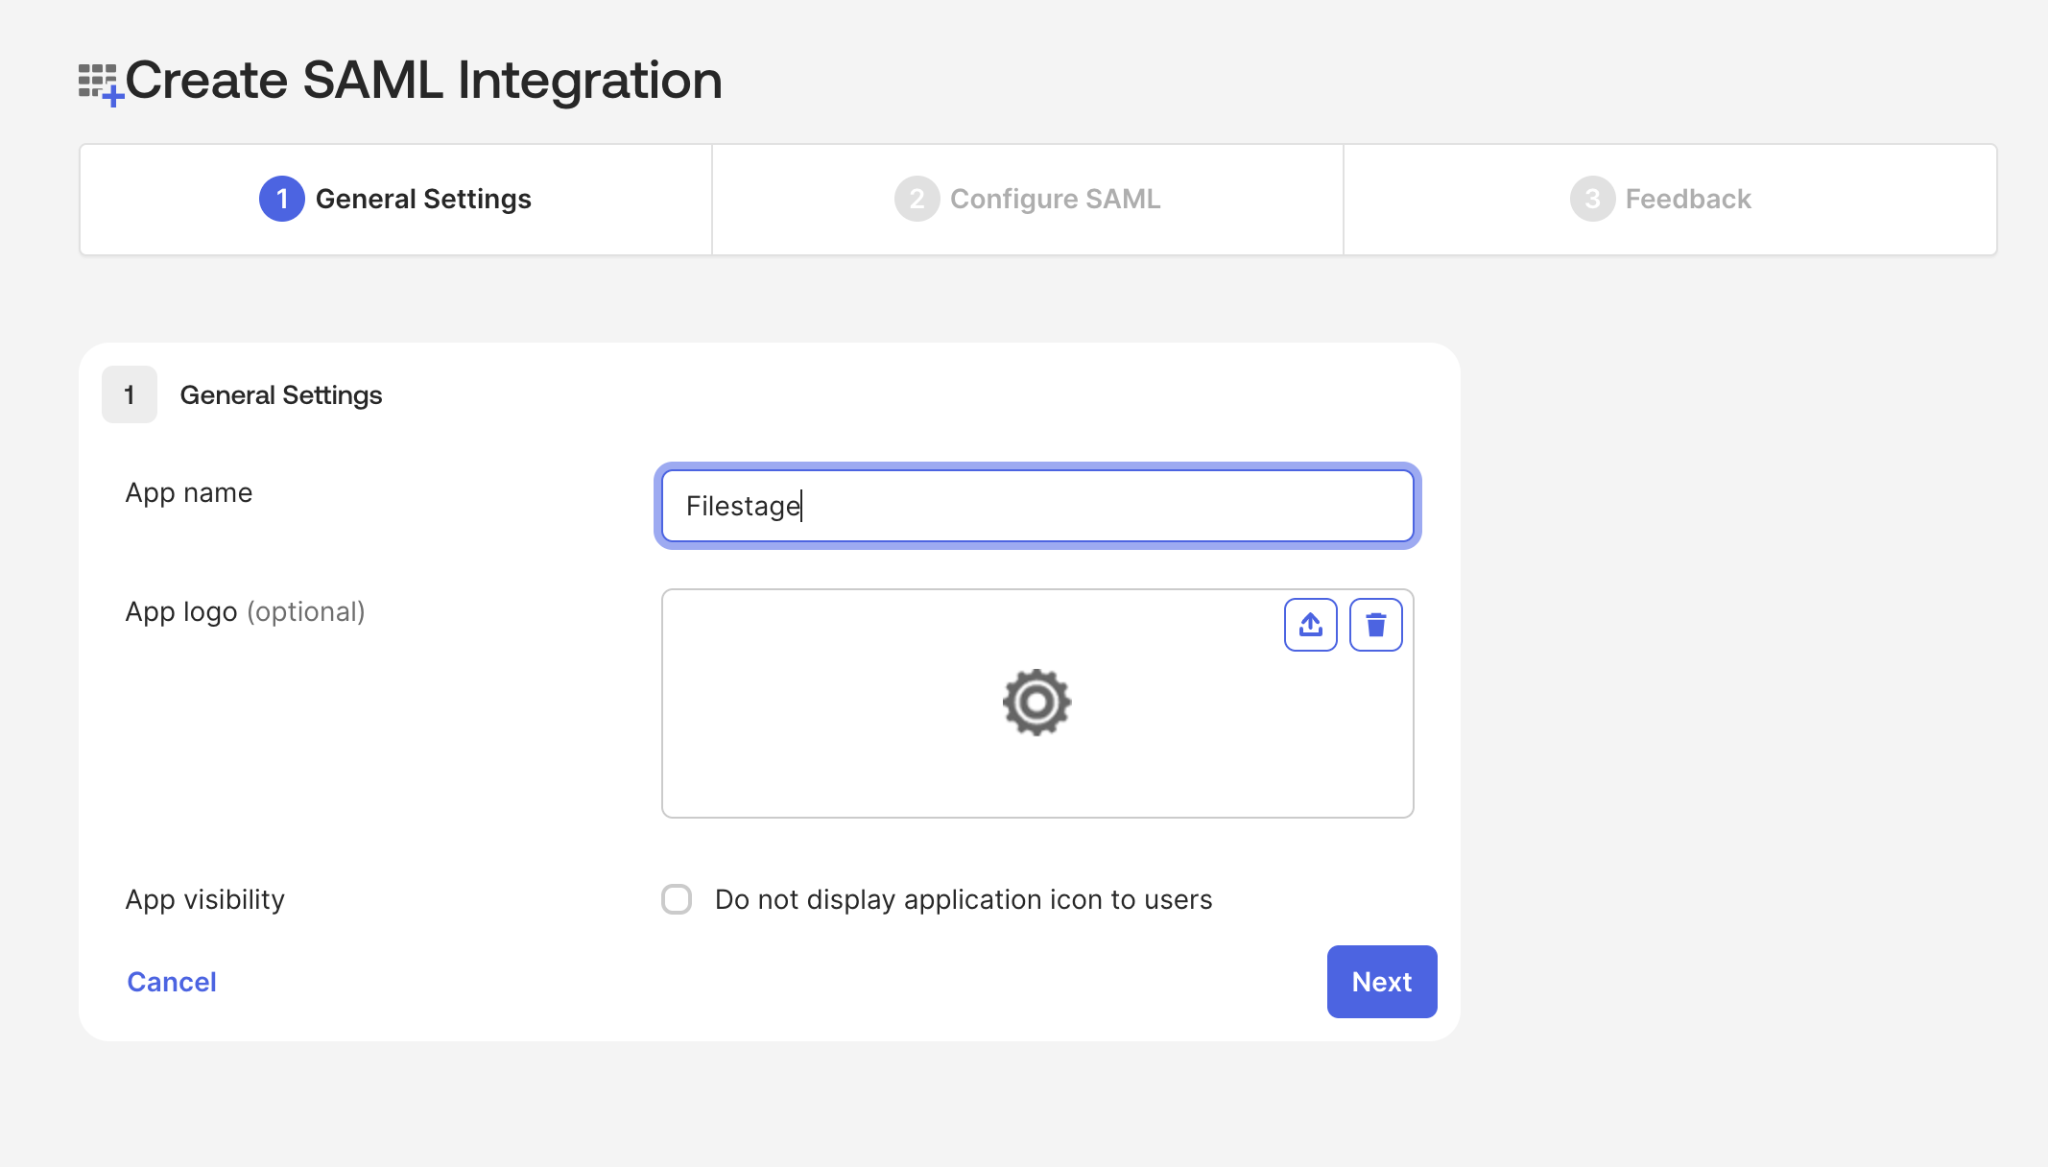
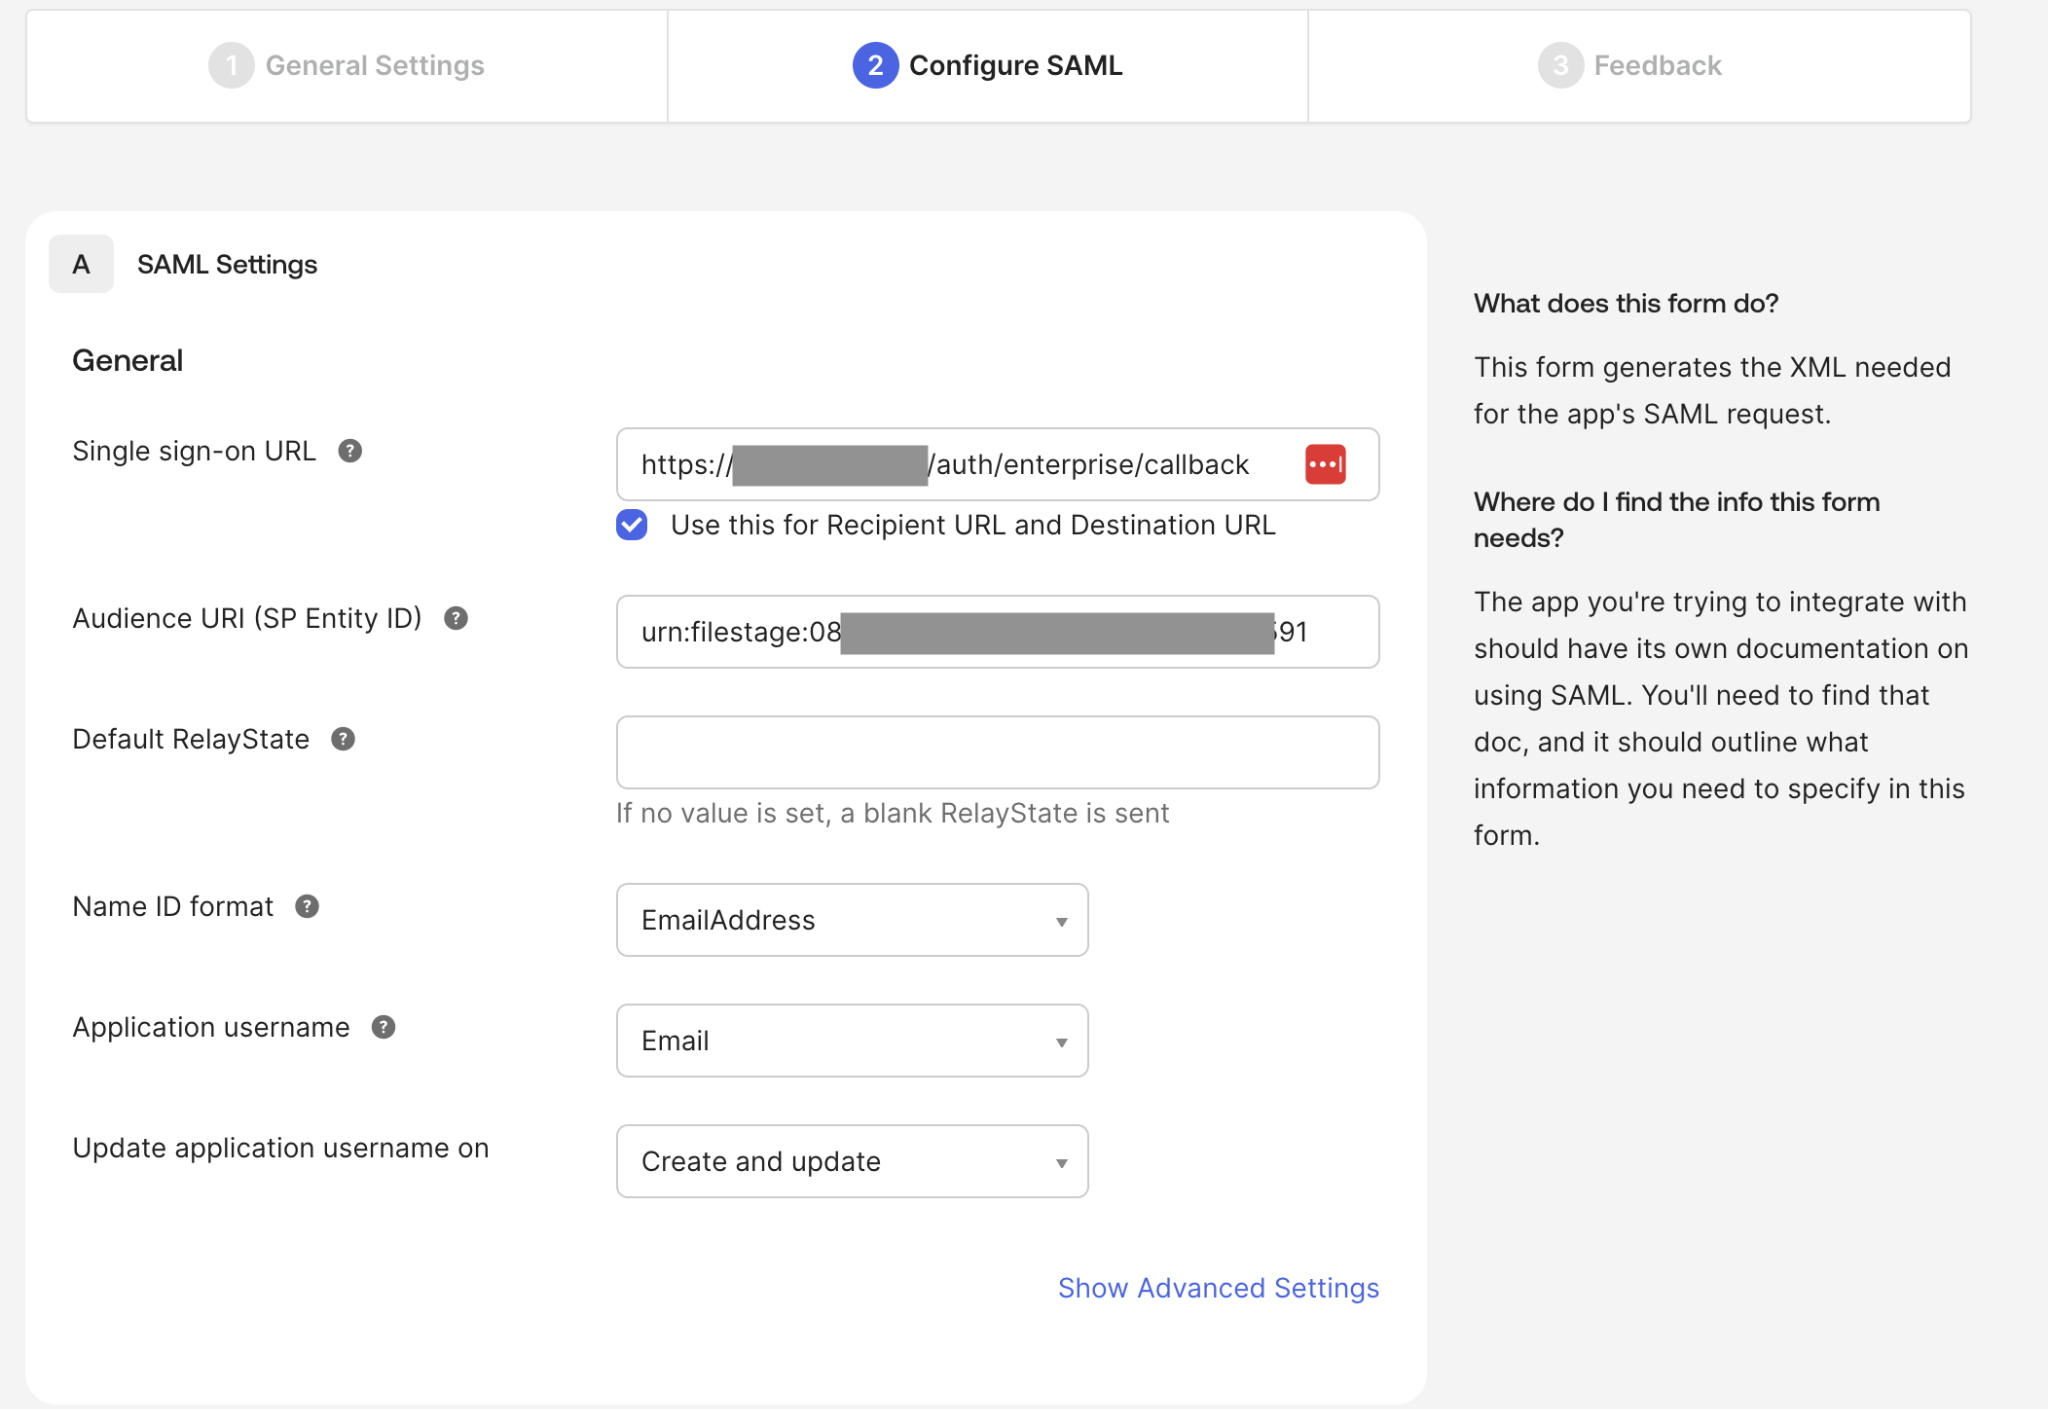
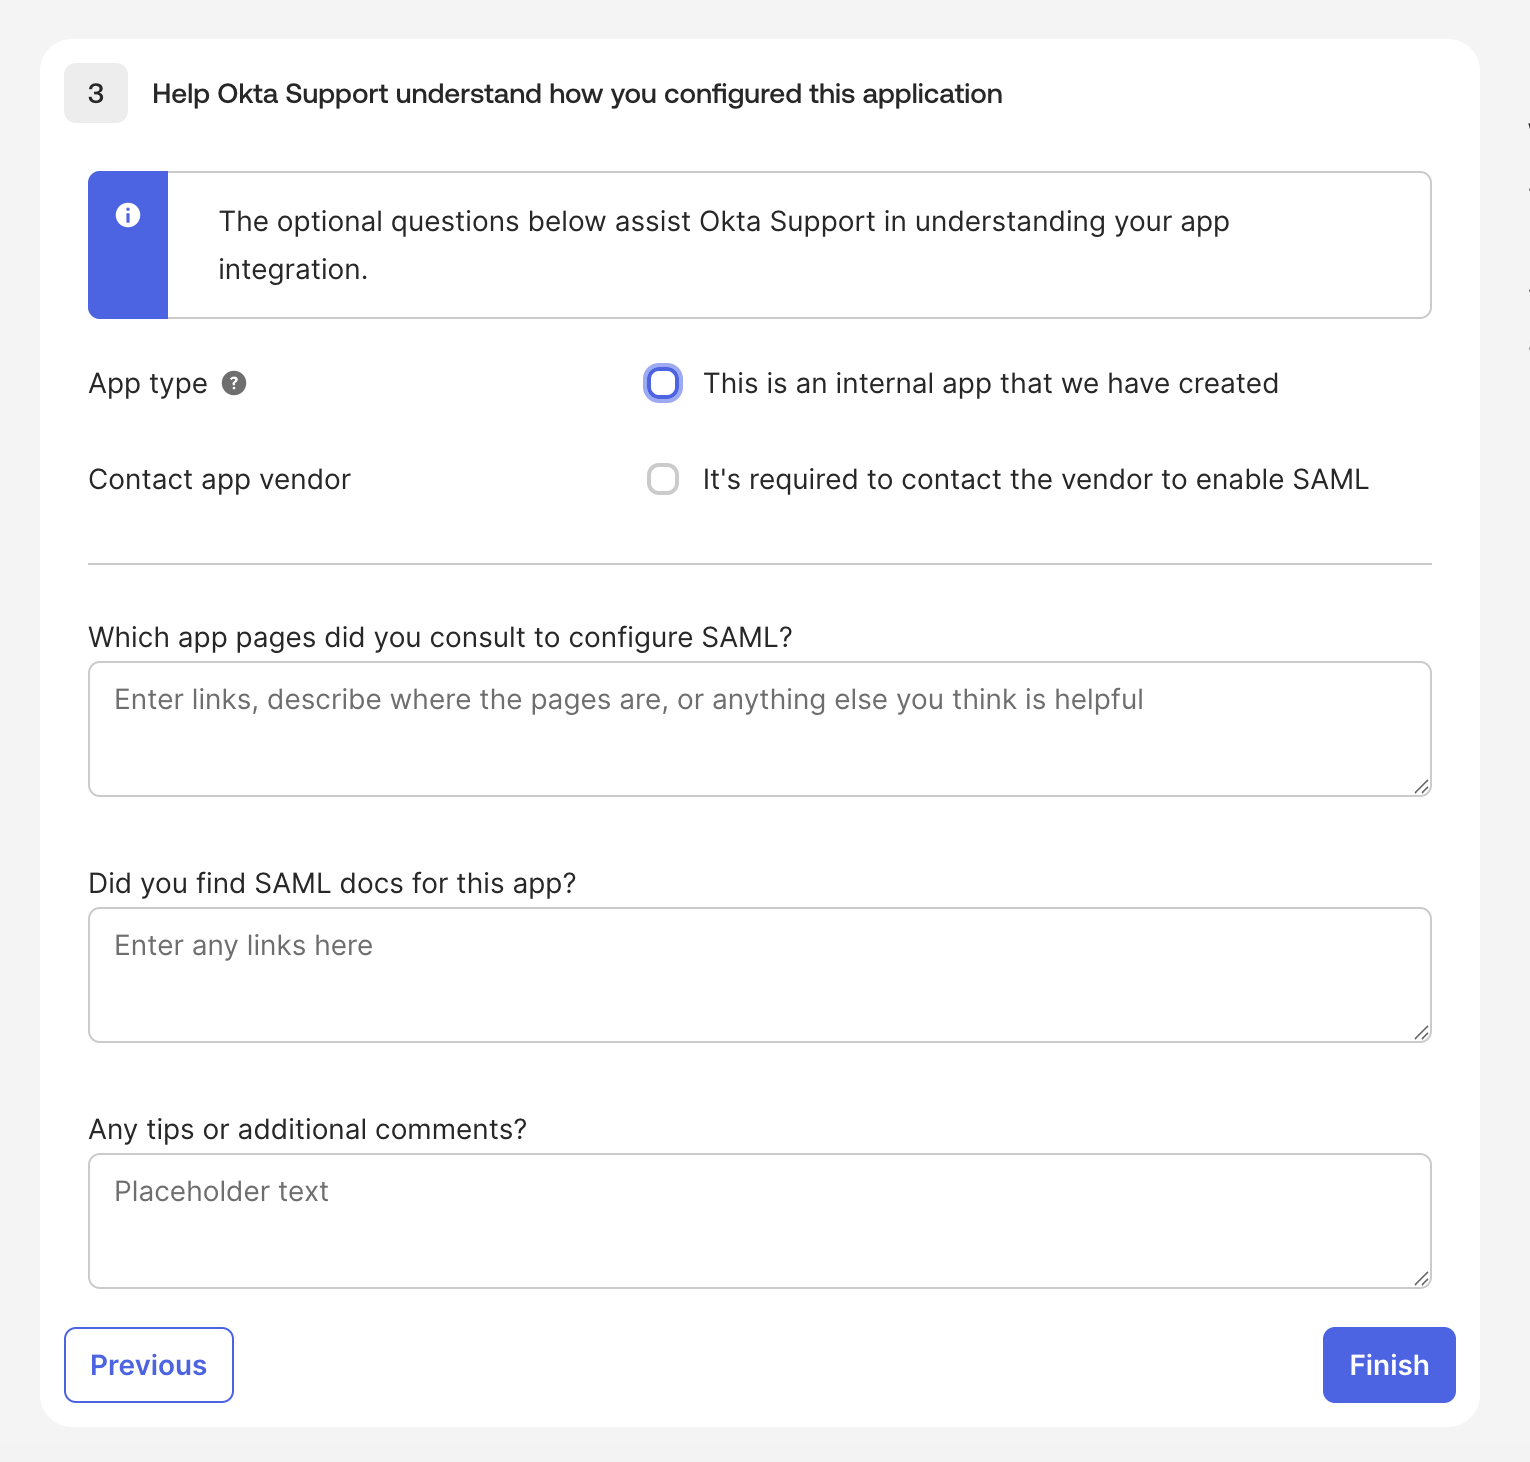
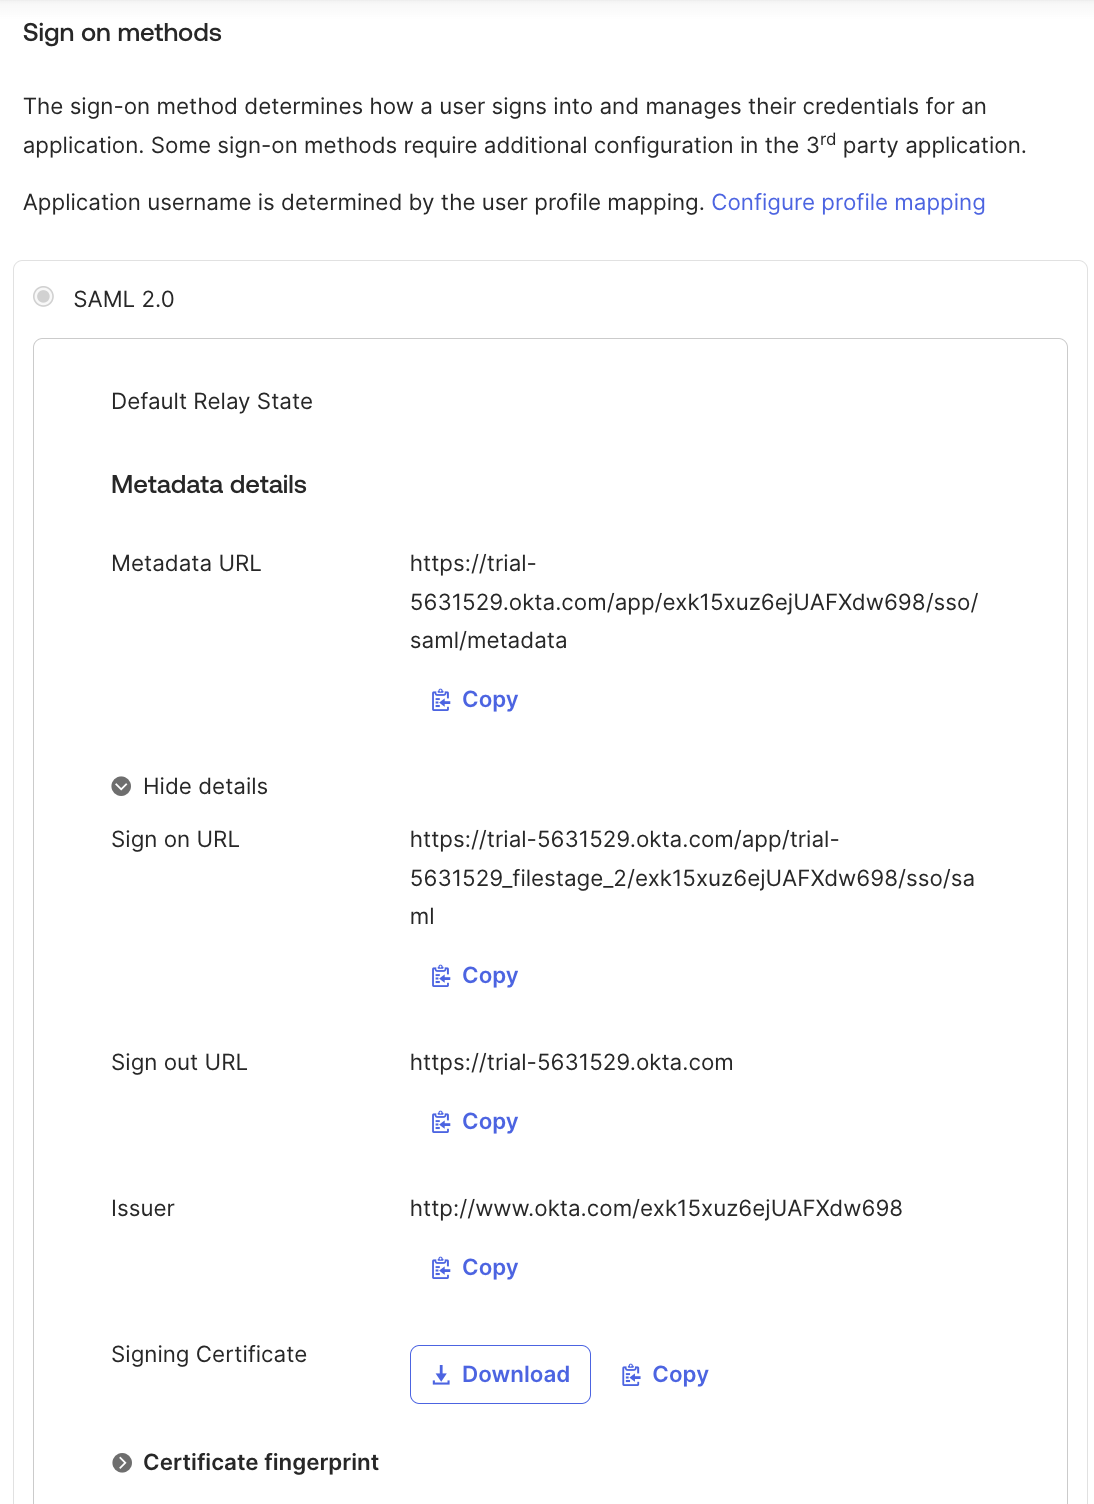
<table style="min-width: 25px;"><colgroup><col style="min-width: 25px;"></colgroup><tbody><tr><td colspan="1" rowspan="1" style="box-sizing: border-box; font-family: proxima-nova, &quot;Helvetica Neue&quot;, system-ui, &quot;Segoe UI&quot;, Roboto, Helvetica, Arial, sans-serif, &quot;Apple Color Emoji&quot;, &quot;Segoe UI Emoji&quot;, &quot;Segoe UI Symbol&quot;; line-height: 1; border: 1px solid rgba(0, 0, 0, 0.1); min-width: 100px; padding: 0.5rem; position: relative; text-align: left; vertical-align: top; margin-top: 0px;"><ol><li><p style="text-align: left;"><span style="color: rgb(0, 0, 0);">Melde dich in deinem <strong>Okta Admin Dashboard</strong> an.</span></p></li><li><p style="text-align: left;"><span style="color: rgb(0, 0, 0);">Gehe zu <strong>Applications &gt; Applications</strong> und klicke auf <strong>Create App Integration</strong>.</span></p></li></ol><img src="https://staticfiles.gleap.io/g/nAFaTlkBu1auWrrjdhqhYtgjm79twmf3Xu0ErKO4JFUAjATrZmzsgVfbR985PwIB4T7GmcmdnDh.png" style="box-sizing: border-box; font-family: proxima-nova, &quot;Helvetica Neue&quot;, system-ui, &quot;Segoe UI&quot;, Roboto, Helvetica, Arial, sans-serif, &quot;Apple Color Emoji&quot;, &quot;Segoe UI Emoji&quot;, &quot;Segoe UI Symbol&quot;; line-height: 1; height: auto; width: 100%; max-width: 100%; margin-top: 24px; margin-bottom: 24px; border-radius: 8px; align-self: center; cursor: pointer;"><ol start="3"><li><p style="text-align: left;">Wähle <strong>SAML 2.0</strong> als Sign-in-Methode und klicke auf <strong>Next</strong>.</p></li></ol><img src="https://staticfiles.gleap.io/g/B9htfrznp6AzSi8vcndvoit7puwX8x1jYLihAl2l6FWS8OgDOjAmretCN9cYM4oqUfpYB1wYktB.png" style="box-sizing: border-box; font-family: proxima-nova, &quot;Helvetica Neue&quot;, system-ui, &quot;Segoe UI&quot;, Roboto, Helvetica, Arial, sans-serif, &quot;Apple Color Emoji&quot;, &quot;Segoe UI Emoji&quot;, &quot;Segoe UI Symbol&quot;; line-height: 1; height: auto; width: 100%; max-width: 100%; margin-top: 24px; margin-bottom: 24px; border-radius: 8px; align-self: center; cursor: pointer;"><ol start="4"><li><p style="text-align: left;">Gib einen <strong>App name</strong> ein, mit dem du die App wiedererkennst (z. B. Filestage), und klicke auf <strong>Next</strong>.</p></li></ol><img src="https://staticfiles.gleap.io/g/9eUe2Um9Ej3z7Cv51UPyI30CjaOP6iPOaXL5Orh8jrLccUy6QEBKqKQX8Y1SlwDI1CCfvfj0PnG.png" style="box-sizing: border-box; font-family: proxima-nova, &quot;Helvetica Neue&quot;, system-ui, &quot;Segoe UI&quot;, Roboto, Helvetica, Arial, sans-serif, &quot;Apple Color Emoji&quot;, &quot;Segoe UI Emoji&quot;, &quot;Segoe UI Symbol&quot;; line-height: 1; height: auto; width: 100%; max-width: 100%; margin-top: 24px; margin-bottom: 24px; border-radius: 8px; align-self: center; cursor: pointer;"><ol start="5"><li><p style="text-align: left;">Setze im Schritt Configure SAML die <strong>Single sign-on URL</strong> auf die <strong>Assertion Consumer Service (ACS) URL</strong>, die du aus Filestage kopiert hast.</p></li><li><p style="text-align: left;">Setze die <strong>Audience URI (SP Entity ID)</strong> auf die <strong>Entity ID (Audience)</strong> aus Filestage.</p></li><li><p style="text-align: left;">Setze das <strong>Name ID format</strong> auf <strong>EmailAddress</strong> und den <strong>Application username</strong> auf <strong>Email</strong>, dann klicke auf <strong>Next</strong>.</p></li></ol><img src="https://staticfiles.gleap.io/g/vfLLQejc3bJo93m4DTYcFAZY0KBgRre6fN6kQItiBa88lb7jFD3ZDcJcicCWyevZWQQwVx6OQqJ.png" style="box-sizing: border-box; font-family: proxima-nova, &quot;Helvetica Neue&quot;, system-ui, &quot;Segoe UI&quot;, Roboto, Helvetica, Arial, sans-serif, &quot;Apple Color Emoji&quot;, &quot;Segoe UI Emoji&quot;, &quot;Segoe UI Symbol&quot;; line-height: 1; height: auto; width: 100%; max-width: 100%; margin-top: 24px; margin-bottom: 24px; border-radius: 8px; align-self: center; cursor: pointer;"><ol start="8"><li><p style="text-align: left;">Im Schritt <strong>Feedback</strong> sind alle Felder optional - klicke auf <strong>Finish</strong>.</p></li></ol><img src="https://staticfiles.gleap.io/g/9MF18chzXfMLB3LsX2c03wu6l1su8KqAli5N2peuqUSm0Co2o4tCacd9guF3cOofEVeWiSI7HaJ.png" style="box-sizing: border-box; font-family: proxima-nova, &quot;Helvetica Neue&quot;, system-ui, &quot;Segoe UI&quot;, Roboto, Helvetica, Arial, sans-serif, &quot;Apple Color Emoji&quot;, &quot;Segoe UI Emoji&quot;, &quot;Segoe UI Symbol&quot;; line-height: 1; height: auto; width: 100%; max-width: 100%; margin-top: 24px; margin-bottom: 24px; border-radius: 8px; align-self: center; cursor: pointer;"><ol start="9"><li><p style="text-align: left;">Öffne die eben erstellte App, gehe zum Tab <strong>Sign On</strong> und klicke auf <strong>More details</strong>.</p></li></ol><img src="https://staticfiles.gleap.io/g/eouzb3OURNA6ZUiIN81dmxFLk8YgGMDueK1VOuq0S1kebFhpqGQla7yByPsHc1fqgGETxfQU6bN.png" style="box-sizing: border-box; font-family: proxima-nova, &quot;Helvetica Neue&quot;, system-ui, &quot;Segoe UI&quot;, Roboto, Helvetica, Arial, sans-serif, &quot;Apple Color Emoji&quot;, &quot;Segoe UI Emoji&quot;, &quot;Segoe UI Symbol&quot;; line-height: 1; height: auto; width: 100%; max-width: 100%; margin-top: 24px; margin-bottom: 24px; border-radius: 8px; align-self: center; cursor: pointer;"><ol start="10"><li><p style="text-align: left;">Notiere dir die <strong>Sign on URL</strong> und den <strong>Issuer</strong> und lade das <strong>Signing Certificate</strong> herunter - du brauchst sie gleich in Filestage.</p></li></ol></td></tr></tbody></table>

### Schritt 3: Konfiguriere SSO in Filestage

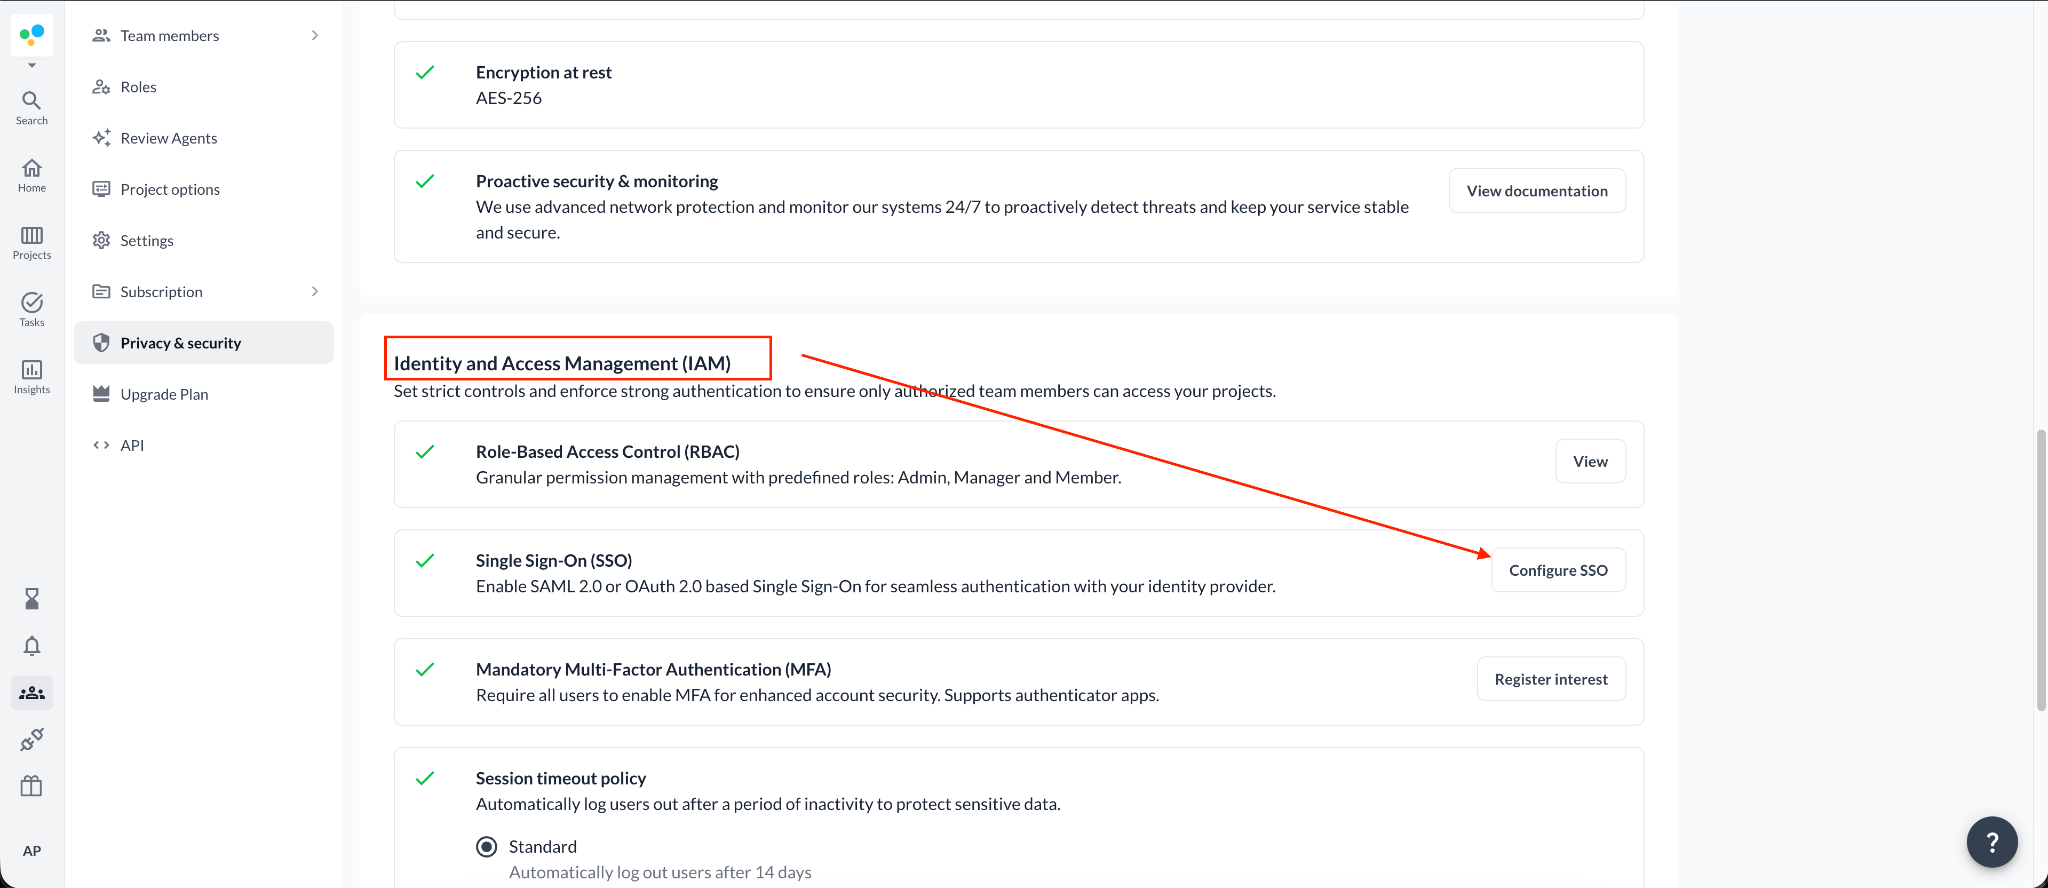
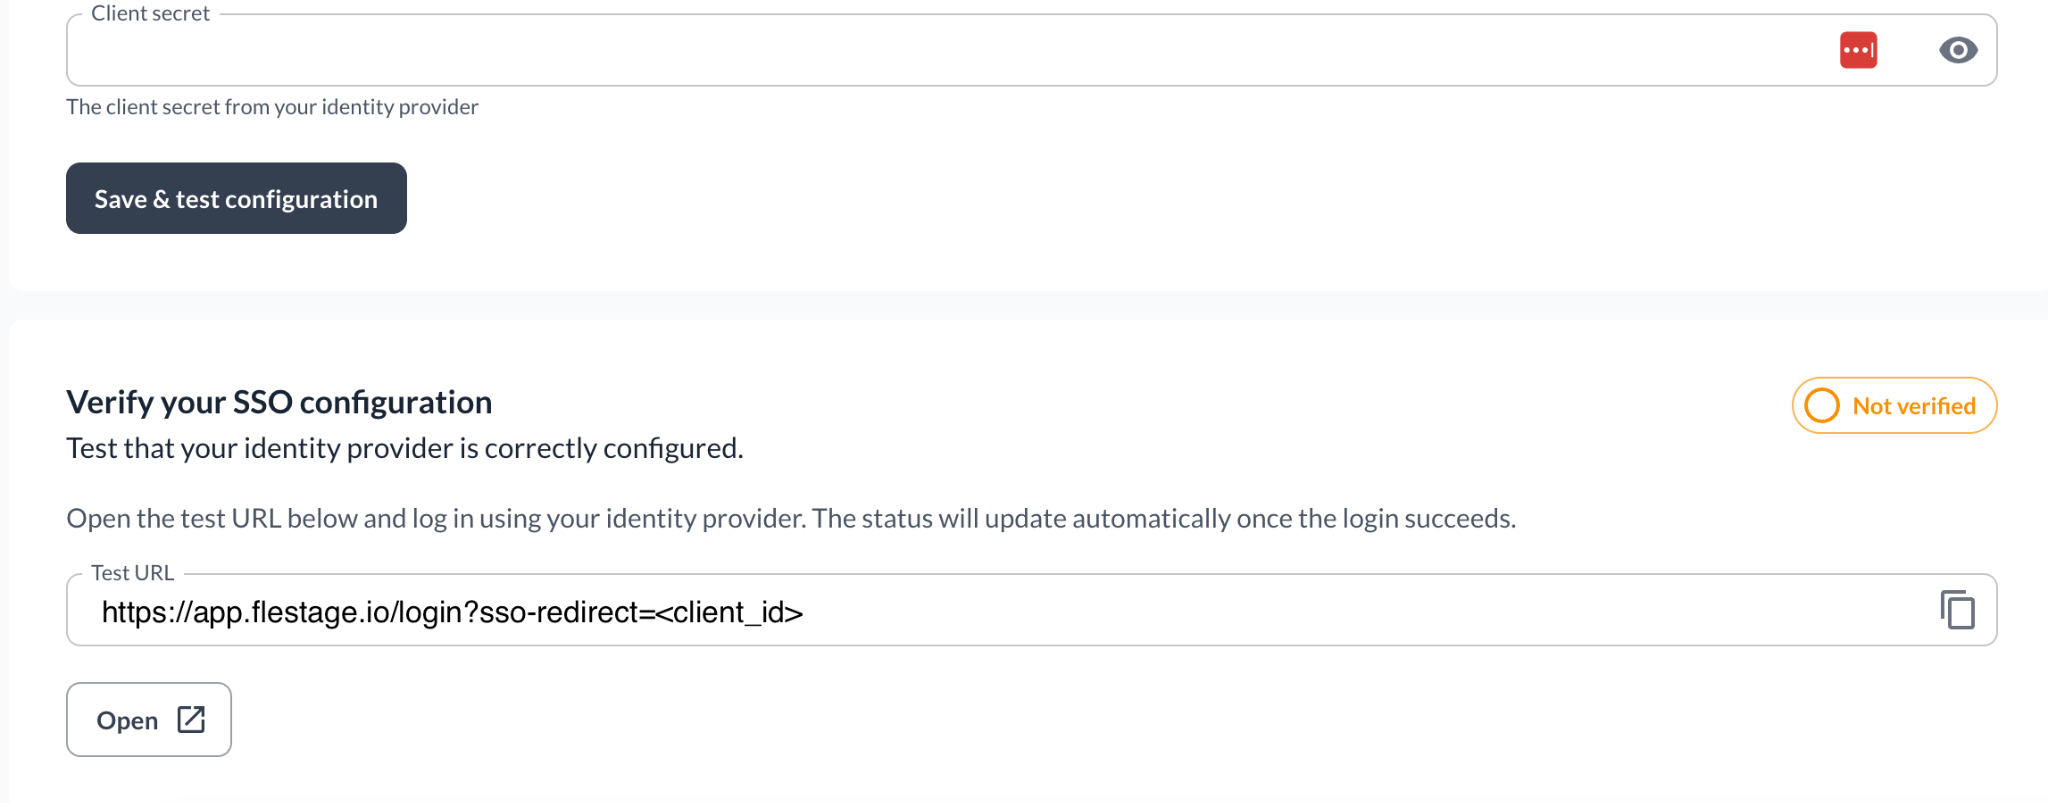
<table style="min-width: 25px;"><colgroup><col style="min-width: 25px;"></colgroup><tbody><tr><td colspan="1" rowspan="1" style="box-sizing: border-box; font-family: proxima-nova, &quot;Helvetica Neue&quot;, system-ui, &quot;Segoe UI&quot;, Roboto, Helvetica, Arial, sans-serif, &quot;Apple Color Emoji&quot;, &quot;Segoe UI Emoji&quot;, &quot;Segoe UI Symbol&quot;; line-height: 1; border: 1px solid rgba(0, 0, 0, 0.1); min-width: 100px; padding: 0.5rem; position: relative; text-align: left; vertical-align: top; margin-top: 0px;"><ol><li><p style="text-align: left;"><span style="color: rgb(0, 0, 0);">Gehe in Filestage zu </span><a target="_blank" rel="noopener noreferrer nofollow" class="linktype-link link" data-linktype="link" href="https://app.filestage.io/teams/security-and-privacy"><span style="color: rgb(0, 0, 0);"><u>app.filestage.io/teams/security-and-privacy</u></span></a><span style="color: rgb(0, 0, 0);"> - dort öffnen sich die Sicherheits- und Datenschutzeinstellungen deines zuletzt ausgewählten Teams.</span></p></li><li><p style="text-align: left;"><span style="color: rgb(0, 0, 0);">Scrolle nach unten zum Bereich <strong>Identity and Access Management (IAM)</strong> und klicke auf <strong>Configure SSO</strong>.</span></p></li></ol><img src="https://staticfiles.gleap.io/g/uE3ZMLWr50g1O2UL8pfxYZg5b7UUg4UfAZpOjKYULiy8fqbC6uIydXI6AGCeFtL2gKjfRLpxd8U.png" style="box-sizing: border-box; font-family: proxima-nova, &quot;Helvetica Neue&quot;, system-ui, &quot;Segoe UI&quot;, Roboto, Helvetica, Arial, sans-serif, &quot;Apple Color Emoji&quot;, &quot;Segoe UI Emoji&quot;, &quot;Segoe UI Symbol&quot;; line-height: 1; height: auto; width: 100%; max-width: 100%; margin-top: 24px; margin-bottom: 24px; border-radius: 8px; align-self: center; cursor: pointer;"><ol start="3"><li><p style="text-align: left;">Wähle die Option <strong>SAML</strong>.</p></li><li><p style="text-align: left;">Trage die Daten ein, die du aus Okta kopiert hast: die <strong>Sign on URL</strong> in <strong>SSO URL (login URL)</strong>, den <strong>Issuer</strong> in <strong>Issuer (Entity ID)</strong> - und lade die <strong>Signing certificate</strong>-Datei hoch.</p></li></ol><img src="https://staticfiles.gleap.io/g/iqrRZQiHrzCNHQ3RfzCvMoNTR8xaRg1xUdKel3Z4R2tjWr3DcpVyXMi9ennuiadD7sNzJjkeBsV.png" style="box-sizing: border-box; font-family: proxima-nova, &quot;Helvetica Neue&quot;, system-ui, &quot;Segoe UI&quot;, Roboto, Helvetica, Arial, sans-serif, &quot;Apple Color Emoji&quot;, &quot;Segoe UI Emoji&quot;, &quot;Segoe UI Symbol&quot;; line-height: 1; height: auto; width: 100%; max-width: 100%; margin-top: 24px; margin-bottom: 24px; border-radius: 8px; align-self: center; cursor: pointer;"><ol start="5"><li><p style="text-align: left;"><span style="color: rgb(0, 0, 0);">Klicke auf <strong>Save &amp; test configuration</strong> - der Bereich zum Verifizieren erscheint unten auf der Seite.</span></p></li></ol><img src="https://staticfiles.gleap.io/g/bn7BlirgMI0sxZtbi1qB1qeaaWHtSFUTVRoEHVS1wuMCQsNiR3MaUiZwxZwPtoTbX8OZyqyn3Am.png" style="box-sizing: border-box; font-family: proxima-nova, &quot;Helvetica Neue&quot;, system-ui, &quot;Segoe UI&quot;, Roboto, Helvetica, Arial, sans-serif, &quot;Apple Color Emoji&quot;, &quot;Segoe UI Emoji&quot;, &quot;Segoe UI Symbol&quot;; line-height: 1; height: auto; width: 100%; max-width: 100%; margin-top: 24px; margin-bottom: 24px; border-radius: 8px; align-self: center; cursor: pointer;"></td></tr></tbody></table>

### Schritt 4: Verifiziere deine SSO-Konfiguration

> **Warning:** Sobald die Verifizierung erfolgreich abgeschlossen ist, müssen sich alle deine Teammitglieder nur noch über SSO bei Filestage anmelden.

<table style="min-width: 25px;"><colgroup><col style="min-width: 25px;"></colgroup><tbody><tr><td colspan="1" rowspan="1" style="box-sizing: border-box; font-family: proxima-nova, &quot;Helvetica Neue&quot;, system-ui, &quot;Segoe UI&quot;, Roboto, Helvetica, Arial, sans-serif, &quot;Apple Color Emoji&quot;, &quot;Segoe UI Emoji&quot;, &quot;Segoe UI Symbol&quot;; line-height: 1; border: 1px solid rgba(0, 0, 0, 0.1); min-width: 100px; padding: 0.5rem; position: relative; text-align: left; vertical-align: top; margin-top: 0px;"><ol><li><p style="text-align: left;"><span style="color: rgb(0, 0, 0);">Kopiere die <strong>Test URL</strong> aus dem Verifizierungsbereich.</span></p></li><li><p style="text-align: left;"><span style="color: rgb(0, 0, 0);">Melde dich von Filestage ab oder öffne die Test-URL in einem Inkognito-Fenster deines Browsers.</span></p></li><li><p style="text-align: left;"><span style="color: rgb(0, 0, 0);">Melde dich über deinen Identity Provider an. Wenn alles richtig konfiguriert ist, wechselt der Status zu <strong>Verified</strong> und du siehst diese Bestätigung:</span></p></li></ol><img src="https://staticfiles.gleap.io/g/oACzy4fPlG5d8AxR7DscdsQsJGecEGLKe5mfhnNmlGUlkfbTITLVpdktcOViscnfgvObVfGNacG.png" style="box-sizing: border-box; font-family: proxima-nova, &quot;Helvetica Neue&quot;, system-ui, &quot;Segoe UI&quot;, Roboto, Helvetica, Arial, sans-serif, &quot;Apple Color Emoji&quot;, &quot;Segoe UI Emoji&quot;, &quot;Segoe UI Symbol&quot;; line-height: 1; height: auto; width: 100%; max-width: 100%; margin-top: 24px; margin-bottom: 24px; border-radius: 8px; align-self: center; cursor: pointer;"></td></tr></tbody></table>

Und das war's - ab jetzt melden sich deine Teammitglieder über deinen Identity Provider bei Filestage an.

💡 Wie geht es weiter? Sieh dir als Nächstes an, wie du [deine Teammitglieder verwaltest](https://help.filestage.io/de/articles/9465096-understand-and-manage-team-members.md)!

Bei Fragen erreichst du uns jederzeit über den Chat oder per E-Mail an [support@filestage.io](mailto:support@filestage.io). Wir helfen dir gerne weiter!