---
title: "Richte dein Single Sign-On (SSO) über Okta (OpenID Connect) ein"
description: "Erfahre, wie du eine Verbindung über das OpenID-Connect-Protokoll für SSO mit Filestage herstellst"
url: https://help.filestage.io/de/articles/9465128-richte-dein-single-sign-on-sso-uber-okta-openid-connect-ein
collection: "Einrichtung, Kompatibilität und Fehlerbehebung"
updated: 2026-08-11
language: de
alternates: [en, fr, es]
---

# Richte dein Single Sign-On (SSO) über Okta (OpenID Connect) ein

Erfahre, wie du eine Verbindung über das OpenID-Connect-Protokoll für SSO mit Filestage herstellst

> **Info:** Diese Funktion ist in unserem Enterprise-Plan oder als kostenpflichtiges Add-on in unserem Business-Plan verfügbar. Bei weiteren Fragen wende dich bitte an unseren Kundensupport unter [support@filestage.io](mailto:support@filestage.io) oder über unseren Chat.

* * *

_Mit Single Sign-On (SSO) meldet sich dein Team bei Filestage mit dem Okta-Konto an, das es ohnehin jeden Tag nutzt. Keine zusätzlichen Passwörter, mehr Sicherheit und volle Kontrolle darüber, wer auf deine Projekte zugreifen kann - und die Verbindung über OpenID Connect ist in wenigen Minuten eingerichtet._

## Wie dir Single Sign-On über OpenID Connect helfen kann

Die Verbindung zwischen Filestage und Okta macht das Anmelden für dein Team einfacher und gibt deinen Admins zentrale Kontrolle über den Zugriff:

-   **Keine zusätzlichen Passwörter** - alle melden sich mit ihrem bestehenden Okta-Konto bei Filestage an.
    
-   **Zentrale Zugriffskontrolle** - entscheide in Okta, wer auf Filestage zugreifen kann, und entferne Zugriffe an einer Stelle, wenn jemand deine Organisation verlässt.
    
-   **Enterprise-Sicherheit** - deine Authentifizierungsrichtlinien, wie Multi-Faktor-Authentifizierung, gelten automatisch für jede Filestage-Anmeldung.
    

## So richtest du SSO mit OpenID Connect (über Okta) ein

### Schritt 1: Erstelle die App-Integration in Okta

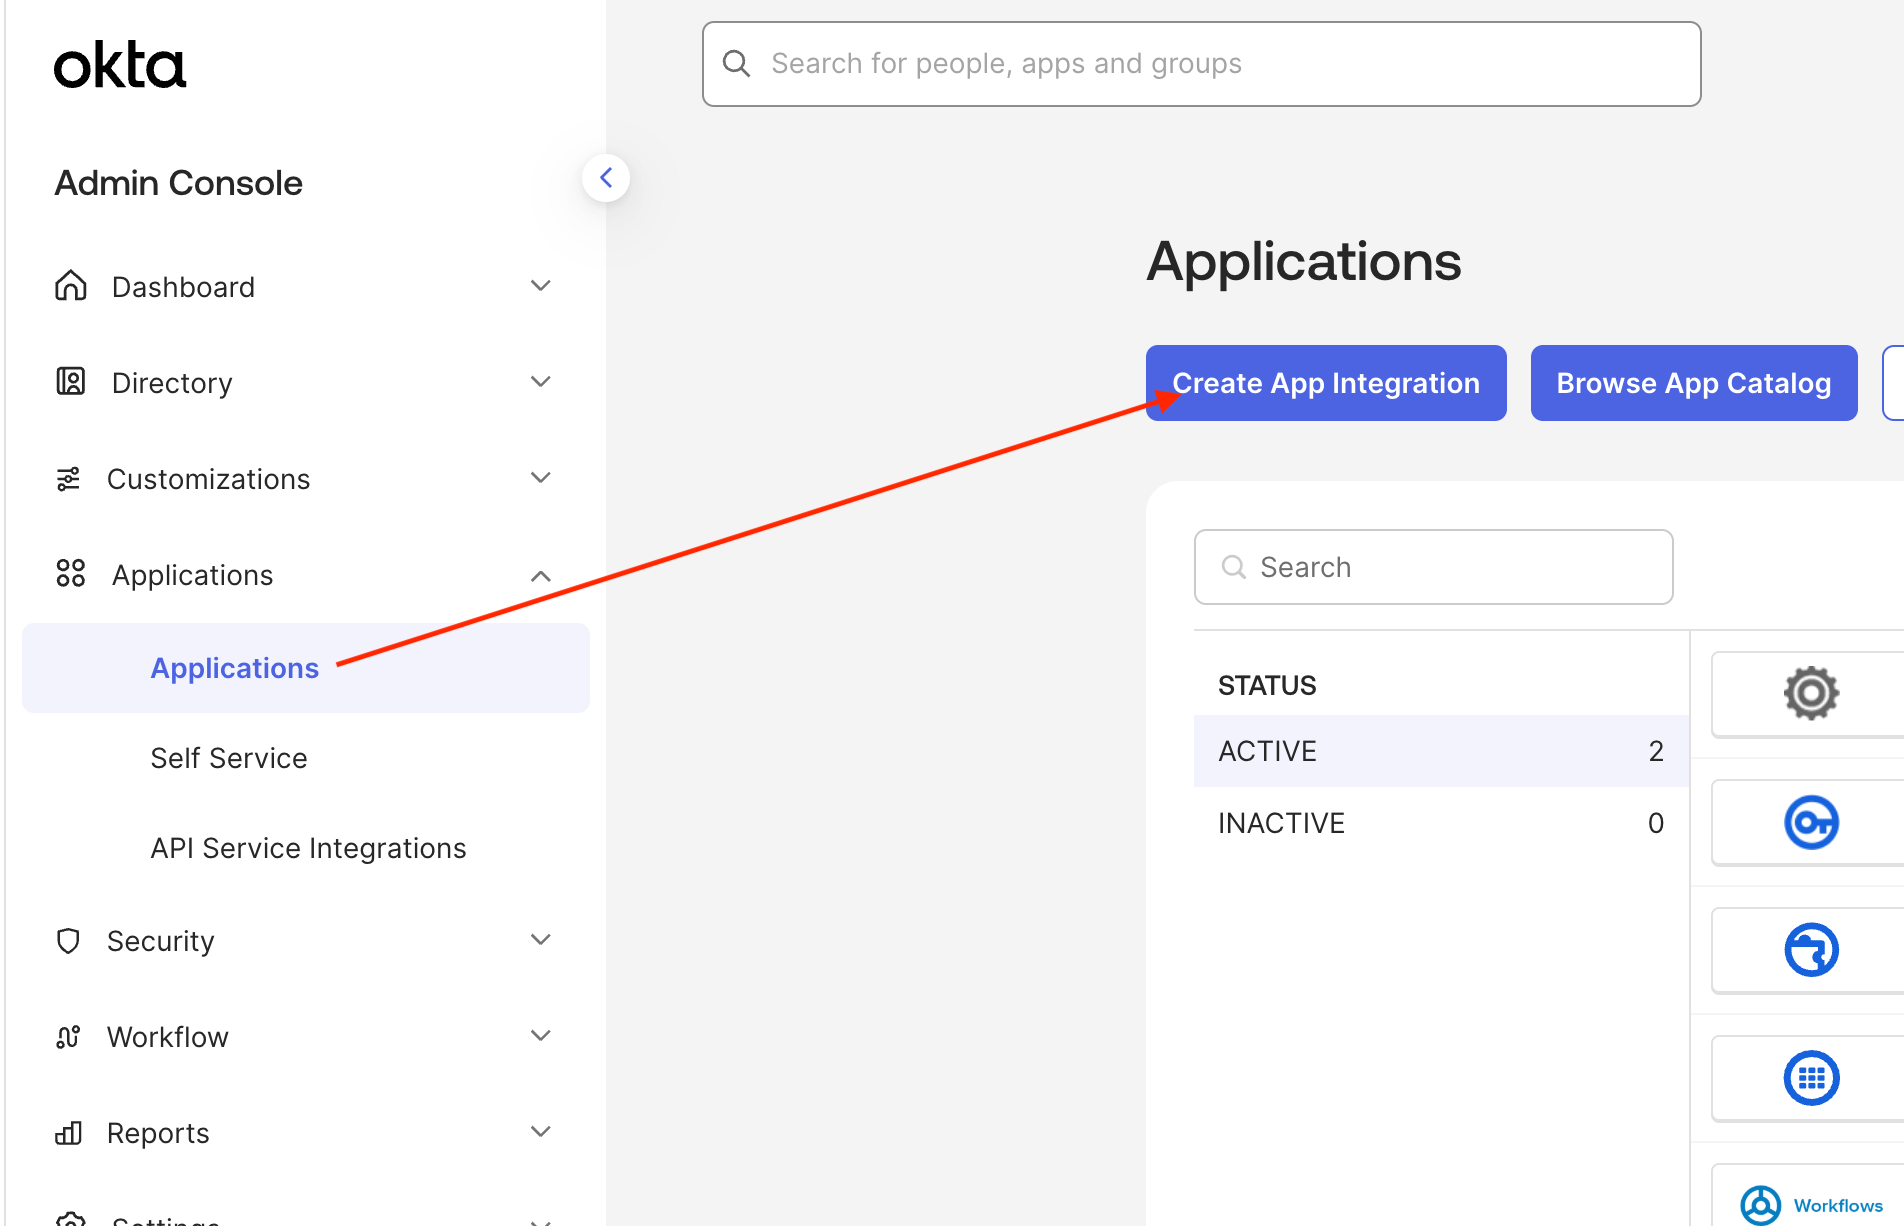
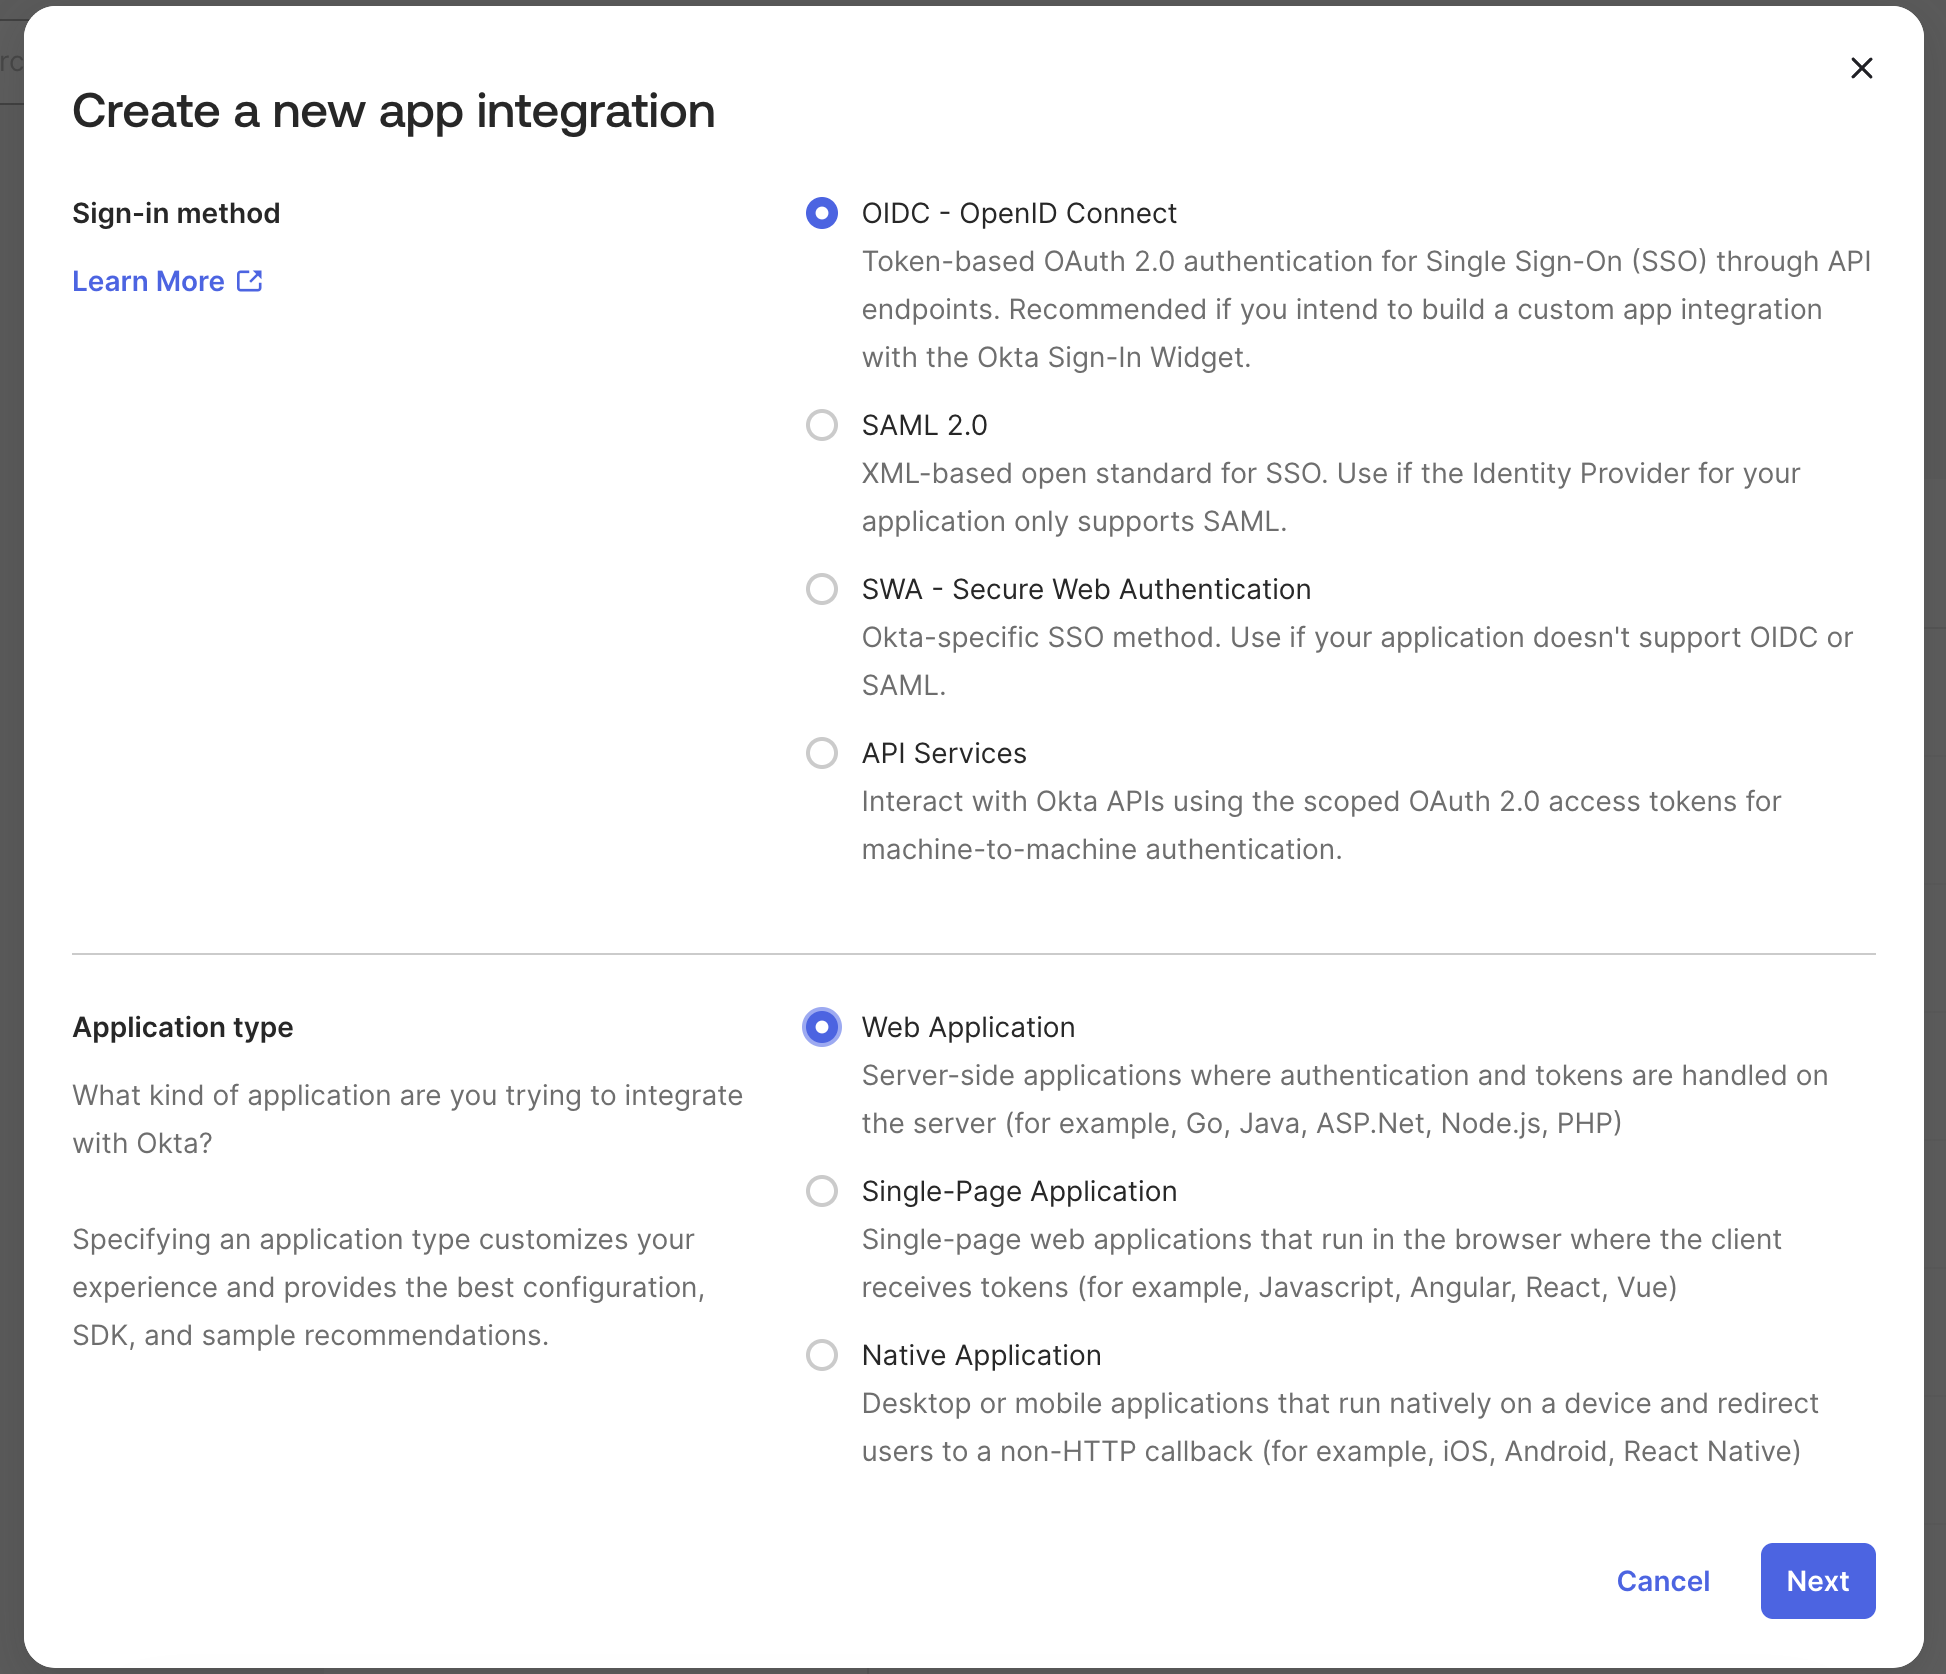
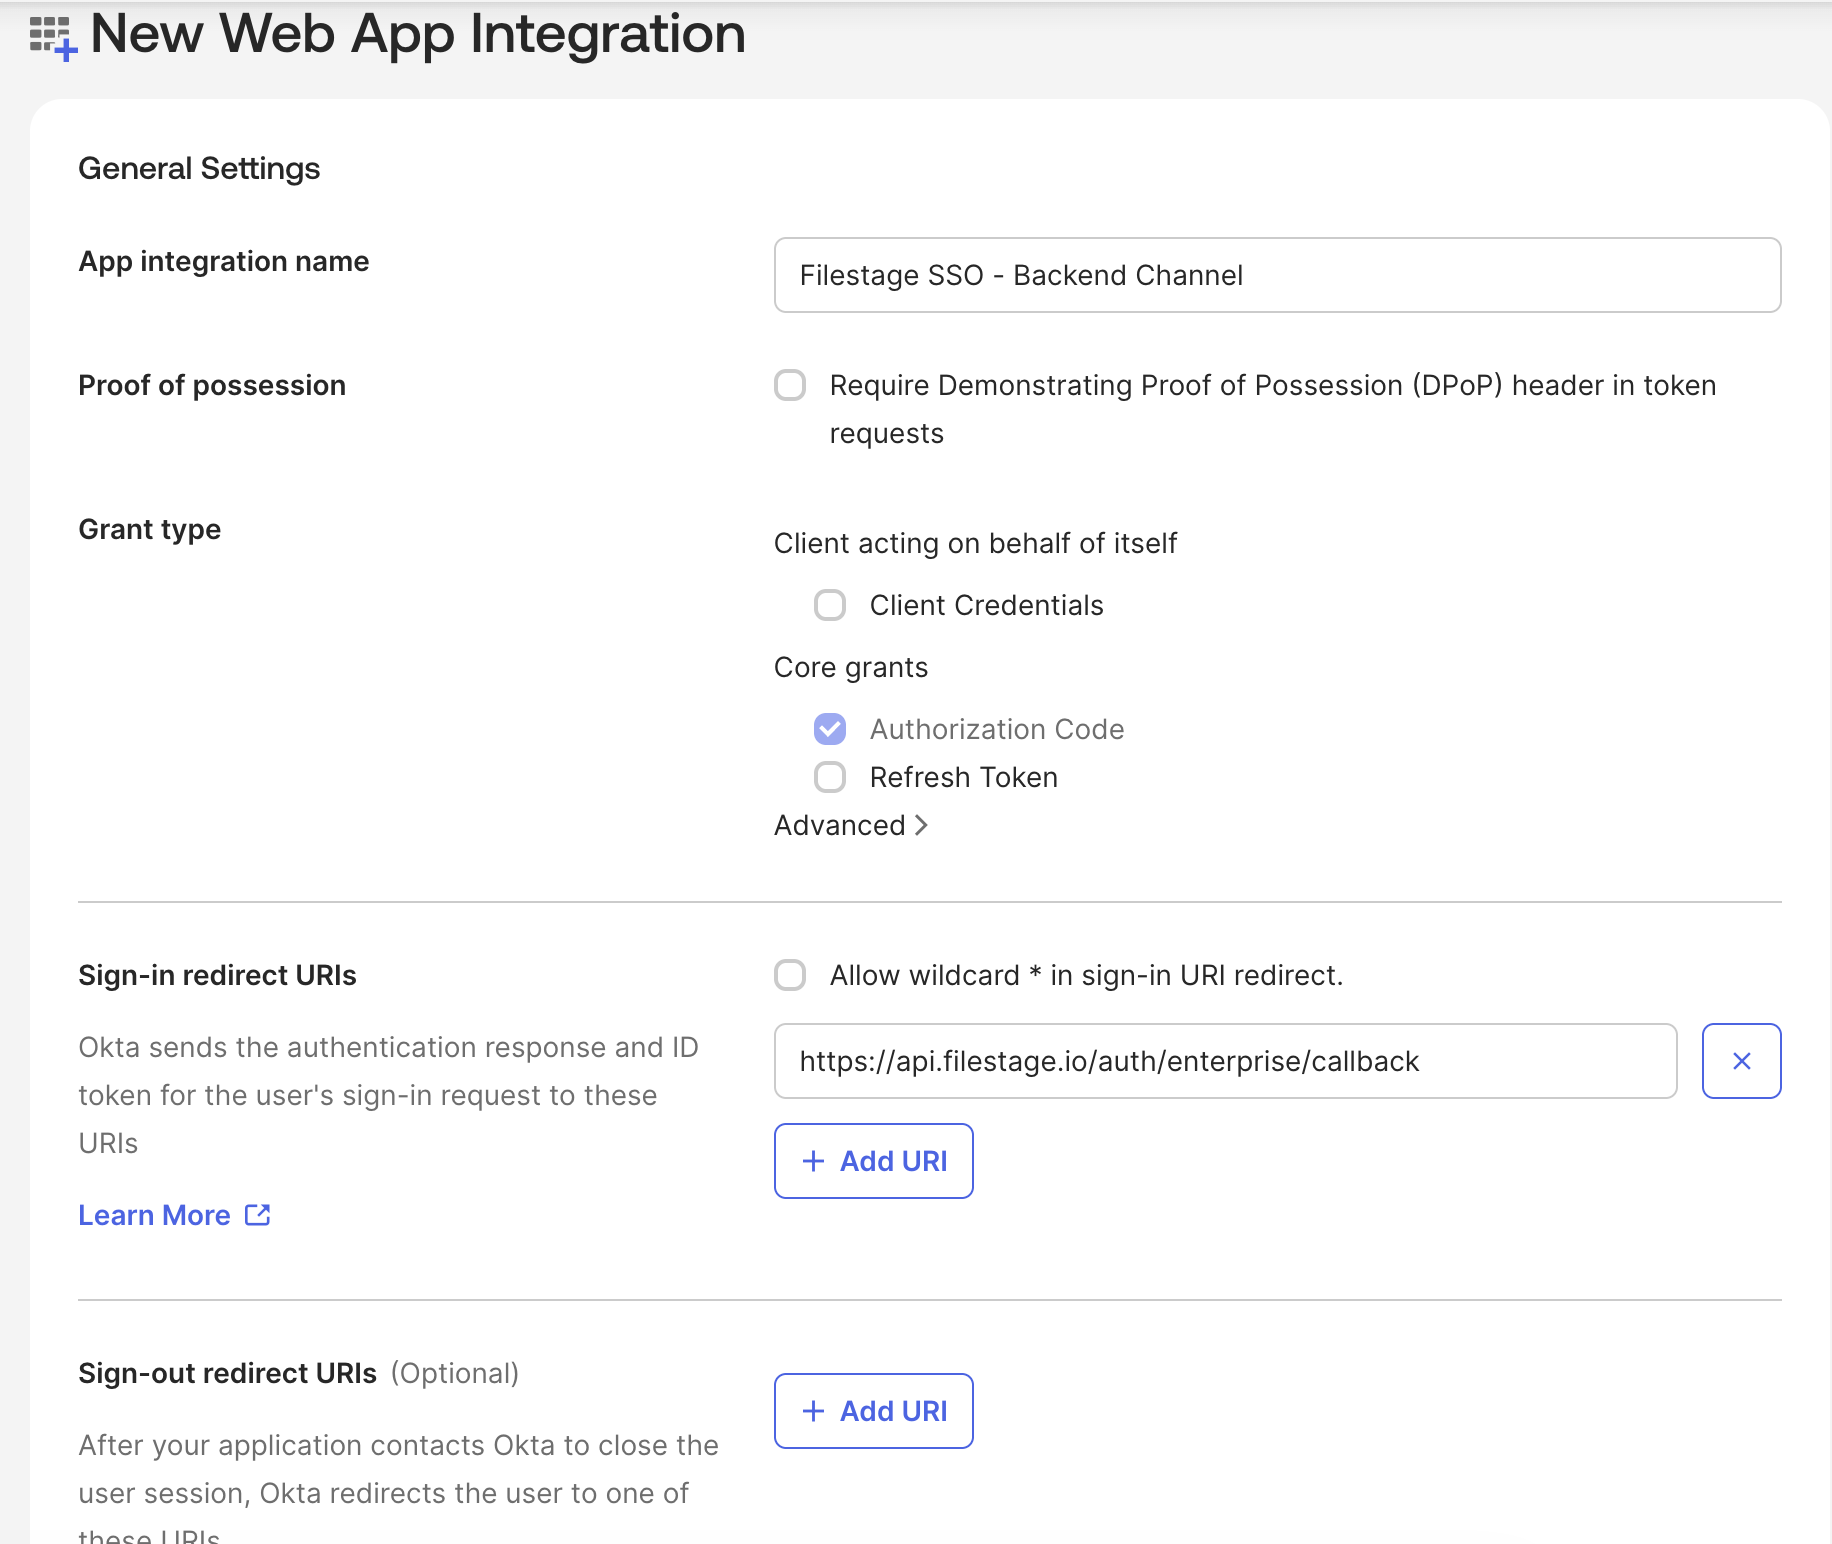
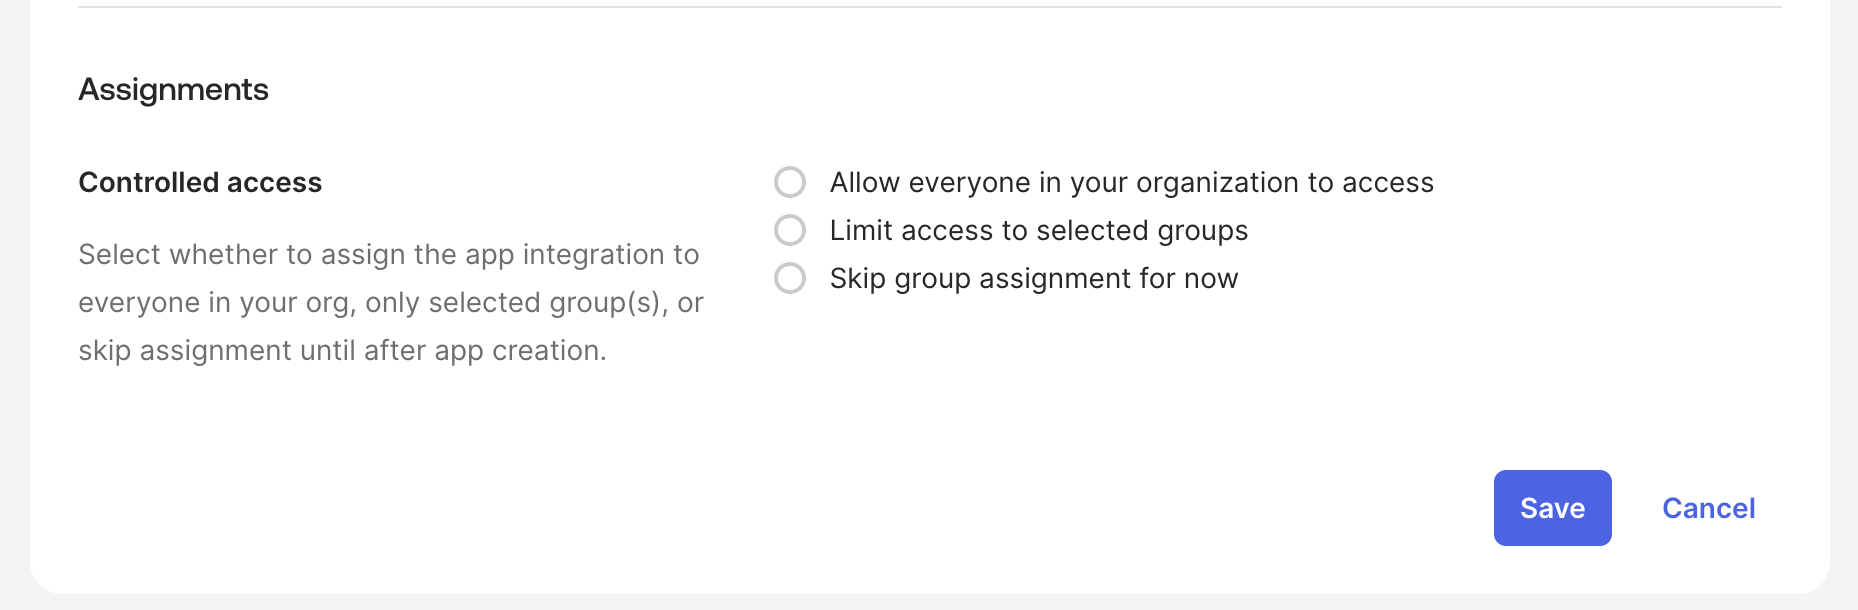
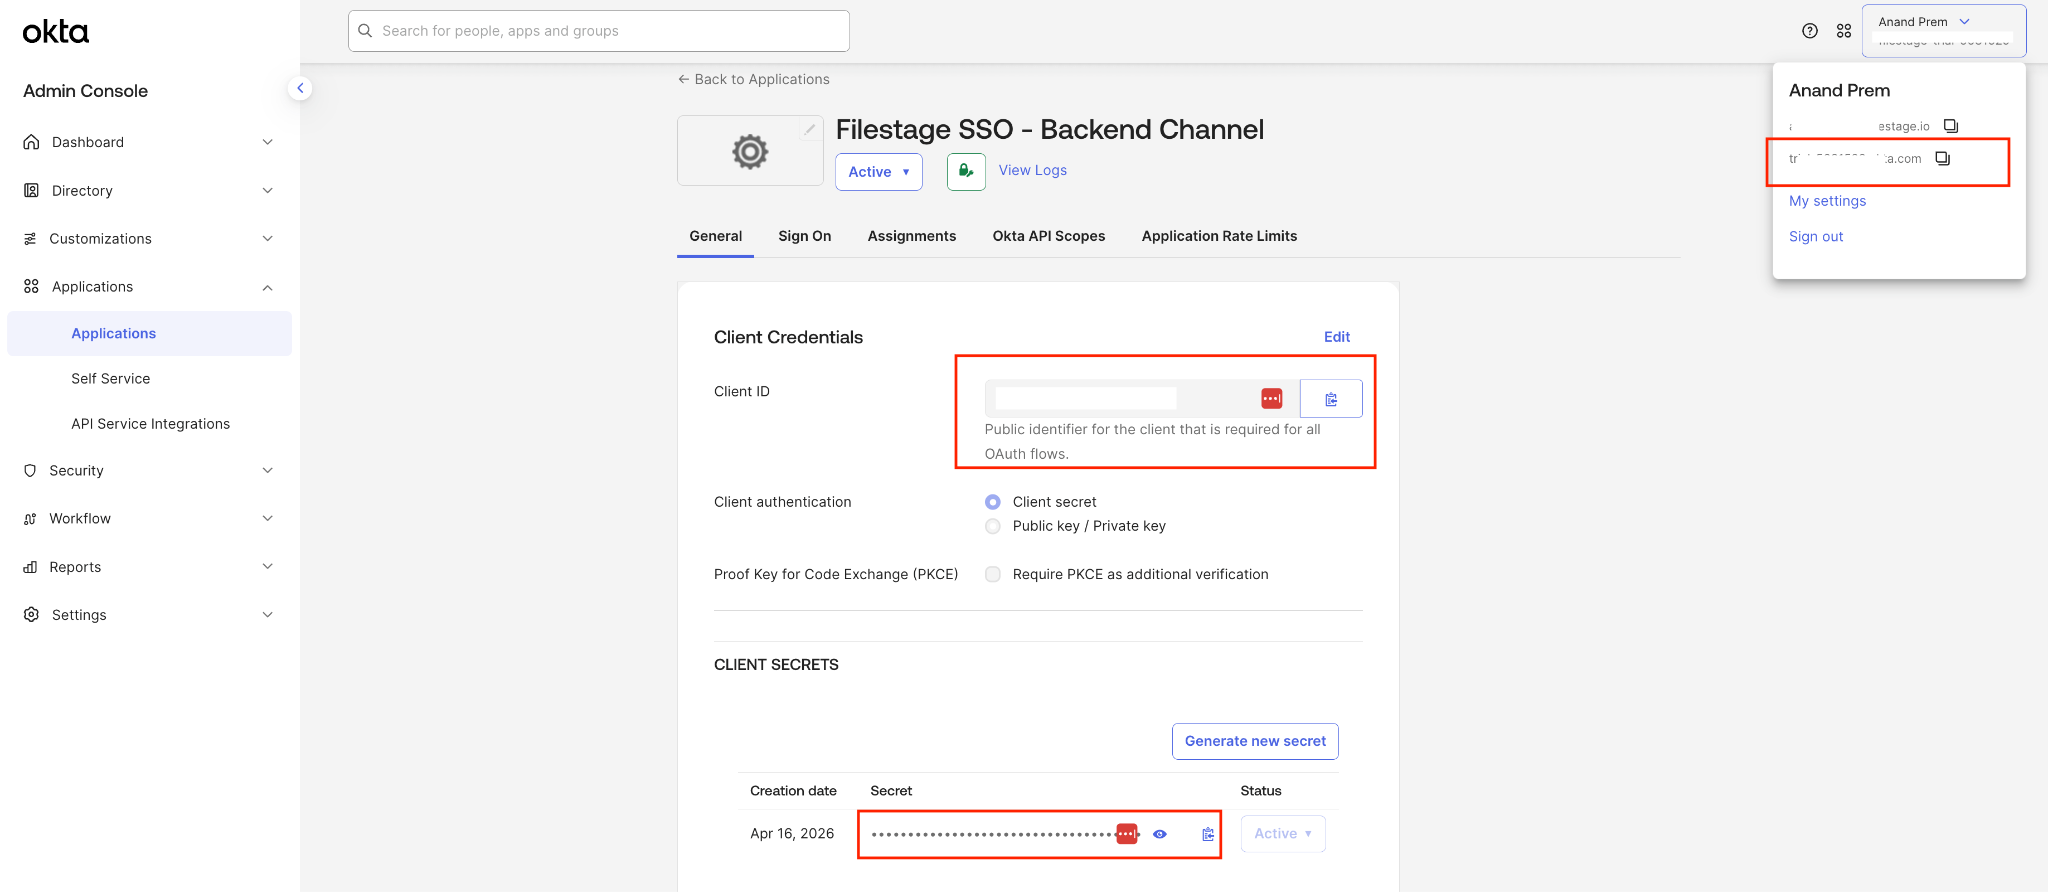
<table data-id="fe4340d1-a5c2-4c95-bd96-b3d29be564d5" style="min-width: 25px;"><colgroup><col style="min-width: 25px;"></colgroup><tbody><tr><td colspan="1" rowspan="1" style="box-sizing: border-box; font-family: proxima-nova, &quot;Helvetica Neue&quot;, system-ui, &quot;Segoe UI&quot;, Roboto, Helvetica, Arial, sans-serif, &quot;Apple Color Emoji&quot;, &quot;Segoe UI Emoji&quot;, &quot;Segoe UI Symbol&quot;; line-height: 1; border: 1px solid rgba(0, 0, 0, 0.1); min-width: 100px; padding: 0.5rem; position: relative; text-align: left; vertical-align: top; margin-top: 0px;"><ol><li><p data-id="8f8a075e-64ed-4b73-aae6-41ba18f9a366" style="text-align: left;"><span style="color: rgb(0, 0, 0);">Melde dich in deinem <strong>Okta Admin Dashboard</strong> an.</span></p></li><li><p data-id="bfe495a5-ea3f-4bec-8194-c290859249af" style="text-align: left;"><span style="color: rgb(0, 0, 0);">Gehe zu <strong>Applications &gt; Applications</strong> und klicke auf <strong>Create App Integration</strong>.</span></p></li></ol><img src="https://staticfiles.gleap.io/g/nAFaTlkBu1auWrrjdhqhYtgjm79twmf3Xu0ErKO4JFUAjATrZmzsgVfbR985PwIB4T7GmcmdnDh.png" alt="Create App Integration button in the Okta Admin Dashboard" style="box-sizing: border-box; font-family: proxima-nova, &quot;Helvetica Neue&quot;, system-ui, &quot;Segoe UI&quot;, Roboto, Helvetica, Arial, sans-serif, &quot;Apple Color Emoji&quot;, &quot;Segoe UI Emoji&quot;, &quot;Segoe UI Symbol&quot;; line-height: 1; height: auto; width: 100%; max-width: 100%; margin-top: 24px; margin-bottom: 24px; border-radius: 8px; align-self: center; cursor: pointer;"><ol start="3"><li><p data-id="df90cbf3-f332-4902-b2d1-f8d1e937f55f" style="text-align: left;"><span style="color: rgb(0, 0, 0);">Wähle <strong>OIDC - OpenID Connect</strong> als Sign-in-Methode und <strong>Web Application</strong> als Anwendungstyp, und klicke dann auf <strong>Next</strong>.</span></p></li></ol><img src="https://staticfiles.gleap.io/g/n9LZoM7Z4XWlKpuuFnQZKHqZ5udg0aei158vVXefcPcs9RwV4juMRfK8b59M9uQUgB28NxY5cyc.png" alt="Selecting OIDC - OpenID Connect and Web Application in Okta" style="box-sizing: border-box; font-family: proxima-nova, &quot;Helvetica Neue&quot;, system-ui, &quot;Segoe UI&quot;, Roboto, Helvetica, Arial, sans-serif, &quot;Apple Color Emoji&quot;, &quot;Segoe UI Emoji&quot;, &quot;Segoe UI Symbol&quot;; line-height: 1; height: auto; width: 100%; max-width: 100%; margin-top: 24px; margin-bottom: 24px; border-radius: 8px; align-self: center; cursor: pointer;"><ol start="4"><li><p data-id="4ee2c5e6-15ed-4a71-bec9-71d817a03c44" style="text-align: left;"><span style="color: rgb(0, 0, 0);">Gib einen <strong>App-Integration-Namen</strong> ein, über den du die Verbindung leicht wiedererkennst (z. B. Filestage).</span></p></li><li><p data-id="a63fcbe2-9033-4cab-b3c2-7eb7d7e4eff6" style="text-align: left;"><span style="color: rgb(0, 0, 0);">Wähle unter Grant type die Option <strong>Authorization Code</strong>.</span></p></li><li><p data-id="061beef7-9ea0-4bfc-80a7-0b5686db0116" style="text-align: left;"><span style="color: rgb(0, 0, 0);">Füge die folgende <strong>Sign-in redirect URI</strong> hinzu: https://api.filestage.io/auth/enterprise/callback</span></p></li></ol><img src="https://staticfiles.gleap.io/g/VnOF9Ub8M3LSEpyuddeIinz4sWCgviuO6dVkeVJHq7jdbniOCoFA5WAWK7yfGoairGJjV9USGj5.png" alt="New Web App Integration settings in Okta with the Filestage redirect URI" style="box-sizing: border-box; font-family: proxima-nova, &quot;Helvetica Neue&quot;, system-ui, &quot;Segoe UI&quot;, Roboto, Helvetica, Arial, sans-serif, &quot;Apple Color Emoji&quot;, &quot;Segoe UI Emoji&quot;, &quot;Segoe UI Symbol&quot;; line-height: 1; height: auto; width: 100%; max-width: 100%; margin-top: 24px; margin-bottom: 24px; border-radius: 8px; align-self: center; cursor: pointer;"><ol start="7"><li><p data-id="b37cb513-89d9-4822-9e99-3e19e177d314" style="text-align: left;"><span style="color: rgb(0, 0, 0);">Wähle unter Assignments aus, wer aus deiner Organisation Zugriff auf Filestage haben soll.</span></p></li></ol><img src="https://staticfiles.gleap.io/g/A3Fd1GErzhVkI71gIjG1nMGOCd6iE1bn1p3JEu9q6qrPN8gJdRQFR4KnzhpxP2CjPUKinm25DHK.png" alt="Assignments section with controlled access options in Okta" style="box-sizing: border-box; font-family: proxima-nova, &quot;Helvetica Neue&quot;, system-ui, &quot;Segoe UI&quot;, Roboto, Helvetica, Arial, sans-serif, &quot;Apple Color Emoji&quot;, &quot;Segoe UI Emoji&quot;, &quot;Segoe UI Symbol&quot;; line-height: 1; height: auto; width: 100%; max-width: 100%; margin-top: 24px; margin-bottom: 24px; border-radius: 8px; align-self: center; cursor: pointer;"><ol start="8"><li><p data-id="e4c9aa44-561d-4ed2-8e59-7bebbd71ac02" style="text-align: left;"><span style="color: rgb(0, 0, 0);">Klicke auf <strong>Save</strong>, um die Anwendung zu speichern.</span></p></li><li><p data-id="e566900a-7e72-4bc0-986d-de5014e524d5" style="text-align: left;"><span style="color: rgb(0, 0, 0);">Kopiere auf der General-Seite der App die <strong>Client ID</strong> und das <strong>Client Secret</strong>. Außerdem brauchst du deine <strong>Okta domain URI</strong> - du findest sie im Dropdown unter deinem Benutzernamen/Profil-Icon oben rechts.</span></p></li></ol><img src="https://staticfiles.gleap.io/g/r49TnLmvxFWecacjd7264v3P6mRcH206RHgyezHc1unB9piSIBuih9DDHB3aOVbCUyvusnqvr3Q.png" alt="Client ID, client secret, and Okta domain in the Okta app settings" style="box-sizing: border-box; font-family: proxima-nova, &quot;Helvetica Neue&quot;, system-ui, &quot;Segoe UI&quot;, Roboto, Helvetica, Arial, sans-serif, &quot;Apple Color Emoji&quot;, &quot;Segoe UI Emoji&quot;, &quot;Segoe UI Symbol&quot;; line-height: 1; height: auto; width: 100%; max-width: 100%; margin-top: 24px; margin-bottom: 24px; border-radius: 8px; align-self: center; cursor: pointer;"></td></tr></tbody></table>

Das war's auf der Okta-Seite - mit Client ID, Client Secret und deiner Okta domain URI hast du alles, was du für die Verbindung mit Filestage brauchst.

### Schritt 2: Konfiguriere SSO in Filestage

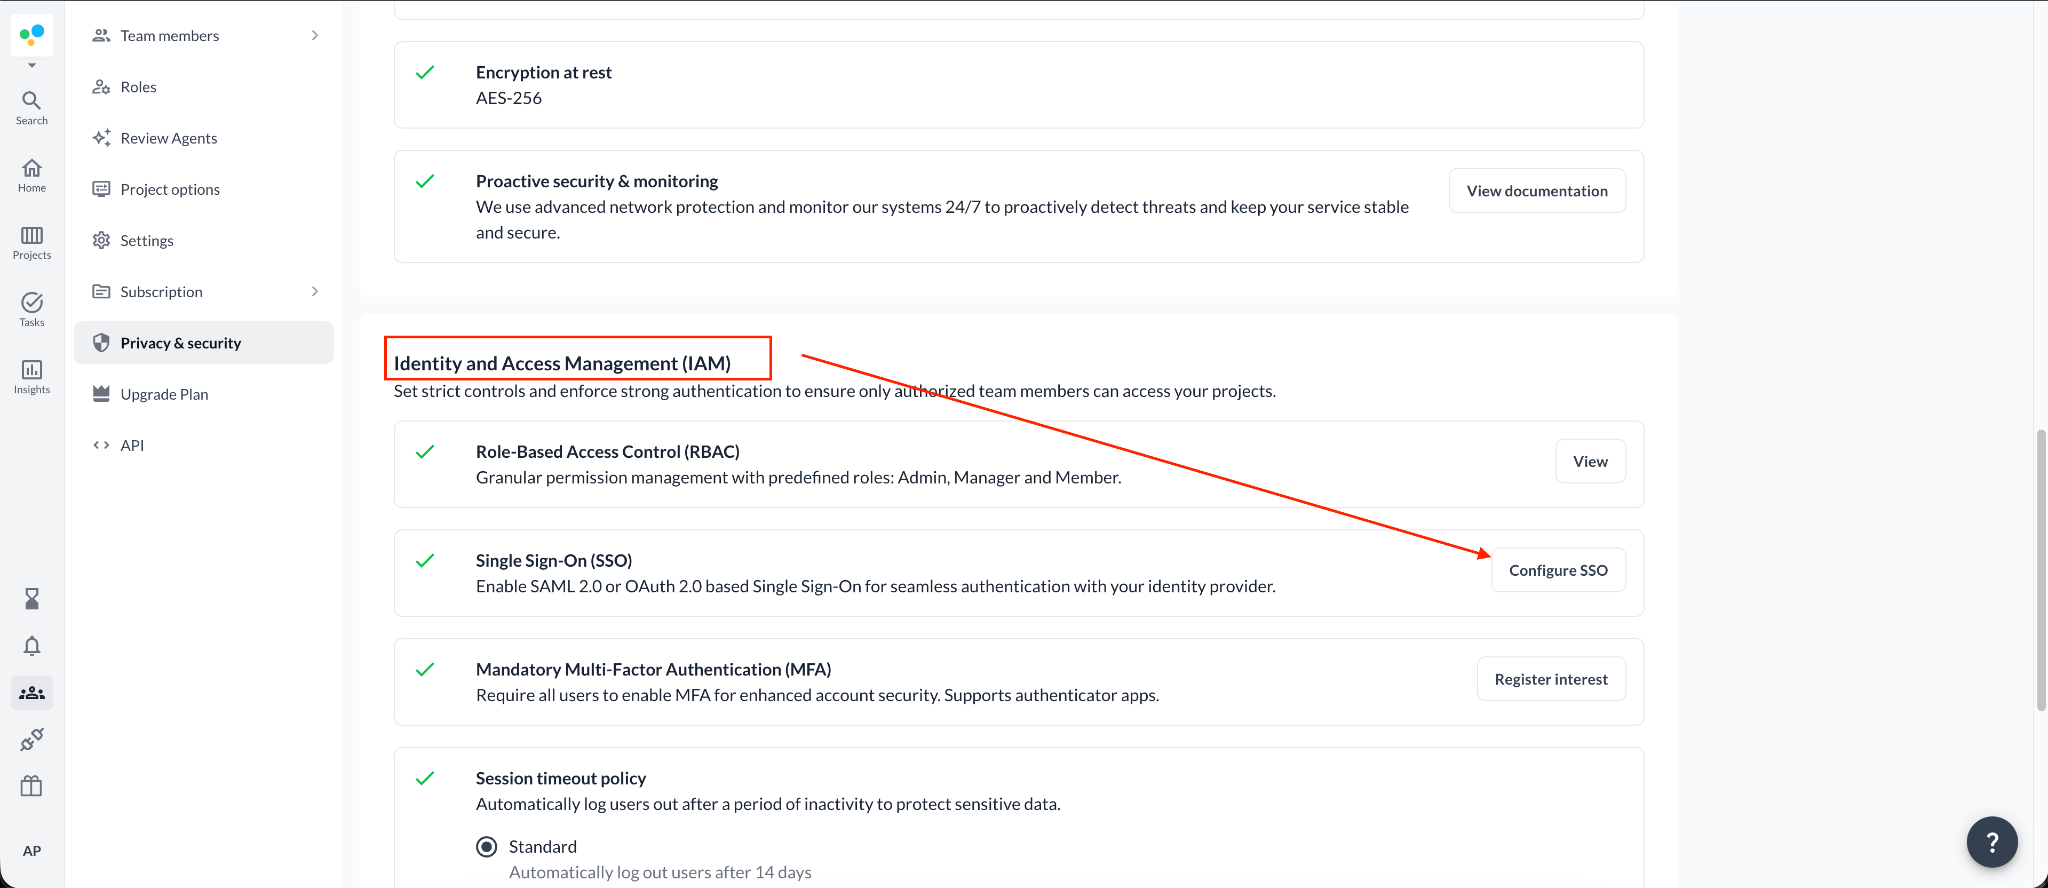
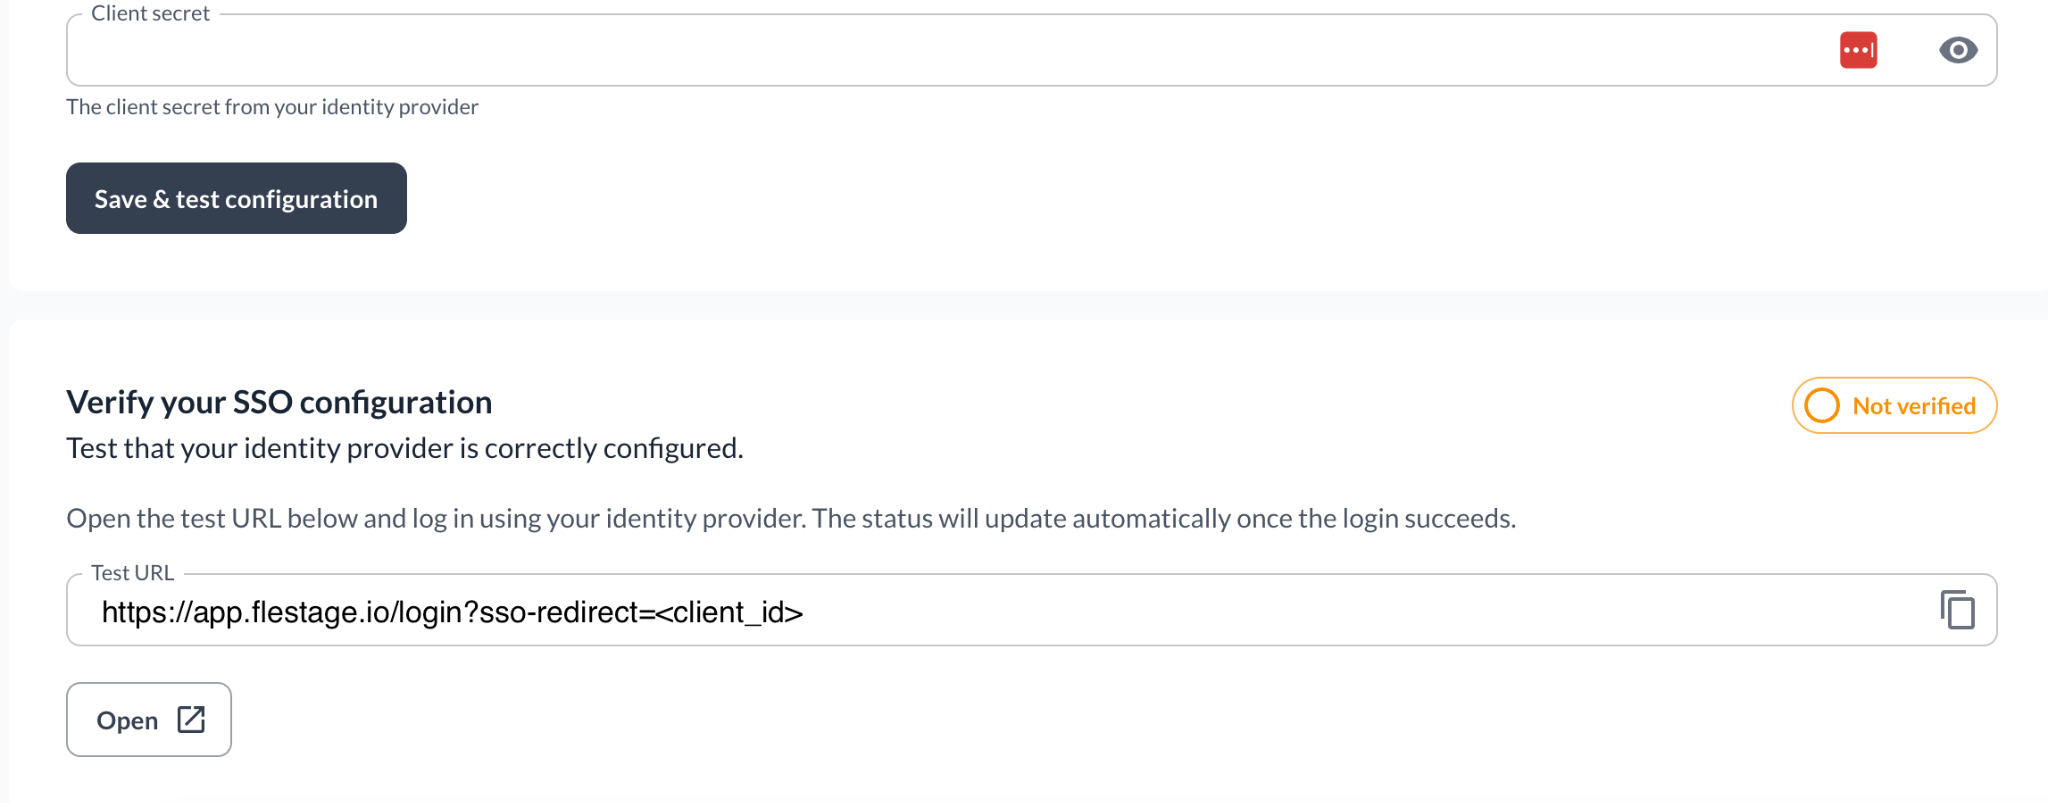
<table style="min-width: 25px;"><colgroup><col style="min-width: 25px;"></colgroup><tbody><tr><td colspan="1" rowspan="1" style="box-sizing: border-box; font-family: proxima-nova, &quot;Helvetica Neue&quot;, system-ui, &quot;Segoe UI&quot;, Roboto, Helvetica, Arial, sans-serif, &quot;Apple Color Emoji&quot;, &quot;Segoe UI Emoji&quot;, &quot;Segoe UI Symbol&quot;; line-height: 1; border: 1px solid rgba(0, 0, 0, 0.1); min-width: 100px; padding: 0.5rem; position: relative; text-align: left; vertical-align: top; margin-top: 0px;"><ol><li><p style="text-align: left;"><span style="color: rgb(0, 0, 0);">Gehe in Filestage zu </span><a target="_blank" rel="noopener noreferrer nofollow" class="linktype-link link" data-linktype="link" href="https://app.filestage.io/teams/security-and-privacy"><span style="color: rgb(0, 0, 0);"><u>app.filestage.io/teams/security-and-privacy</u></span></a><span style="color: rgb(0, 0, 0);"> - dort öffnen sich die Sicherheits- und Datenschutzeinstellungen deines zuletzt ausgewählten Teams.</span></p></li><li><p style="text-align: left;"><span style="color: rgb(0, 0, 0);">Scrolle nach unten zum Bereich <strong>Identity and Access Management (IAM)</strong> und klicke auf <strong>Configure SSO</strong>.</span></p></li></ol><img src="https://staticfiles.gleap.io/g/uE3ZMLWr50g1O2UL8pfxYZg5b7UUg4UfAZpOjKYULiy8fqbC6uIydXI6AGCeFtL2gKjfRLpxd8U.png" alt="Identity and Access Management section with the Configure SSO button in Filestage" style="box-sizing: border-box; font-family: proxima-nova, &quot;Helvetica Neue&quot;, system-ui, &quot;Segoe UI&quot;, Roboto, Helvetica, Arial, sans-serif, &quot;Apple Color Emoji&quot;, &quot;Segoe UI Emoji&quot;, &quot;Segoe UI Symbol&quot;; line-height: 1; height: auto; width: 100%; max-width: 100%; margin-top: 24px; margin-bottom: 24px; border-radius: 8px; align-self: center; cursor: pointer;"><ol start="3"><li><p style="text-align: left;"><span style="color: rgb(0, 0, 0);">Wähle die Option <strong>OpenID Connect</strong>.</span></p></li><li><p style="text-align: left;"><span style="color: rgb(0, 0, 0);">Trage die Daten ein, die du aus Okta kopiert hast: <strong>Issuer URL</strong></span> (deine Okta domain URI)<span style="color: rgb(0, 0, 0);">, <strong>Client ID</strong> und <strong>Client Secret</strong>.</span></p></li><li><p style="text-align: left;"><span style="color: rgb(0, 0, 0);">Klicke auf <strong>Save &amp; test configuration</strong> - der Bereich zum Verifizieren erscheint unten auf der Seite.</span></p></li></ol><img src="https://staticfiles.gleap.io/g/bn7BlirgMI0sxZtbi1qB1qeaaWHtSFUTVRoEHVS1wuMCQsNiR3MaUiZwxZwPtoTbX8OZyqyn3Am.png" alt="Verify your SSO configuration section with the test URL in Filestage" style="box-sizing: border-box; font-family: proxima-nova, &quot;Helvetica Neue&quot;, system-ui, &quot;Segoe UI&quot;, Roboto, Helvetica, Arial, sans-serif, &quot;Apple Color Emoji&quot;, &quot;Segoe UI Emoji&quot;, &quot;Segoe UI Symbol&quot;; line-height: 1; height: auto; width: 100%; max-width: 100%; margin-top: 24px; margin-bottom: 24px; border-radius: 8px; align-self: center; cursor: pointer;"></td></tr></tbody></table>

### Schritt 3: Verifiziere deine SSO-Konfiguration

> **Warning:** Sobald die Verifizierung erfolgreich abgeschlossen ist, müssen sich alle deine Teammitglieder nur noch über SSO bei Filestage anmelden.

<table style="min-width: 25px;"><colgroup><col style="min-width: 25px;"></colgroup><tbody><tr><td colspan="1" rowspan="1" style="box-sizing: border-box; font-family: proxima-nova, &quot;Helvetica Neue&quot;, system-ui, &quot;Segoe UI&quot;, Roboto, Helvetica, Arial, sans-serif, &quot;Apple Color Emoji&quot;, &quot;Segoe UI Emoji&quot;, &quot;Segoe UI Symbol&quot;; line-height: 1; border: 1px solid rgba(0, 0, 0, 0.1); min-width: 100px; padding: 0.5rem; position: relative; text-align: left; vertical-align: top; margin-top: 0px;"><ol><li><p style="text-align: left;"><span style="color: rgb(0, 0, 0);">Kopiere die <strong>Test URL</strong> aus dem Verifizierungsbereich.</span></p></li><li><p style="text-align: left;"><span style="color: rgb(0, 0, 0);">Melde dich von Filestage ab oder öffne die Test-URL in einem Inkognito-Fenster deines Browsers.</span></p></li><li><p style="text-align: left;"><span style="color: rgb(0, 0, 0);">Melde dich über deinen Identity Provider an. Wenn alles richtig konfiguriert ist, wechselt der Status zu <strong>Verified</strong> und du siehst diese Bestätigung:</span></p></li></ol><img src="https://staticfiles.gleap.io/g/oACzy4fPlG5d8AxR7DscdsQsJGecEGLKe5mfhnNmlGUlkfbTITLVpdktcOViscnfgvObVfGNacG.png" alt="Your SSO configuration has been verified successfully message in Filestage" style="box-sizing: border-box; font-family: proxima-nova, &quot;Helvetica Neue&quot;, system-ui, &quot;Segoe UI&quot;, Roboto, Helvetica, Arial, sans-serif, &quot;Apple Color Emoji&quot;, &quot;Segoe UI Emoji&quot;, &quot;Segoe UI Symbol&quot;; line-height: 1; height: auto; width: 100%; max-width: 100%; margin-top: 24px; margin-bottom: 24px; border-radius: 8px; align-self: center; cursor: pointer;"></td></tr></tbody></table>

Und das war's - ab jetzt melden sich deine Teammitglieder über deinen Identity Provider bei Filestage an.

💡 Wie geht es weiter? Sieh dir als Nächstes an, wie du [deine Teammitglieder verwaltest](https://help.filestage.io/de/articles/9465096-understand-and-manage-team-members.md)!

Bei Fragen erreichst du uns jederzeit über den Chat oder per E-Mail an [support@filestage.io](mailto:support@filestage.io). Wir helfen dir gerne weiter!